Introduction
AdalFlow, founded by Li Yin, was created to bridge the gap between Retrieval-Augmented Generation (RAG) research and product development. While both communities use PyTorch, existing frameworks either lack real-world flexibility or are too complex for research. AdalFlow provides a unified library with strong string processing, flexible tools, multiple output formats, and model monitoring like TensorBoard. Its goal is to enable researchers and engineers to focus on prompts, datasets, evaluations, and fine-tuning, speeding up AI innovation and making it easier to transition from research to production.

Overview
- AdalFlow bridges the gap between RAG research and product development by offering a flexible, unified library that simplifies LLM task pipelines.
- Designed for AI researchers, ML engineers, developers, and organizations, AdalFlow is ideal for building, training, and optimizing LLM applications from experimentation to production.
- Inspired by PyTorch, AdalFlow provides minimal abstraction, strong string processing, and versatile tools for customizing and fine-tuning NLP and Generative AI tasks.
- AdalFlow’s unified optimization framework enhances token efficiency and performance, supporting both zero-shot and few-shot prompt optimization.
- With core components like AdalComponent and Trainer, AdalFlow simplifies the development and deployment of AI applications, enabling seamless transitions from research to production.
Table of contents
- Who Should Use AdalFlow?
- What is Adalflow?
- Design Philosophy of AdalFlow
- Why AdalFlow?
- AdalFlow Workflows
- Example Workflow
- Installing and Implementing AdalFlow
- Step 1: Setting Up the Environment
- Step 2: Cloning the AdalFlow Repository
- Step 3: Installing AdalFlow and Required Dependencies
- Step 4: Setting Up the .env File
- Step 5: Install Jupyter Notebook
- Step 6: Fixing the charset_normalizer Issue
- Step 7: Launch Jupyter Notebook
- Step 8: Setting Up the Environment Programmatically
- Step 9: Defining a Data Class for Q&A Output
- Step 10: Creating the Q&A Template
- Step 11: Defining the Q&A Component
- Step 12: Creating an Instance of the Q&A Component
- Step 13: Sending a Query to the Model
- Step 14: Debugging the Prompt
- Frequently Asked Questions
Who Should Use AdalFlow?
AdalFlow is designed for many users, from AI researchers to developers and engineers. Specifically, AdalFlow is ideal for:
- AI Researchers: Those looking for a flexible and minimal-abstraction tool to experiment with LLMs, optimize prompts, and fine-tune models across various NLP tasks.
- ML Engineers: Professionals who need a customizable, modular framework to build, train, and auto-optimize LLM pipelines for production-ready applications like chatbots, summarization tools, RAG systems, or autonomous agents.
- Developers: Software developers working with large language models who seek an easy-to-use, PyTorch-inspired library that offers full control over prompt templates, model selection, and output parsing while supporting robust optimization and training capabilities.
- Organizations: Teams building advanced AI products who want to streamline their LLM workflows with a powerful, token-efficient solution that can scale from experimentation to production.
What is Adalflow?
AdalFlow is “The PyTorch Library to Build and Auto-Optimize Any LLM Task Pipeline.” This powerful, lightweight, and modular library simplifies the development and optimization of any LLM task pipeline. Inspired by PyTorch’s design philosophy, AdalFlow provides minimal abstraction while offering maximum flexibility, allowing developers to create and fine-tune applications across a wide range of tasks. From Generative AI applications such as chatbots, translation, summarization, and code generation to classical NLP tasks like text classification and named entity recognition, AdalFlow is the PyTorch library that helps shape LLMs for any use case.
At its core, AdalFlow relies on two key components: Component for defining pipelines and DataClass for managing data interactions with LLMs. This structure gives developers full control over prompt templates, model choices, and output parsing, ensuring that their pipelines are completely customizable.
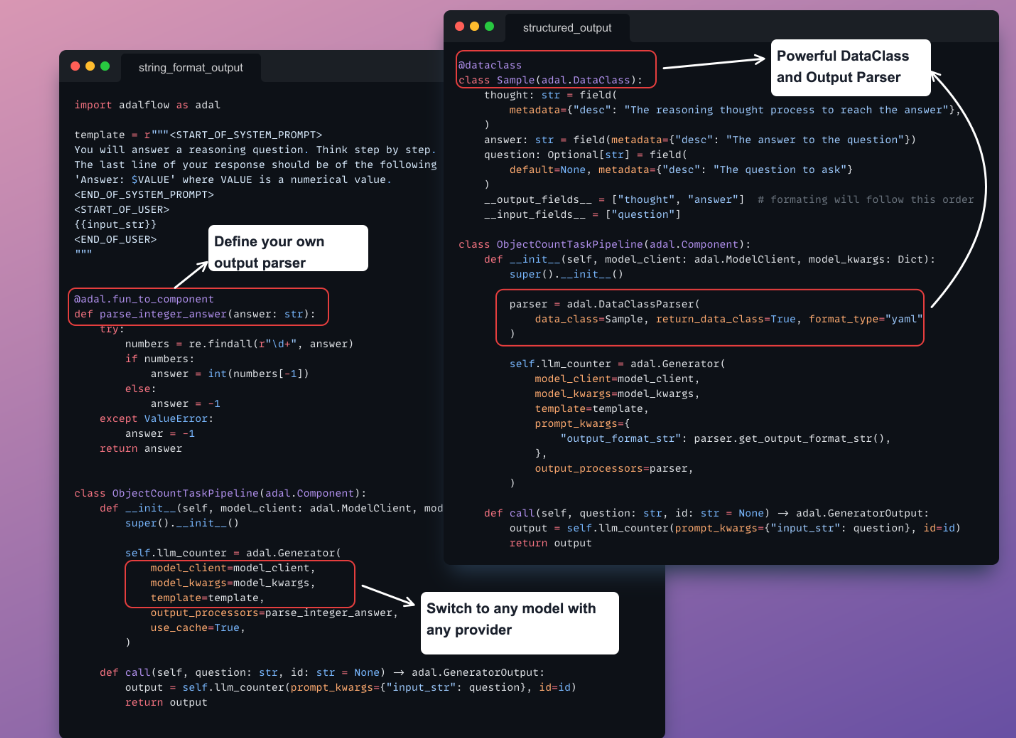
AdalFlow also introduces a unified framework for auto-optimization, enabling token-efficient and high-performing prompt optimization. By defining a Parameter and passing it to the Generator, developers can easily optimize task instructions, few-shot demonstrations, and more, while benefiting from a clear system for diagnosing, visualizing, and training their pipelines.
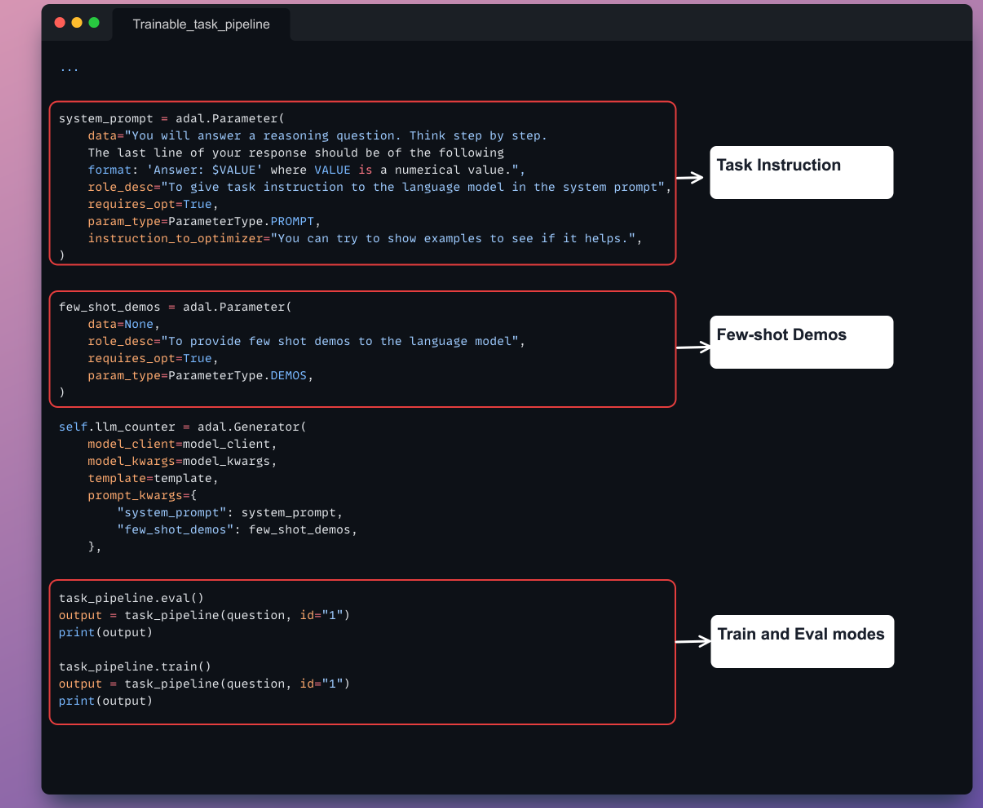
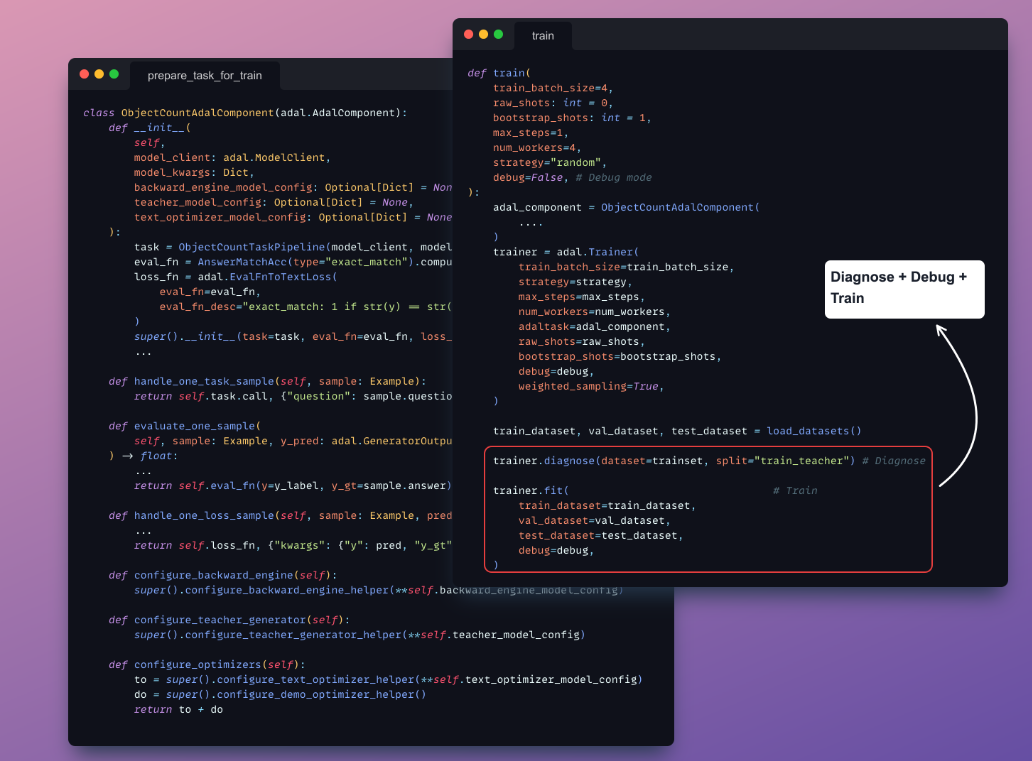
With the AdalComponent and Trainer, developers can build trainable task pipelines that support custom training and validation steps, optimizers, evaluators, and loss functions. AdalFlow provides a comprehensive toolkit for developers who want to fine-tune LLMs across various applications.
Design Philosophy of AdalFlow
Here’s the design philosophy:
- Simplicity Over Complexity: AdalFlow limits layers of abstraction to a maximum of three, focusing on clarity by minimizing code complexity. The goal is to simplify deeply without compromising on depth.
- Quality Over Quantity: Prioritizing high-quality core components over a vast number of integrations. The building blocks (prompt, model client, retriever, optimizer, and trainer) are designed to be easy to understand, flexible, and transparent to debug.
- Optimizing Over Building: AdalFlow emphasizes optimizing the task pipeline through robust logging, observability, and configurable tools. It not only helps build pipelines but focuses on making optimization simpler and more efficient.
Why AdalFlow?
Here’s why AdalFlow:
- PyTorch-Inspired Design: Powerful, lightweight, modular, and robust, similar to PyTorch’s design philosophy.
- Model-Agnostic Flexibility: Provides building blocks for LLM pipelines across various applications, from RAG and agents to classical NLP tasks (text classification, named entity recognition).
- Ease of Use: Achieve high performance even with basic manual prompting.
- Unified Optimization Framework: Supports both zero-shot and few-shot prompt optimization using auto-differentiation.
- Advanced Techniques: Builds on state-of-the-art methods like Text-Grad and DsPy for prompt optimization.
- Cutting-Edge Accuracy: Features innovations such as Text-Grad 2.0 and Learn-to-Reason Few-shot In-Context Learning to deliver high accuracy and token efficiency.
AdalFlow Workflows
AdalFlow offers a comprehensive framework for managing workflows in machine learning applications. Its main strength is simplifying the creation, optimization, and execution of complex task pipelines.
Key Components of AdalFlow Workflows
Here are the key components of AdalFlow workflows:
- AdalComponent: This is the core element where task pipelines are assembled. It supports the integration of optimizers, evaluators, and loss functions. Drawing inspiration from PyTorch Lightning’s LightningModule, the AdalComponent makes it easier to transition into the Trainer, which handles training and validation stages.
- Task Pipeline: A task pipeline in AdalFlow optimizes the flow of data and operations through different stages, including data preprocessing, model training, evaluation, and deployment. Each of these stages can be customized to address specific needs, providing both flexibility and efficiency.
Example Workflow
To demonstrate a typical AdalFlow workflow:

- Data Preparation: Start by loading and preprocessing your dataset using AdalFlow’s utility functions.
- Model Definition: Define the model architecture inside an AdalComponent.
- Training: Use the Trainer to manage the training process and fine-tune hyperparameters.
- Evaluation: After training, assess the model’s performance using the built-in evaluation metrics.
- Deployment: Finally, deploy the trained model for inference in a production setting.
Code Example
Below is a simplified code snippet showing how to set up a basic AdalFlow workflow:
from adalflow import AdalComponent, Trainer

# Define the model

class MyModel(AdalComponent):

    def __init__(self):

        super().__init__()

        # Initialize model layers and components here

# Create an instance of the model

model = MyModel()

# Set up the trainer

trainer = Trainer(model=model)

# Begin training

trainer.train()
This setup outlines the core structure of an AdalFlow workflow, allowing for streamlined model development, training, and deployment.
Installing and Implementing AdalFlow
Now let’s see how to Install and Implement AdalFlow Step-by-Step:
Step 1: Setting Up the Environment
The first step is to create a clean environment and install all necessary dependencies.
conda create -n Adalflow python=3.11 -yconda activate AdalflowExplanation: We are creating a new conda environment called Adalflow with Python 3.11. This environment will help keep dependencies isolated from other projects.
Step 2: Cloning the AdalFlow Repository
Next, let’s clone the official AdalFlow repository from GitHub.
git clone https://github.com/SylphAI-Inc/AdalFlow.gitcd AdalFlowExplanation: We clone the AdalFlow repository and navigate into the project directory. This allows us to access the codebase and files necessary for the AdalFlow system.
Step 3: Installing AdalFlow and Required Dependencies
Now, we should install AdalFlow and the required dependencies.
pip install adalflow

pip install openai==1.12.0

pip install faiss-cpu==1.8.0

pip install sqlalchemy==2.0.30

pip install pgvector==0.2.5

pip install groq==0.5.0- adalflow: Installs the Adalflow package.
- Openai: Installs a specific version of the OpenAI API.
- faiss-cpu: Adds FAISS for efficient similarity search.
- sqlalchemy: A popular SQL toolkit for working with databases.
- pgvector: Provides vector extensions for PostgreSQL databases.
- groq: Integrates with the Groq API for model serving.
Step 4: Setting Up the .env File
Set your API keys for OpenAI and Groq and shore in .env .This file will store your API keys and other environment-specific settings that AdalFlow will use to authenticate requests.
Step 5: Install Jupyter Notebook
Install Jupyter Notebook to run and test your code interactively.
conda install jupyter -yThis installs Jupyter Notebook in the AdalFlow environment, allowing you to work with your project in an interactive Python environment.
Step 6: Fixing the charset_normalizer Issue
A known issue with charset_normalizer is resolved by uninstalling and reinstalling it.
pip uninstall charset_normalizer -ypip install charset_normalizerIn this step we are addressing a dependency issue by reinstalling charset_normalizer, which might be required by one of the other libraries.
Step 7: Launch Jupyter Notebook
Once everything is set up, launch Jupyter Notebook.
Jupyter Notebook is launched. You can now open a .ipynb file or create a new notebook to experiment with the AdalFlow system.
Step 8: Setting Up the Environment Programmatically
In the notebook, set up the environment for AdalFlow.
from adalflow.utils import setup_envsetup_env()setup_env() configures your environment using the values defined in your .env file. This function ensures that all necessary configurations and API keys are properly loaded.
Step 9: Defining a Data Class for Q&A Output
You define a data class that will hold the model’s output.
from dataclasses import dataclass, field

from adalflow.core import Component, Generator, DataClass

from adalflow.components.model_client import GroqAPIClient

from groq import Groq

from adalflow.components.output_parsers import JsonOutputParser

@dataclass

class QAOutput(DataClass):

    explanation: str = field(

        metadata={"desc": "A brief explanation of the concept in one sentence."}

    )

    example: str = field(metadata={"desc": "An example of the concept in a sentence."})
QAOutput is a data class used to structure the response from the model. It has two fields: explanation and example, which will hold the explanation and example for the user query.
Step 10: Creating the Q&A Template
Now, create a prompt template for generating the Q&A responses.
qa_template = r"""<SYS>

You are a helpful assistant.

<OUTPUT_FORMAT>

{{output_format_str}}

</OUTPUT_FORMAT>

</SYS>

User: {{input_str}}

You:"""
Explanation: This string template defines the system’s prompt, including the role of the assistant, the expected output format, and the user query. The placeholders {{output_format_str}} and {{input_str}} are dynamically replaced with the actual format instructions and query during execution.
Step 11: Defining the Q&A Component
Define a class QA that represents the Q&A logic:
class QA(Component):

    def __init__(self):

        super().__init__()

        parser = JsonOutputParser(data_class=QAOutput, return_data_class=True)

        self.generator = Generator(

            model_client=GroqAPIClient(),

            model_kwargs={"model": "llama3-8b-8192"},

            template=qa_template,

            prompt_kwargs={"output_format_str": parser.format_instructions()},

            output_processors=parser,

        )

    def call(self, query: str):

        return self.generator.call({"input_str": query})

    async def acall(self, query: str):

return await self.generator.acall({"input_str": query})- QA: The main component that handles querying the model.
- JsonOutputParser: Parses the model’s output into structured JSON format based on QAOutput.
- Generator: Uses GroqAPIClient to communicate with the model, with the specific model llama3-8b-8192 being called.
- call: A synchronous method that sends the user query to the model and returns the processed result.
- acall: The asynchronous version of the call method for handling queries asynchronously.
Step 12: Creating an Instance of the Q&A Component
Instantiate the QA component and test it.
qa = QA()

print(qa)
This creates an instance of the QA class, which is ready to handle user queries. Printing qa will output the component details, confirming that the setup is correct.
Output:
Step 13: Sending a Query to the Model
We can send a query to the model and retrieve the output.
output = qa("What is AdalFlow?")

print(output)
Output

output = qa("Explain the workflow of Adalflow?")

print(output)
Output

Step 14: Debugging the Prompt
Finally, print the full prompt used to interact with the model.
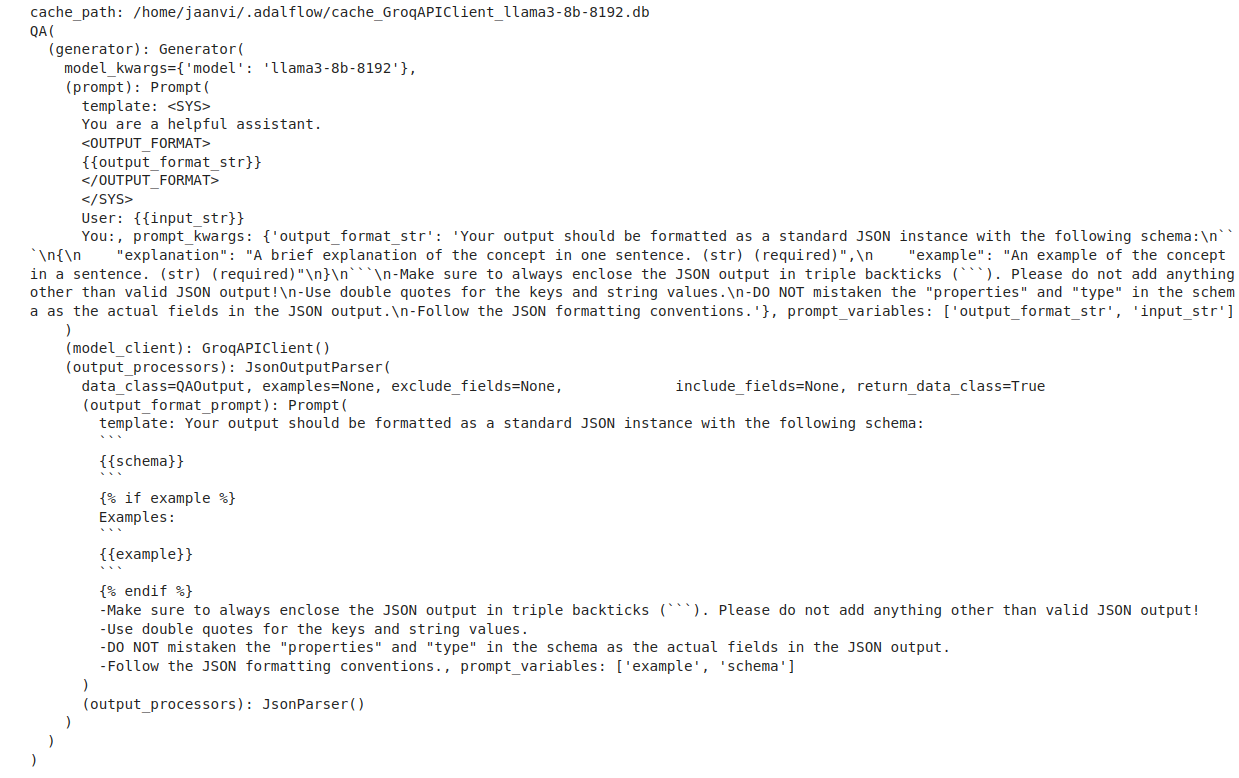
qa.generator.print_prompt(

    output_format_str=qa.generator.output_processors.format_instructions(),

    input_str="What is AdalFlow?",

)
This is useful for debugging. It shows the actual prompt being sent to the model, helping in verifying that the template is being constructed correctly with the expected input and format.
Output

Conclusion
AdalFlow is a powerful, streamlined library that bridges the gap between research and real-world AI development. Designed for flexibility and efficiency, it simplifies the creation, optimization, and deployment of LLM task pipelines. Whether you’re working on Generative AI applications or classical NLP tasks, AdalFlow offers the tools to accelerate AI innovation and transition seamlessly from experimentation to production. With minimal abstraction and a focus on performance, it empowers developers and researchers to focus on what matters—building and fine-tuning advanced AI solutions.
If you are looking for an online Generative AI course from experts, then explore the GenAI Pinnacle Program.
Frequently Asked Questions
Q1. What is AdalFlow?
Ans. AdalFlow is a lightweight, modular library built on PyTorch designed to simplify the development and optimization of large language model (LLM) task pipelines. It is suitable for both research and real-world AI applications, offering tools for Generative AI and traditional NLP tasks.
Q2. Who is AdalFlow for?
Ans. AdalFlow is designed for AI researchers, machine learning engineers, developers, and organizations looking to build and optimize LLM pipelines. It’s ideal for those seeking flexible and customizable tools to manage tasks like chatbots, translation, summarization, RAG systems, and more.
Q3. What tasks can AdalFlow handle?
Ans. AdalFlow can handle a wide range of tasks, from Generative AI applications like chatbots, translation, and code generation to classical NLP tasks such as text classification and named entity recognition. It supports both research experimentation and production environments.
Q4. How does AdalFlow optimize task pipelines?
Ans. AdalFlow features a unified framework for auto-optimization, focusing on token efficiency and performance. By defining a parameter and passing it to the generator, users can optimize prompts, few-shot demonstrations, and task instructions while benefiting from easy-to-use tools for diagnosis and training.
Q5. Is AdalFlow suitable for production use?
Ans. Yes, AdalFlow is designed to scale from research to production. It offers tools for building trainable task pipelines with support for custom training steps, optimizers, and evaluators, making it suitable for deploying advanced AI applications in real-world settings.
Hi, I am Janvi, a passionate data science enthusiast currently working at Analytics Vidhya. My journey into the world of data began with a deep curiosity about how we can extract meaningful insights from complex datasets.


