Struggling to work with Google Sheets data in Python? You’re not alone! While Google Sheets is a powerful, collaborative tool (real-time edits and Google Workspace integration!), analyzing its data can be tricky. Unlike Excel, which Pandas handles effortlessly, Google Sheets requires API access. The good news? You can easily fetch, analyze, and update Sheets data using Python. With the Google Sheets API and libraries like gspread, you can load data into Pandas, run quick transformations, and push changes back. In this article, you will learn about the automation of Google Sheets using Python.
Table of contents
- Setting up your Google Cloud Project
- Understanding gspread
- Establishing Connection and Opening the Spreadsheet
- Creating and Managing Google Sheets
- Managing Worksheets
- Cell Properties
- Adding New Rows and Columns
- Fetching Cells and Ranges Values
- Updating Cells and Ranges
- Deleting Rows and Columns
- Searching Cells
- Formatting Cells
- Clear Range of Cells and Worksheet
- Limitations of the Google API
- Conclusion
- Frequently Asked Questions
Setting up your Google Cloud Project
As mentioned earlier, Google Sheets is a SaaS offering, so you need to prepare extra steps for automation. Google Cloud Platform (GCP), a popular cloud computing platform, offers a variety of services that help to interact with Google products, along with the deployment of your custom projects.
Broadly, we need to follow these 3 steps to get started with Google Sheets automation.
Creating and Configuring a Google Cloud Project
Head over to Google Cloud Console and sign up for a free account. Next, from the top left, click on the project selection menu and select a new project. Provide a project name, leaving the organization as “No organization”, hit create, and your GCP project is set now.

Generating and Securing API Credentials
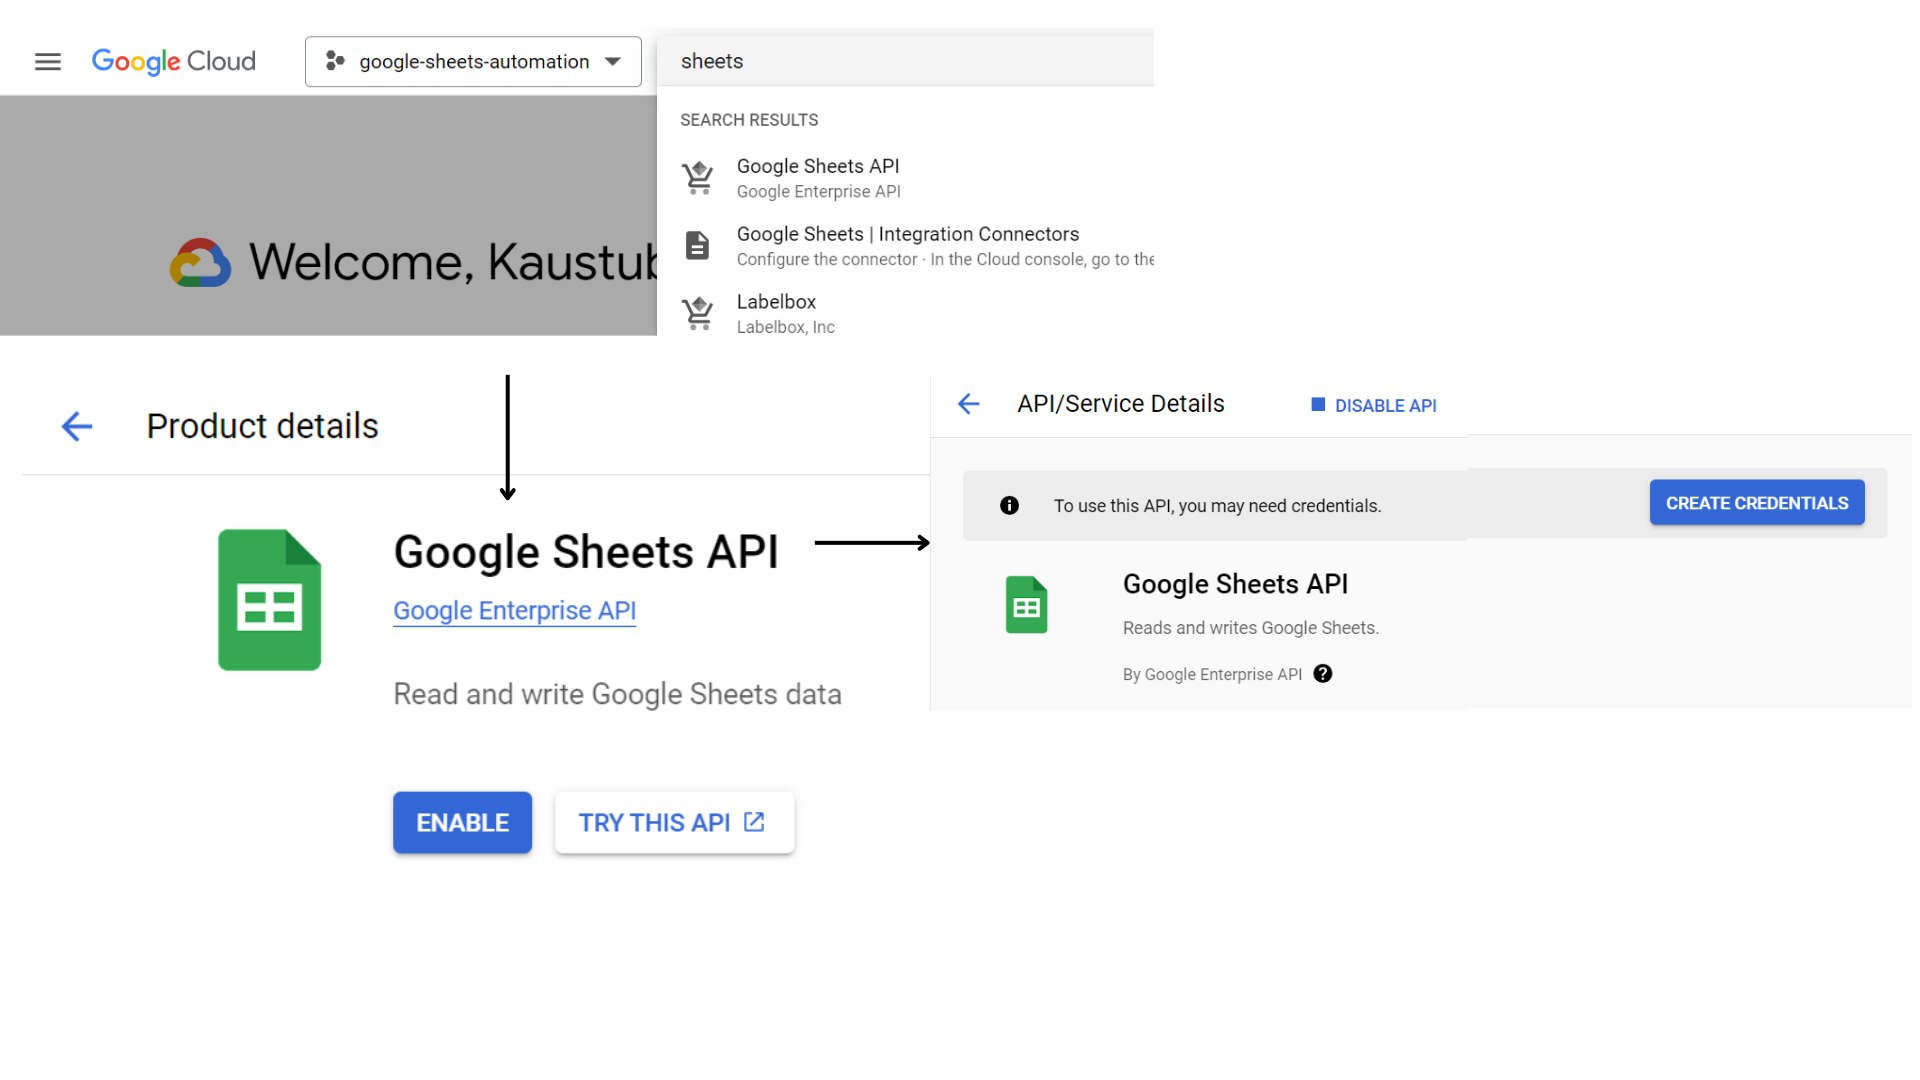
We need to enable the Google Sheets and Google Drive API and create a service account. This special type of account allows us to access and manage Google Cloud resources without requiring human interaction. To enable the Google Sheets API, search for Sheets in the top search bar and select “Google Sheets API“. Click “Allow” and it will redirect us to the API details page. Here, click on “Create Credentials” and it will open up the credentials creation form.
Select “Application Data” from the selection box and click Next. On the next screen, provide a meaningful name for the service account, as you will use it in later steps. Then, select the “Editor” role. Finally, click “Done” at the bottom.

Similarly, the Google Drive API can be enabled. Please note that we don’t need to create another service account for this API. The existing service account will be able to access both APIs. Now, we need to download the credentials JSON, which our Python script will consume to access Google Sheets. Click on the newly generated service account email, switch to the keys tab, click on the add key button to select the create new key option, select JSON, and then create.

Granting Access to Google Sheets
Our Python script will use the generated credentials to access Google Sheets. However, we need to manually grant access to the files that our script will use. To do this, copy the email generated for the service account (found in the details tab of the service account) and add that email as an Editor to the desired files.
Understanding gspread
gspread is a Python API wrapper for Google Sheets. It encapsulates a lot of functionalities offered by the Google Sheets API under separate classes and access methods. It makes interaction with the Sheets API easy to navigate, and one can quickly pick it up.
To set up the library in the local environment, one can use a simple pip command, as with any other Python package. Install the library in a separate environment as a best practice to avoid any dependency conflicts.
pip install gspreadA quick note on cell references
The cell addresses in Google Sheets can be referenced using two popular notations:
- A1 notation: This cell reference consists of the sheet name, row number, and column letter. This reference works without mentioning the sheet name and allows you to refer to a single cell, a range of cells, or an entire column.
- Named range: This is a defined range of cells having a custom name for easy identification and simplified reference across the Google Sheet.
Establishing Connection and Opening the Spreadsheet
Now that we have set up the necessary access and libraries, let’s test our code. In the spreadsheet containing the service account email, enter some random text in the first cell. We’ll attempt to retrieve this value using our Python script.

We will use the JSON module to load our credentials and pass them to the gspread service_account_from_dict() function. This will return a Google Sheets client object, and this object can be used to open any Google Sheet using the open() function. See the code below.
import gspread
import json

with open('creds.json') as f:
    credentials = json.load(f)

gc = gspread.service_account_from_dict(credentials)

sh = gc.open("ArticleDemo")
There are two alternative ways to open a Google Sheet instead of a title name. These alternative ways eliminate the title name dependency, as in Google Workspace, multiple files can have the same title. In the case of spreadsheets, if there are two files with the same title, then the latest file will be accessed by the API. We can access the spreadsheets using the file URL or the spreadsheet’s unique ID, which proceeds the following link: “https://docs.google.com/spreadsheets/d/<unique_id>/edit”. Below is the code to access the spreadsheet via URL or unique ID.
## Access via unique ID
sh = gc.open_by_key("1R97twcM0FfFNSsrh_0FjDDg-HcQF5PLHbhRxu9pTV_Q")


## Access via URL
sh = gc.open_by_url("https://docs.google.com/spreadsheets/d/1R97twcM0FfFNSsrh_0FjDDg-HcQF5PLHbhRxu9pTV_Q/edit?gid=0#gid=0")
The following code will read the value entered earlier in the sheet. The code will be explained in the later sections of the article.
print(sh.sheet1.acell('A1').value)This will return the value present in the A1 cell in the sheet, which in our case is “GSheet: This is the first cell”. Now we are all set to deep dive into the gspread library and explore all the available options.
Note: The sh variable holds the spreadsheet object, and it will be referred to throughout the guide
Creating and Managing Google Sheets
There could be many use cases where a spreadsheet is created programmatically. One could be building a solution to publish data and insights for their users. Along with this, they might want to share this sheet directly with the user.
- To create a new spreadsheet, use the
create()function of the gspread client. Pass the title of the new spreadsheet as a parameter, and if you want to specify the location, use thefolder_idparameter. - The new spreadsheet created is only accessible by the service account user. It means that the spreadsheet will not be visible even to the user who created the service account. For this purpose, we can use the “share()” function of the spreadsheet object. This function requires 3 mandatory parameters: “email_address” (email address), “perm_type” (permission type), and “role”. The permission type can take the following values: user, group, domain, or anyone. For most of the use cases, the user value will work. The perm_type also has a fixed number of acceptable values: ‘reader’, ‘commenter’, ‘writer’, ‘fileOrganizer’, ‘organizer’, and ‘owner’. There are some additional optional parameters as well, offering a granular level of information.
- “notify”: Boolean value to control if the user should get a notification of the file shared.
- “email_message”: String value for the message to be sent along with the notification email.
sh = gc.create('ArticleDemoTest') ## Creating a new spreadsheet
sh.share(email_address='[email protected]', perm_type='user', role='writer', notify=True, email_message="This is a test file")
Managing Worksheets
Every spreadsheet is a collection of worksheets. A simple analogy to this is how a book has multiple pages. Using gspread, users can access, modify, delete, or create new worksheets. Let’s take a look at each of these functions.
Worksheet Selection
The worksheet(s) of a spreadsheet object can be accessed using the following methods of the worksheet object:
- Access by index: The
get_worksheet()function takes in the index of the worksheet that needs to be accessed. - Access by title: The
worksheet()function takes in the title of the worksheet. Do note that the worksheet titles are unique by nature and therefore, no two worksheets can have the same title. - Access by dot notation shortcut: The dot notation shortcut allows accessing the first worksheet of the spreadsheet without giving out a title, index, or ID.
- Access all: The
worksheets()function returns all the worksheets of the spreadsheet. It returns them as gspread worksheet objects. The “title” and “id” are a few important properties of this class that help in accessing desired worksheets in a bulk manner. - Access by ID: While developing automation scripts, there might be some use cases where we are dealing with worksheet ID instead of titles. In such scenarios, the
get_worksheet_by_id()function can be used.
Here is the sample code for all the listed methods.
print(sh.get_worksheet(0))
print(sh.worksheet("ArticleWorkSheet1"))
print(sh.sheet1)
print(sh.get_worksheet_by_id(0))

print("Now fetching all sheets...")

## Returning all worksheets
for ws in sh.worksheets():
    print(ws)
All of these print statements return the worksheet object

Creating a New Worksheet
Apart from existing worksheets in the spreadsheet, we can programmatically create new worksheets in the same spreadsheet. This approach can be useful when processing data from an existing worksheet and publishing the results in a separate worksheet.
To create a new worksheet, we need to use the add_worksheet() function of the worksheet object. It takes the following parameters.
- title: The title of the worksheet
- rows, columns, index (optional): We need to define the number of rows and columns for the newly created worksheet. The “index” parameter is optional, and it controls the ordering of the worksheet.
The code below will create a worksheet with 100 rows and 20 columns and place the worksheet in the second position.
sh.add_worksheet('ArticleWorkSheet1.5', rows=100, cols=20, index=1)
And it placed it in the second position (index + 1).

Renaming a Worksheet
You can rename worksheet titles using the update_title() function of the worksheet object, which accepts the new title as a parameter.
print(sh.worksheet("ArticleWorkSheet3").update_title("ArticleWorkSheet2.5"))
Deleting a Worksheet
A worksheet can be deleted from a spreadsheet using the following function of the worksheet object:
- Delete a worksheet using the worksheet object:
del_worksheet()function takes the worksheet object as a parameter and deletes the worksheet from the spreadsheet. - Delete a worksheet using the worksheet ID:
del_worksheet_by_id()function takes the worksheet ID as input for deleting the worksheet.
The selection of which function to use depends on the use case the script is made. Below is the code sample demonstrating the usage of both functions.
sh.del_worksheet(sh.worksheet("ArticleWorkSheet2.5"))
sh.del_worksheet_by_id('602396579')
Cell Properties
We are slowly narrowing down from top to bottom and reaching the smallest (and most important) unit of our worksheet, a cell. A cell is an intersection of a row and a column. For gspread library, it holds the following properties:
- row: Row number for the cell
- col: Column number for the cell
- value: The value of the cell
- address: The address of the cell in the A1 notation
The below sample code accesses all the properties of a cell. The particular cell for inspection is returned using the cell function of the worksheet.
sampleCell = sh.worksheet("ArticleWorkSheet1").cell(row=1, col=1)
print('Row: {}\nColumn: {}\nValue: {}\nAddress: {}'.format(sampleCell.row, sampleCell.col, sampleCell.value, sampleCell.address))
All these accessors will come into play once we are dealing with higher-order functions of the library.
Adding New Rows and Columns
Let’s begin adding new rows and columns to our existing sample worksheet to have some data to work on for the later sections of this guide. The insertion as an operation is supported in two ways by the gspread library.
Insertion at a particular position
You can insert a row or column at a specific position using the insert_row(), insert_rows(), and insert_cols() functions of the worksheet object. These functions allow us to add rows or columns at a particular location in a worksheet. The function specifics are as below:
- insert_row: The function requires the “values” parameter as a list of values to insert. The order of values in the list determines the order of the inserted rows. The “index” parameter, which defaults to 1, specifies the position for row insertion. Optional parameters like “value_input_option” and “inherit_from_before” control how the function interprets the input data and rows, and whether it should push the data directly or parse it as if the user is typing in the UI.
- insert_rows: It takes the list of lists in the “values” parameter for inserting multiple rows. Each list acts as a single row. Internally, this is the actual implementation of how the rows are inserted into the worksheet via spread.
The insert_row()function calls theinsert_rows()function and therefore, all the parameters described for theinsert_row()function are also usable oninsert_rows()except one parameter. In theinsert_row()function, you determine the offset using the index parameter, while in theinsert_rows()function, you specify it with the row parameter. - insert_cols: This function is a replica of the
insert_rows()function with a changed parameter name for offset from “row” to “col”. The rest of the optional parameter functioning remains the same.
Insertion after a table range
This insertion is only applicable to rows. It allows us to insert rows after a particular table range, where the position is unknown. Again, the insertion can be done in a single or multi-row manner.
- append_row: It takes in the row values as a list via the “values” parameter. The “table_range” parameter helps define the table range after which the row insertion should happen. The range is given in A1 notation.
- append_rows: Just like the
insert_rows(), theappend_rows()is the actual implementation of row insertion after a table range. All the parameters for both functions remain the same, with the difference thatappend_rows()takes a list of lists in the “values” parameter.
Here is the sample code that:
- Adds a row for columns: A, B, C, and D
- Adds 4 rows under these columns
sampleWorksheet.insert_row(
    ['A', 'B', 'C', 'D']
)
sampleWorksheet.insert_rows(
    [
        ['KG', 54, 23, 12],
        ['OG', 34, 12, 34],
        ['ME', 23, 45, 90],
        ['YE', 65, 12, 54]
    ], row=2
)
Now, let’s do the following steps on top of this:
- Append 2 rows to continue in this table range
- Add another column E
sampleWorksheet.append_rows(
    [
        ['SN', 67, 87, 45],
        ['AR', 56, 23, 65]
    ],
    table_range="A1:D5"
)
sampleWorksheet.insert_cols(
    [
        ['E', 56, 34, 65, 34, 76, 45]
    ],
    col=5
)
Note: The sampleWorksheet variable holds the worksheet object, and it will be referred to throughout the guide.
Fetching Cells and Ranges Values
In the last sections, we have prepared our data programmatically using various insertion operations. Now, we can fetch the data inserted using various read functions. We will see how to fetch cells and then move to fetch values from a range of cells and the entire worksheet.
Fetching Single Cell
The most basic read operation on a worksheet involves getting the value or any other cell property as described in the previous sections. To fetch a single cell, there are two functions:
- acell: This takes the cell address in the A1 notation and returns a cell object.
- cell: This takes the cell coordinates in the order of (row, column).
Both these functions return a cell object, and we have already seen how to get the value from these objects. The acell function was used in the section where we established a connection with the Google Sheets API.
print(sampleWorksheet.acell('A1').row)
print(sampleWorksheet.cell(1, 1).value)
Fetching all Cells of the Worksheet or Range
- We can get all the cells of the worksheet in a list of cell objects using the
get_all_cells()function of the worksheet object. There is no parameter for this function, and it can be directly called on a worksheet object. - To fetch cell objects for a specific range, use the
range()function of the worksheet object. This function accepts various input forms, such as A1 notation, numeric boundaries, or named ranges. If used without input, it returns all cells in the worksheet in a single API call. For use cases involving cell properties, this function helps filter out the desired cells and perform further actions.
print(sampleWorksheet.get_all_cells())
print(sampleWorksheet.range('B4:E5'))
Fetching Values of Range of Cells
Users usually create multiple miniature tables in the same worksheet for better accessibility. In such cases, we need to refine our fetching range to the exact addresses of these table ranges. To fetch such table ranges, we can use the following two functions of the worksheet object:
- get: The
get()function takes the table range in A1 notation or a named range and returns the list of lists of values. - batch_get: The
get()function can only take one range, but if we are dealing with multiple ranges, we can use batch_get. This function makes one API call, saving up cost.
print('Get Range: {}'.format(sampleWorksheet.get("A1:D4")))
print('Batch Get Range: {}'.format(sampleWorksheet.batch_get([
    "A1:D4",
    "B4:E3"
]))
Fetching all Values from a Row or Column
We can fetch all the values of a row or column using the row_values() and col_values() functions of the worksheet object. Both functions take the position (numbering from 1) of a row or column and return the values in a list.
print(sampleWorksheet.row_values(1))
print(sampleWorksheet.col_values(4))
Fetching Entire Worksheet Values
One of the best use cases of fetching an entire worksheet would be to load this data directly into a pandas data frame and then do the post-processing or analysis as per the requirement. The entire data can be returned using the following functions of the worksheet object:
- List of Lists: The
get_all_values()function returns every row as a list and then all row lists in one list. This function is an alias to theget_values()function, but interestingly, theget_values()function is implemented using theget()function. Theget()function without any inputs returns a list of lists. Therefore, all 3 functions are the same. - List of Dictionaries: The
get_all_records()function returns a list of dictionaries. Each dictionary is a key-value mapping where the keys are the first-row values and the values as the next-row values. Every row gets its dictionary. By default, it assumes that the first row is the key but we can make it aware of a different row as a key using the “header” parameter. There are some additional parameters as well that can help in handling empty cells and expected headers.
You can directly pass the outputs of both functions to the Pandas DataFrame function to obtain the worksheet table as a Pandas DataFrame.
import pandas as pd
print(pd.DataFrame(sampleWorksheet.get_all_records()))
print(pd.DataFrame(sampleWorksheet.get_all_values()))
Updating Cells and Ranges
Updating the existing data of the spreadsheet is the most crucial function that can be performed easily using gspread library functions. There are multiple ways to update the cells of a spreadsheet, single cell updation to multiple cells of a range, and then to multiple ranges with a single API call.
Updating a Single Cell
A single cell of a worksheet can be updated using the following functions of the worksheet object.
- update_acell: This function takes two parameters, the cell address in the A1 notation and the value to be updated
- update_cell: This function takes the coordinates of the cell in the row-column order and the value for updation
- update: Although this function has a bigger scope for updating multiple cells, it can also be used to update a single cell. The input parameters order is different from the above two functions. The
update()function takes a list of lists as the first value and then the cell address.
print(sampleWorksheet.update_acell('A2', 'Kaustubh'))
print(sampleWorksheet.update_acell('A3', 'Oggy'))
print(sampleWorksheet.update([['Hello']], 'A4'))
Updating a Range of Cells
You can update a range of cells in a worksheet using the following two functions from the worksheet object.
- update_cells: This function works best in combination with the
range()function. Theupdate_cells()function takes input as a list of cells. This list of cells can have their values changed by looping over the cell objects returned from the range function and accessing their value property. - update: As previously seen in single-cell updates, you can use this function to update a named range or an A1-notated range.
rangeOfCells = sampleWorksheet.range('B2:B7')
for cell in rangeOfCells:
    newValue = int(cell.value) + 10
    cell.value = newValue
print(sampleWorksheet.update_cells(rangeOfCells))
The above code fetches a range of cells, adds 10 to their value, and updates them in a single API call.
Updating Multiple Range of Cells
In the above section, we were able to update multiple cells in a range with a single API call. This behavior can be extended to multiple ranges as well. It means we can update multiple groups of cells with one call. The batch_update() function takes a list of dictionaries with keys as ranges and values. The range key value should be the A1 notation range or a named range, and the values key value as a list of list of values.
range1 = 'C2:C7'
range2 = 'E2:E7'
bothRangeValues = sampleWorksheet.batch_get([
    range1,
    range2
])
range1Values, range2Values = bothRangeValues
range1UpdatedValues = [[int(x[0]) + 10] for x in range1Values]
range2UpdatedValues = [[int(x[0]) + 20] for x in range2Values]
print(sampleWorksheet.batch_update([
    {
        'range': range1,
        'values': range1UpdatedValues
    },

    {
        'range': range2,
        'values': range2UpdatedValues
    }
]))
The above code fetches two ranges using the batch_get() function, then updates their values locally, and then uses the batch_update() function to push back the updated values to the Google Sheets. The output of this update looks like this:

Deleting Rows and Columns
Till this point, we have inserted, read, and updated the data in the worksheet. We can perform delete operations to remove redundant or unnecessary data from the worksheet. The delete_rows() and delete_colums() function takes the “start_index” to be deleted. If “end_index” is specified, then it deletes all the columns in the index range of start and end.
print(sampleWorksheet.delete_columns(4))
print(sampleWorksheet.delete_rows(6))
Searching Cells
The Google Sheets API enables you to search for cells by matching a string or a regular expression. You can perform case-sensitive or case-insensitive searches and narrow the search to specific rows or columns if desired. Use these two worksheet functions to find matching cells:
- find: The
find()function returns the first occurrence of the match. This takes in the search string or a regex, “in_row” or “in_column” parameters to narrow down the search, and the “case_sensitive” flag to control the search type. The “in” parameters take the row or column positions (index + 1) - findall: The
findall()is the advanced stage of thefind()function where it returns all the matches of the search.
import re
print(sampleWorksheet.find('64', in_column=2))
searchRe = re.compile(r'(a|A)')
print(sampleWorksheet.findall(searchRe))
Formatting Cells
In Excel, you can format worksheets in various ways, including text highlights, formatting, borders, alignment, and numerous functions. Google Sheets also offers a variety of formatting options for cells. The whole list of fields is available in Google Sheets Cells documentation.
You can use the format() function of the gspread worksheet object to specify the cell or range where you want to apply formatting. Provide the format as a JSON dictionary, which includes all the formatting key fields and their values.
The code below will apply borders to all the cells of the table.
borderFormatting = {
    "style": "SOLID",
    "colorStyle": {"rgbColor": {"red": 0, "green": 0, "blue": 0, "alpha": 1}},
}

print(
    sampleWorksheet.format(
        "A1:D6",
        format={
            "borders": {
                "top": borderFormatting,
                "bottom": borderFormatting,
                "left": borderFormatting,
                "right": borderFormatting,
            },
        },
    )
)
We can also apply batch formatting to format multiple ranges at the same time. This saves a lot of time writing different format calls for every new change. The batch_format() function takes a list of dictionaries containing two important keys. The first key is the range key, which defines the cell’s scope, and the format key, which contains the formatting dictionary.
Let’s do the following on our sample table using the batch_format() function:
- Apply borders to all the cells of the table.
- Bold the text of the first row, indicating that those are the columns of our table.
- Align all the data in the center.
- Add a light blue color for the columns (the first row).
borderFormatting = {
    "style": "SOLID",
    "colorStyle": {"rgbColor": {"red": 0, "green": 0, "blue": 0, "alpha": 1}},
}
formats = [
    {
        "range": "A1:D6",
        "format": {
            "borders": {
                "top": borderFormatting,
                "bottom": borderFormatting,
                "left": borderFormatting,
                "right": borderFormatting,
            },
            "horizontalAlignment": "CENTER",
        },
    },
    {
        "range": "A1:D1",
        "format": {
            "textFormat": {
                "bold": True,
            },
            "backgroundColorStyle": {
                "rgbColor": {"red": 0.8, "green": 0.8, "blue": 1, "alpha": 0.8}
            },
        },
    },
]

print(sampleWorksheet.batch_format(formats))
And this is the final state of our table.

Clear Range of Cells and Worksheet
It might be possible that we want to clear the range before carrying out the operations. For clearing the cell ranges, the batch_clear() function of the worksheet object can be used. This takes the list of ranges that need to be cleared. Let’s clear column C from our sample table.
print(sampleWorksheet.batch_clear(["C1:C6"]))

Note: Clear function only clears the values and not the formatting applied.
The entire worksheet can be cleared using the clear() function of the worksheet object.
print(sampleWorksheet.clear())Check out this article about How to Use Python to Automate Google Sheets
Limitations of the Google API
We have done a lot of operations on Google Sheets using the gspread library. This library is just a wrapper that prepares the user-passed data into a format that’s acceptable and makes the API calls to Google projects associated with the sheets. It works so that the developer does not need to understand the underlying API calls, payloads, and responses. The developer interacts only with the abstracted functions.
- Understanding API Quota Consumption: Developers must understand how API calls consume quota, especially for production and critical tasks.
- Free but Restricted Usage: The Google Sheets API is free but has restrictions on the number of API calls that can be made.
- Common Error – 429 (“Too many requests”): Many users encounter the 429 error due to exceeding API call limits.
- Quota Limit Example: The current quota allows 300 requests per minute per project.
- Exceeding Quota: If a script sends more than 300 requests, additional requests are not processed.
- Exponential Backoff Solution: A retry mechanism like exponential backoff, which uses random wait times, can help manage these limitations.
Conclusion
In this guide, we created a Google Service account to perform all the operations one would perform on the Google Sheets UI. We explored a lot of functions, such as adding, updating, and deleting data. We also explored how to format sheets and Google Sheets Automation using Python.
The Google Sheets API offers a lot more functionalities, such as merging cells, making protected ranges, hiding cells, adding notes, copying ranges, or even adding filters, all operations programmatically! While the documentation for the gspread library lacks these explanations, one can go ahead to explore the Google Sheets official documentation and also check the API reference section of the gspread documentation that gives high-level information about all the functions implemented in the library.
Key Takeaways
- Google Sheets automation requires setting up a Google Cloud Project, which incurs no cost. However, if you don’t optimize the code, you might exhaust the quota, leading to errors later in the code. Aim to use the batch function wherever possible.
- There are many possibilities of what can be achieved using Google Sheets API and the gspread library is just a starting point. One should explore the official documentation to implement the functionalities missing in the library (and maybe contribute back)
- You can use Google Sheets automation setups to build sourcing pipelines that maintain a master record and push it to a more advanced database, like an OLAP database. Connect these databases to BI software, such as Tableau, to complete an end-to-end project.
- Google Sheets automations can help you eliminate manual data entry by setting up workflows that automatically update, import, or organize data, significantly improving efficiency.
- Using Google Sheets automations, you can schedule recurring tasks such as sending reports, performing calculations, or updating cells, reducing the need for repetitive manual actions.
This article was published as part of the Data Science Blogathon.
Frequently Asked Questions
Q1. What can be done to avoid the “429: Too many requests” error?
A. A retry mechanism should be implemented that tries to make the requests again in some time. One such example is the exponential backoff algorithm
Q2.Can you do automation in Google Sheets?
A. Yes, you can automate tasks in Google Sheets using built-in features like macros, Google Apps Script, and third-party tools like Zapier or Make (formerly Integromat). These allow you to automate repetitive tasks such as data entry, formatting, and calculations.
Q3. Help with Google Sheets automation?
A. You can automate tasks in Google Sheets using Macros for simple stuff, or Google Apps Script for more control, like sending emails, updating rows, or pulling data.
Q4. How can I set up Google Sheets automations to save time on repetitive tasks?
A. You can set up Google Sheets automations using built-in tools like Macros and Google Apps Script. Macros allow you to record actions and replay them, while Google Apps Script lets you create custom automations using JavaScript. These automations can streamline repetitive tasks such as data entry, formatting, or running specific functions automatically in Google Sheets.
Q5. What are some popular Google Sheets automations for data analysis?
A. Popular Google Sheets automations for data analysis include automated data import from external sources, scheduled reports using Google Apps Script, and conditional formatting to highlight trends. These automations help optimize the data analysis process, making Google Sheets a powerful tool for managing and interpreting large datasets efficiently.
Kaustubh Gupta is a skilled engineer with a B.Tech in Information Technology from Maharaja Agrasen Institute of Technology. With experience as a CS Analyst and Analyst Intern at Prodigal Technologies, Kaustubh excels in Python, SQL, Libraries, and various engineering tools. He has developed core components of product intent engines, created gold tables in Databricks, and built internal tools and dashboards using Streamlit and Tableau. Recognized as India’s Top 5 Community Contributor 2023 by Analytics Vidhya, Kaustubh is also a prolific writer and mentor, contributing significantly to the tech community through speaking sessions and workshops.


