AI agents are intelligent programs that perform tasks autonomously, transforming various industries. As AI agents gain popularity, various frameworks have emerged to simplify their development and integration. Atomic Agents is one of the newer entries in this space, designed to be lightweight, modular, and easy to use. Atomic Agents provides a hands-on, transparent approach, allowing developers to work directly with individual components. This makes it a good choice for building highly customizable AI systems that maintain clarity and control at every step. In this article, we’ll explore how Atomic Agents works and why its minimalist design can benefit developers and AI enthusiasts alike.

Table of Contents
How does Atomic Agents Work?
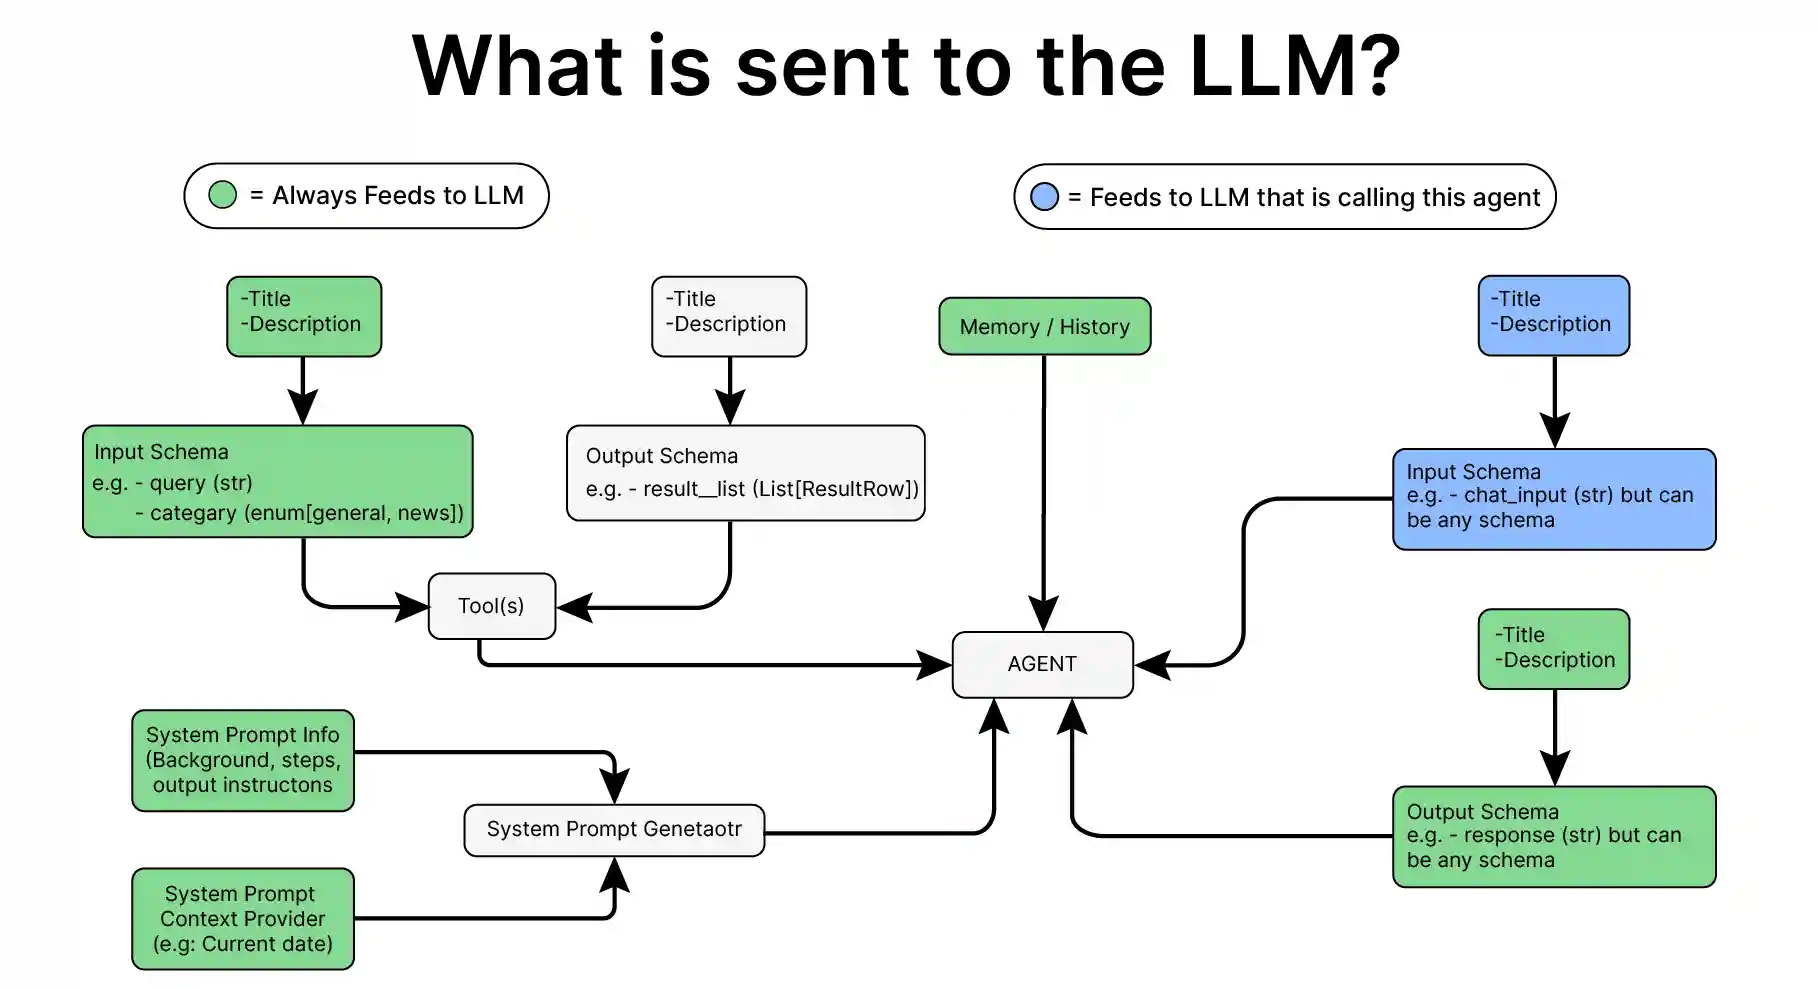
Atomic means non-divisible. In the Atomic Agents framework, each agent is built from the ground up using basic, independent components. Unlike frameworks like AutoGen and Crew AI, which rely on high-level abstractions to manage internal components, Atomic Agents takes a low-level, modular approach. This allows developers to directly control the individual components, such as input/output handling, tool integration, and memory management, making each agent customizable and predictable.
Through a hands-on implementation with code, we’ll see how Atomic Agents keeps each part visible. This enables fine-tuned control over each step of the process, from input processing to response generation.

Building a Simple Agent on Atomic Agents
Pre-requisites
Before building Atomic agents, ensure you have the necessary API keys for the required LLMs.
Load the .env file with the API keys needed.
from dotenv import load_dotenv
load_dotenv(./env)
Key Libraries Required
- atomic-agents – 1.0.9
- instructor – 1.6.4 (The instructor library is used to get structured data from the LLMs.)
- rich – 13.9.4 (The rich library is used for text formatting.)
Building the Agent
Now let’s build a simple agent using Atomic Agents.
Step 1: Import the necessary libraries.
import os
import instructor
import openai
from rich.console import Console
from rich.panel import Panel
from rich.text import Text
from rich.live import Live
from atomic_agents.agents.base_agent import BaseAgent, BaseAgentConfig, BaseAgentInputSchema, BaseAgentOutputSchema
Now lets define the client, LLM, and temperature parameters.
Step 2: Initialize the LLM.
client = instructor.from_openai(openai.OpenAI())Step 3: Setup the agent.
agent = BaseAgent(

	config=BaseAgentConfig(

    	client=client,

    	model="gpt-4o-mini",

    	temperature=0.2

	) )
We can run the agent now
result = agent.run(BaseAgentInputSchema(chat_message='why is mercury liquid at room temperature?'))
print(result.chat_message)
That’s it. We have built a simple agent with minimum code.
Let us initialize the agent and run it again and see the result of the below code
agent = BaseAgent(
	config=BaseAgentConfig(
    	client=client,
    	model="gpt-4o-mini",
    	temperature=0.2
	) )
agent.run(BaseAgentInputSchema(chat_message='what is its electron configuration?'))

>> BaseAgentOutputSchema(chat_message='To provide the electron configuration, I need to know which element you are referring to. Could you please specify the element or its atomic number?')
Since we have initialized the agent again, it doesn’t know we have asked the question about mercury.
So, let’s add memory.
Adding Memory to the Agent
Step 1: Import the necessary Class and initialize the memory.
from atomic_agents.lib.components.agent_memory import AgentMemory
memory = AgentMemory(max_messages=50)
Step 2: Build the agent with memory.
agent = BaseAgent(
	config=BaseAgentConfig(
    	client=client,
    	model="gpt-4o-mini",
    	temperature=0.2,
    	memory=memory
	) )
Now, we can ask the above-mentioned questions again in a similar way. But in this case, it will answer the electron configuration.
We can also access all the messages with memory.get_history()
Now, let’s change the system prompt.
Changing the System Prompt
Step 1: Import the necessary Class and look at the existing system prompt.
from atomic_agents.lib.components.system_prompt_generator import SystemPromptGenerator

print(agent.system_prompt_generator.generate_prompt())
agent.system_prompt_generator.background
Step 2: Define the custom system prompt.
system_prompt_generator = SystemPromptGenerator(
	background=[
    	"This assistant is a specialized Physics expert designed to be helpful and friendly.",
	],
	steps=["Understand the user's input and provide a relevant response.", "Respond to the user."],
	output_instructions=[
    	"Provide helpful and relevant information to assist the user.",
    	"Be friendly and respectful in all interactions.",
    	"Always answer in rhyming verse.",
	],
)
We can also add a message to the memory separately.
Step 3: Add a message to the memory.
memory = AgentMemory(max_messages=50)

initial_message = BaseAgentOutputSchema(chat_message="Hello! How can I assist you today?")

memory.add_message("assistant", initial_message)
Step 4: Now, we can build the agent with memory and a custom system prompt.
agent = BaseAgent(
	config=BaseAgentConfig(
    	client=client,
    	model="gpt-4o-mini",
    	temperature=0.2,
    	system_prompt_generator=system_prompt_generator,
    	memory=memory
	) )

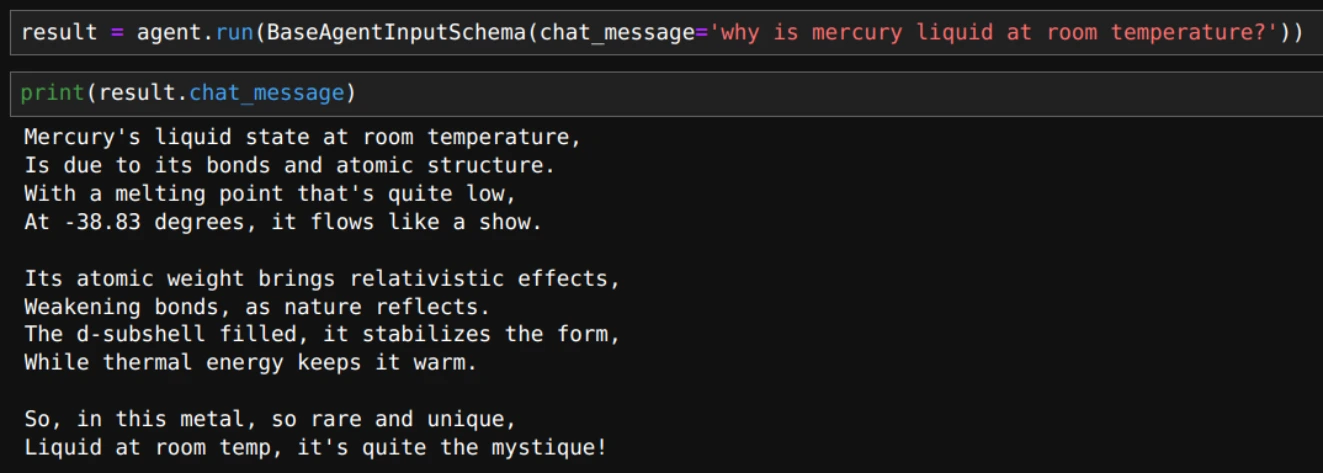
result = agent.run(BaseAgentInputSchema(chat_message='why is mercury liquid at room temperature?'))
print(result.chat_message)
Here’s the output in rhyming verse:

Up to this point, we’ve been having a conversation, one message at a time. Now, let’s explore how to engage in a continuous chat with the agent.
Building a Continuous Agent Chat in Atomic Agents
In Atomic Agents, adding chat functionality is as simple as using a while loop.
# define console for formatting the chat text.
console is used to print and format the conversation.
console = Console()

# Initialize the memory and agent
memory = AgentMemory(max_messages=50)
agent = BaseAgent(
	config=BaseAgentConfig(
    	client=client,
    	model="gpt-4o-mini",
    	temperature=0.2,
    	memory=memory
	)
)
We will use “exit” and “quit” keywords to exit the chat.
while True:
    # Prompt the user for input with a styled prompt
    user_input = console.input("[bold blue]You:[/bold blue] ")
    # Check if the user wants to exit the chat
    if user_input.lower() in ["exit", "quit"]:
        console.print("Exiting chat...")
        break

    # Process the user's input through the agent and get the response
    input_schema = BaseAgentInputSchema(chat_message=user_input)
    response = agent.run(input_schema)

    agent_message = Text(response.chat_message, style="bold green")
    console.print(Text("Agent:", style="bold green"), end=" ")
    console.print(agent_message)
With the above code, the entire output of the model is displayed at once. We can also stream the output message like we do with ChatGPT.
Building a Chat Stream in Atomic Agents
In the Chat as defined above, LLM output is displayed only after the whole content is generated. If the output is long, it is better to stream the output so that we can look at the output as it is being generated. Let’s see how to do that.
Step 1: To stream the output, we need to use the asynchronous client of the LLM.
client = instructor.from_openai(openai.AsyncOpenAI())Step 2: Define the agent.
memory = AgentMemory(max_messages=50)
agent = BaseAgent(
	config=BaseAgentConfig(
    	client=client,
    	model="gpt-4o-mini",
    	temperature=0.2,
    	memory=memory
	) )
Now let’s see how to stream the chat.
Step 3: Add the function to stream the chat.
async def main():
    # Start an infinite loop to handle user inputs and agent responses
    while True:
        # Prompt the user for input with a styled prompt
        user_input = console.input("\n[bold blue]You:[/bold blue] ")
        # Check if the user wants to exit the chat
        if user_input.lower() in ["exit", "quit"]:
            console.print("Exiting chat...")
            break

        # Process the user's input through the agent and get the streaming response
        input_schema = BaseAgentInputSchema(chat_message=user_input)
        console.print()  # Add newline before response

        # Use Live display to show streaming response
        with Live("", refresh_per_second=4, auto_refresh=True) as live:
            current_response = ""
            async for partial_response in agent.stream_response_async(input_schema):
                if hasattr(partial_response, "chat_message") and partial_response.chat_message:
                    # Only update if we have new content
                    if partial_response.chat_message != current_response:
                        current_response = partial_response.chat_message
                        # Combine the label and response in the live display
                        display_text = Text.assemble(("Agent: ", "bold green"), (current_response, "green"))
                        live.update(display_text)
If you are using jupyter lab or jupyter notebook, make sure you run the below code, running the async function defined above.
import nest_asyncio
nest_asyncio.apply()
Step 4: Now we can run the async function main.
import asyncio
asyncio.run(main())
Adding Custom Output Schema in Atomic Agents
Let’s see how to add custom output schema which is useful for getting structured output for the agent.
Step 1: Define the Class as shown here.
from typing import List
from pydantic import Field

from atomic_agents.lib.base.base_io_schema import BaseIOSchema

class CustomOutputSchema(BaseIOSchema):
    """This schema represents the response generated by the chat agent, including suggested follow-up questions."""

    chat_message: str = Field(
        ...,
        description="The chat message exchanged between the user and the chat agent.",
    )
    suggested_user_questions: List[str] = Field(
        ...,
        description="A list of suggested follow-up questions the user could ask the agent.",
    )
custom_system_prompt = SystemPromptGenerator(
    background=[
        "This assistant is a knowledgeable AI designed to be helpful, friendly, and informative.",
        "It has a wide range of knowledge on various topics and can engage in diverse conversations.",
    ],
    steps=[
        "Analyze the user's input to understand the context and intent.",
        "Formulate a relevant and informative response based on the assistant's knowledge.",
        "Generate 3 suggested follow-up questions for the user to explore the topic further.",
    ],
    output_instructions=[
        "Provide clear, concise, and accurate information in response to user queries.",
        "Maintain a friendly and professional tone throughout the conversation.",
        "Conclude each response with 3 relevant suggested questions for the user.",
    ],
)
Step 2: Define the custom system prompt.
custom_system_prompt = SystemPromptGenerator(
    background=[
        "This assistant is a knowledgeable AI designed to be helpful, friendly, and informative.",
        "It has a wide range of knowledge on various topics and can engage in diverse conversations.",
    ],
    steps=[
        "Analyze the user's input to understand the context and intent.",
        "Formulate a relevant and informative response based on the assistant's knowledge.",
        "Generate 3 suggested follow-up questions for the user to explore the topic further.",
    ],
    output_instructions=[
        "Provide clear, concise, and accurate information in response to user queries.",
        "Maintain a friendly and professional tone throughout the conversation.",
        "Conclude each response with 3 relevant suggested questions for the user.",
    ],
)
Now we can define the client, agent, and loop for the stream as we have done before.
Step 3: Define the client, agent, and loop.
client = instructor.from_openai(openai.AsyncOpenAI())
memory = AgentMemory(max_messages=50)
agent = BaseAgent(
	config=BaseAgentConfig(
    	client=client,
    	model="gpt-4o-mini",
    	temperature=0.2,
    	system_prompt_generator=custom_system_prompt,
    	memory=memory,
    	output_schema=CustomOutputSchema
	)
)

async def main():
    # Start an infinite loop to handle user inputs and agent responses
    while True:
        # Prompt the user for input with a styled prompt
        user_input = console.input("[bold blue]You:[/bold blue] ")
        # Check if the user wants to exit the chat
        if user_input.lower() in ["/exit", "/quit"]:
            console.print("Exiting chat...")
            break

        # Process the user's input through the agent and get the streaming response
        input_schema = BaseAgentInputSchema(chat_message=user_input)
        console.print()  # Add newline before response

        # Use Live display to show streaming response
        with Live("", refresh_per_second=4, auto_refresh=True) as live:
            current_response = ""
            current_questions: List[str] = []

            async for partial_response in agent.stream_response_async(input_schema):
                if hasattr(partial_response, "chat_message") and partial_response.chat_message:
                    # Update the message part
                    if partial_response.chat_message != current_response:
                        current_response = partial_response.chat_message

                    # Update questions if available
                    if hasattr(partial_response, "suggested_user_questions"):
                        current_questions = partial_response.suggested_user_questions

                    # Combine all elements for display
                    display_text = Text.assemble(("Agent: ", "bold green"), (current_response, "green"))

                    # Add questions if we have them
                    if current_questions:
                        display_text.append("\n\n")
                        display_text.append("Suggested questions you could ask:\n", style="bold cyan")
                        for i, question in enumerate(current_questions, 1):
                            display_text.append(f"{i}. {question}\n", style="cyan")

                    live.update(display_text)

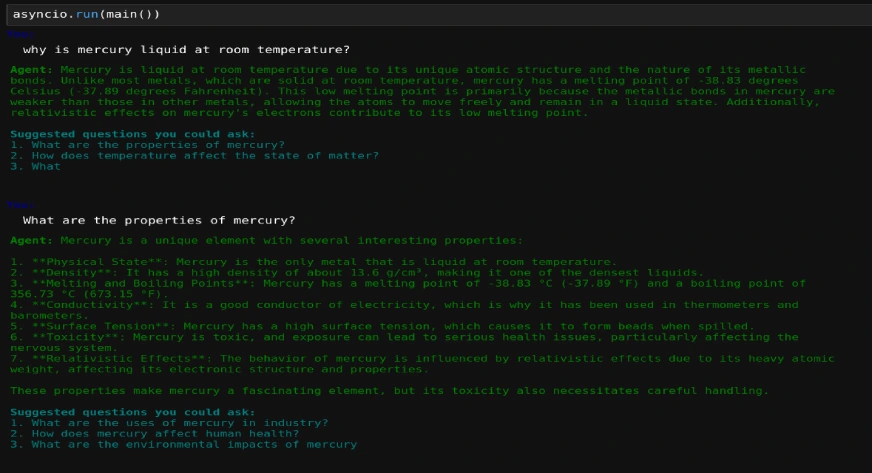
console.print()asyncio.run(main())The output is as follows:

Conclusion
In this article, we have seen how we can build agents using individual components. Atomic Agents provides a streamlined, modular framework that empowers developers with full control over each component of their AI agents. By emphasizing simplicity and transparency, it allows for highly customizable agent solutions without the complexity of high-level abstractions. This makes Atomic Agents an excellent choice for those seeking hands-on, adaptable AI development. As AI agent development evolves, we will see more features coming up in Atomic Agents, offering a minimalist approach for building clear, tailored solutions.
Do you wish to learn more about AI agents and how to build them? Our Agentic AI Pioneer Program can make you an AI agent expert, irrespective of your experience and background. Do check it out today!
Frequently Asked Questions
A. Atomic Agents emphasizes a modular, low-level approach, allowing developers to directly manage each component. Unlike high-level frameworks, it offers more control and transparency, making it ideal for building highly customized agents.
A. Yes, Atomic Agents is compatible with various LLMs, including GPT-4o. By integrating with APIs like OpenAI’s, you can leverage these models within the framework to build responsive and intelligent agents.
A. Atomic Agents includes memory management components that allow agents to retain past interactions. This enables context-aware conversations, where the agent can remember previous messages and build on them for a cohesive user experience.
A. Yes, Atomic Agents supports custom system prompts, allowing you to define specific response styles and behaviors for your agent, making it adaptable to various conversational contexts or professional tones.
A. While Atomic Agents is lightweight and developer-friendly, it is still a new framework that needs further exploring to test for production use. Its modular structure supports scaling and allows developers to build, test, and deploy reliable AI agents efficiently.


