Introduction
Google Colab is an amazing gift to the data science community from the fine folks at Google. Colab gives us the ability to build complex and heavy machine learning and deep learning models without having to expend our machine’s limited resources.
I can certainly appreciate this given how much I used to struggle on my machine! The ‘out of memory’ error is now quite infamous in the data science community – Google Colab provides us with the workaround and adds several cherries on top!
I love the free GPU and TPU support – it’s simply unparalleled and unrivalled in any other coding IDE. If you’re new to Google Colab, I highly recommend checking out my tutorial for beginners here.
In this article, I have listed five awesome Google Colab hacks that I’ve personally found really useful in my data science journey. These hacks will not just save you a lot of time but will broaden your understanding of Colab as a whole.
So, let’s make you a Google Colab expert!
The 5 Google Colab Hacks We’ll Cover:
- Increase Google Colab RAM
- Stop Google Colab From Disconnecting
- Snippets in Google Colab
- Top Keyboard Shortcuts for Google Colab
- Modes in Colab
1. Increase Google Colab RAM
Update: Recently, I have noticed that this hack is not working for some users. So keep this in mind before using this.
Google Colab already gives us about 13 GB of RAM for free. That’s quite impressive, but there are times when even that isn’t enough when we’re building heavy deep learning models. Here’s how you can quickly increase the RAM in your Colab notebook.
It’s a very simple trick and it almost doubles your RAM capacity. For getting higher RAM, you need to run the following code in your Colab code cell and wait for Google Colab to crash:
i = []
while(True):
    i.append('a')
Yes, you read it right – wait for Google Colab to crash. As soon as it crashes due to a lack of RAM, it asks if you want more RAM:
Now, click on Get more RAM and you will see another popup:
Just click on the YES button:
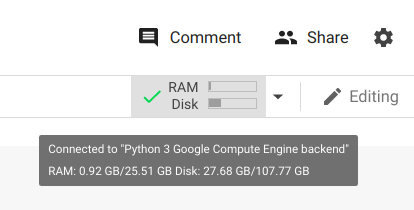
And voila! You now have about 25 GB of RAM at your disposal!
2. Stop Google Colab From Disconnecting
Here’s a story I’m sure a lot of you will be familiar with. I was working on Colab the other day and left my laptop up and running for about an hour. When I came back, I saw that Google Colab disconnected my notebook and the model training had stopped. Imagine my immense disappointment!
Of course, I found out later that Google Colab disconnects our notebook if we leave it idle for more than 30 minutes. But here’s the good news -from today, you will never face this issue.
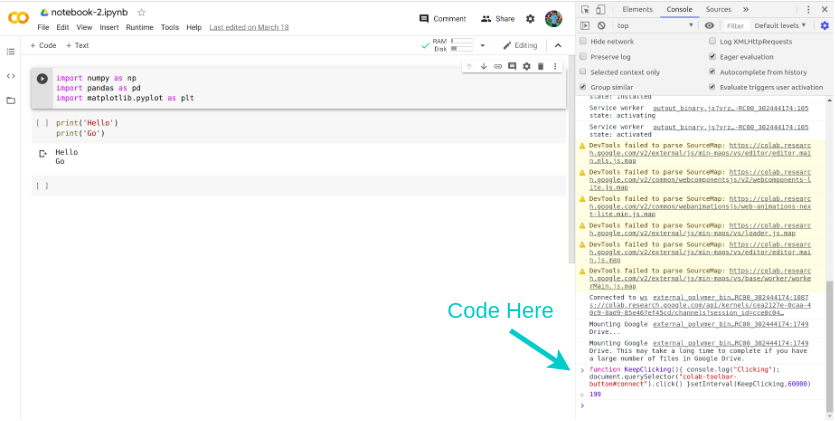
Just open your Chrome DevTools by pressing F12 or Ctrl+Shift+I on Linux and run the following JavaScript code in your console:
function KeepClicking(){
   console.log("Clicking");
   document.querySelector("colab-toolbar-button#connect").click()
}setInterval(KeepClicking,60000)
Here, the value 60,000 represents the milliseconds(equivalent to one minute). This small piece of code makes a click on the Colab screen after every 60 seconds. Thus, Colab thinks that the notebook is not idle and you don’t have to worry about being disconnected!
3. Snippets in Google Colab
4. Top Keyboard Shortcuts in Google Colab
Switching between your keyboard and mouse is a tedious and time taking task. Therefore, to speed things up, Google Colab provides us with certain really useful keyboard shortcuts. Honestly, you can’t master the Colab experience until you’ve used and become acquainted with these keyboard shortcuts.
Honestly, I feel these keyboard shortcuts increase our productivity as data scientists. I know it takes some time to learn these, but once you do get a hang of them, you can complete your work much faster.
I have created a list of top keyboard shortcuts that you should know when working with Google Colab. These key combinations are what I use, but you can modify them according to whatever is more comfortable:
5. Modes in Colab
This hack is about different viewing modes offered by Google Colab and how you can switch between them. A lot of you will appreciate this switch and your eyes will thank you in the long term!
Apart from the default light mode, Google Colab also gives us a dark mode. Yes, similar to any other code editor out there, Google Colab also has a dark mode. Even Jupyter Notebooks don’t come with this feature by default.
To change your viewing mode to dark mode. Go to Tools and open Settings:
Here, you will see a popup like this one below. Just select the dark mode in theme, click SAVE, and you are ready to go:
As you can see, this mode is more relaxing for your eyes. You can use this mode when you are working in the dark because it saves you from eye strain:
We aren’t done yet! How about adding some fun to your Colab screen? Welcome to the Corgi and Kitty mode. In Corgi mode, you see dogs running on your colab screen similar to the one below:
You can easily guess what you get in Kitty mode. Yes, this one is for all the cat lovers out there. You can see your cats on the Colab screen too:
Or you can have both of them and have fun while coding:
Now, let’s see how you can get these modes. Go to Tools, open Settings and go to the Miscellaneous section. Here, you can select your Corgi and Kitty mode, click SAVE and there you have your cats and dogs strolling on your screen:
End Notes
These hacks cover a broad range of things you can do in Google Colab. From efficiently running your code to having fun while designing deep learning models, these Colab hacks will enrich your coding experience.
If you want to know more tips and tricks related to data science, I recommend taking this free course.
Do share this article and comment below in case you have any queries or feedback. And don’t forget to sign up on Analytics Vidhya to read various exciting articles related to machine learning and data science!


Nice Article Abhishek!! Adding to the above mentioned features. Google Colab runtime type can also be switched from one programming language to other like from Python 3 to R. SWIFT language will also be available soon.
Thank you, Sachchidanand Kumar, for adding this.
Thank You RIZVI !!
"Your session crashed after using all available RAM. View Runtime Logs." This is what is displayed when I tried (1). I am not a coder so you might check what I am saying to be true / false.
Hi Jojo, what you're saying is entirely correct. This hack is now working only for a few users. If you really need that much RAM, then you have two options either you can become a Google Colab PRO member or you can go for cloud service providers. But note that all these options are paid ones.
Your session crashed after using all available RAM. View Runtime Logs.” not show get more ram please reply answer