Introduction
QlikView is a popular and simple to learn tool for data visualization. Its simple interface makes it a favorite among newbies in analytics. I loved it too. In fact, my journey in business intelligence began with QlikView. As from a non-programming background, I couldn’t have asked for a better start.
Over the years, I’ve discovered some ways of becoming productive at QlikView. I found these ways after spending endless hours working on this tool. Finally, I ended up finding these 10 tricks which can help you work faster. Without these tricks, I was almost spending 15 minutes in a task which can now be done in less than 3 mins.
In this article, I’ve shared these 10 ultimate tips & tricks which can save your time and increase your productivity while working on this tool.
List of Tips and Tricks Covered
- Copy Objects
- Copy Expression
- Move chart components
- Select multiple objects
- Limit dimensions of a chart
- Adding Visual elements to table
- Conditionally show or hide objects
- Use comments in scripting
- Use tabs in scripting
- Keyboard Shortcuts
Copy Objects
We often create objects which are similar to one of existing objects with minor changes in dimension, expression or any other parameter(s). It’s a time taking process.
But, you can do it much faster now. Simply, copy the existing object and make the necessary changes. You can copy sheet and chart object both. Method is as follows:
- Chart object: Right click on the chart title and then select command “Clone“. This will create a copy of chart objects. Alternative method is to click on chart title by holding CTRL key and drag the object to different location and release mouse button.
- Sheet object: Right click on sheet tab and select command “Copy Sheet“. This will create a similar sheet with name as “Copy of <current sheet name>”. This new sheet will be created at the end of all sheets.

Copy Expression
During dashboard development, we write multiple expressions (simple and complex). There are situations when we end up writing similar expressions for different chart objects. To make it efficient, we can re-use our existing expressions. Let’s look at the methods:
- Open expression. Copy and paste it into a new expression
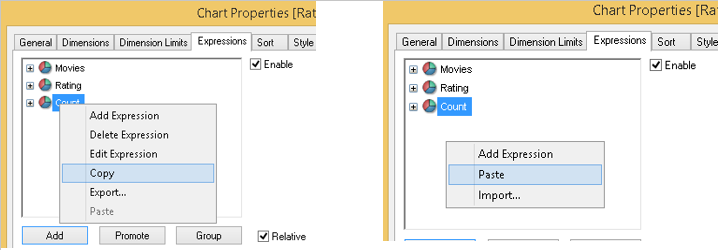
- Right click on expression. Select “Copy” command. Then, paste it to expression window. Here, you do not only copy the expression code. The new column that is created has exactly the same properties as the source expression. This includes column width, alignment, number format etc.
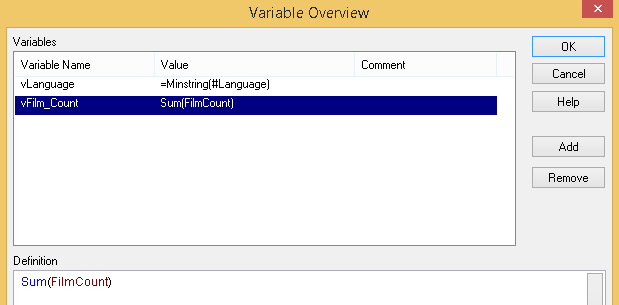
- In dashboard development, there are some expressions which are common to different chart objects. In this case, we can store the expression in a variable and access it with variable name using a dollar expansion. To do this, first store expression in a variable (Go to Settings –> Variable Overview and store expression).
 To access it in any chart objects, write expression as $(Variable_Name).
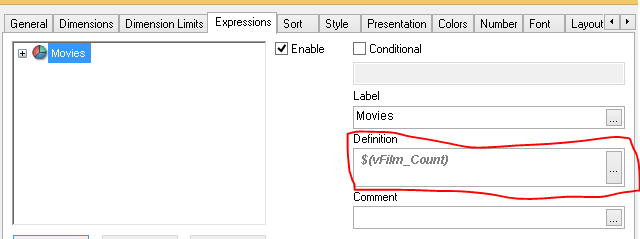 This improves the accuracy and similarity across the dashboard as we are using same expression.
Move chart components
By default, position of chart components are fixed at the right hand side. But, in some cases we are required to change the position for better visualization. For which, there is no direct option available. I too didn’t have any solution of this issue initially. But, with time I found out a way. This can be done by using combination of keyboard shortcuts. Here is the trick:
- Let’s say, we want to move the chart legend to left for below pie chart
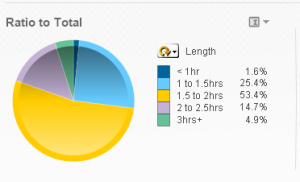
- Now, select the chart and press Ctrl+Shift. You will see a red border around every chart object
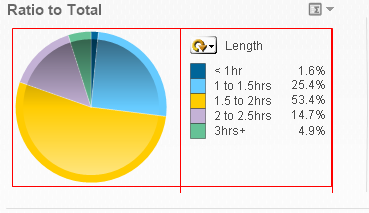
- Now, drag and drop the individual component to left position (or required position).
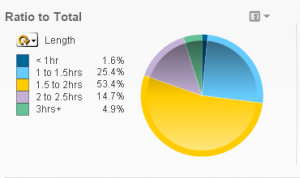 Above, you have seen that chart legends moved to left side. You can also re-size the individual component using double headed arrow.
Select Multiple Objects
Sometimes we want to perform similar operation such as changing font size, layout, deletion with multiple objects. In such cases, we select all objects and perform the required operation. For selection, initially, we select one object then press SHIFT key. Then, click on the title of other objects. Now, you can perform group operation (applicable) on these objects like delete, using properties option (right click on any selected object) change the layout, font and caption.

Adding Visual elements to Table
Usually, we show only numbers in tabular representation. However, we can make the table more informative by adding visual elements to table. In Qlikview, we can apply three visualization techniques to table:
- Conditional Formatting
- Image representation
- Mini Chart (Known as “Sparkline” in excel)
In You can refer article “Data Visualization for Tabular Information in Qlikview” to look at the methods to achieve this.
Limit Dimension of a Chart
Look at the below chart, it has too many dimensions making it difficult to make inferences about data.
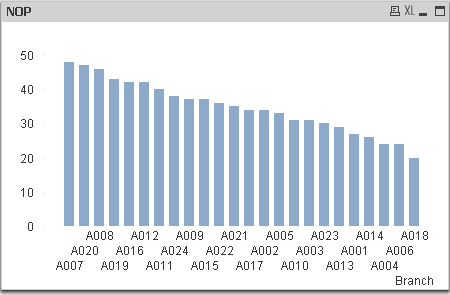
We can solve this challenge by:
- Limiting Dimension: In properties window of chart object, you can find a for “Dimension Limits“, where you can restrict dimension based on value such as show only largest 10, first 10, smallest 10, show values greater than or equals to 5% of total, show values those accumulate to 80% of total.

- Enabling scroll bar for dimension: This option is available on Presentation tab of chart properties window. You can enable scroll bar on x-axis and set limit for number of items to show (look at below snapshot). This is one of the less known useful feature of Qlikview. Here, you can also show top 10, bottom 10 by sorting the chart based on expression in descending or ascending order.

Conditionally Show or Hide Objects
We can show or hide Qlikview objects based on the requirement. It helps to optimize the area of sheet object effectively. Under layout tab of properties window, there is an option to show or hide the sheet object (always or conditionally). Here you can write expression or use variable to control it. Generally, developers use “Buttons” to change the value of variable such as one button assigns value 0 to variable and another assigns 1.
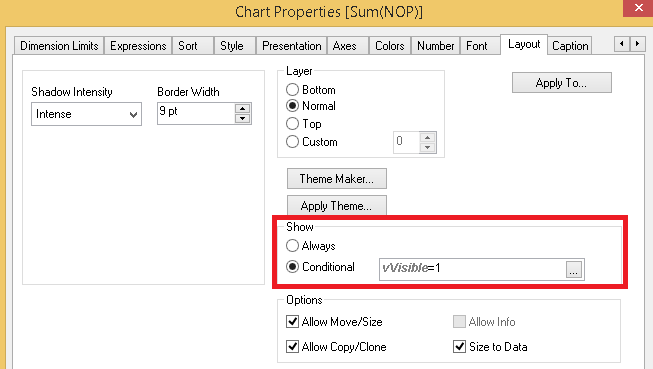 We can also show or hide dimension and expression of chart object and best use of this feature is “Adhoc reporting” or “Customized reporting“. You can refer article “Customized reporting in Qlikview“.
Use comments in Qlikview scripting:
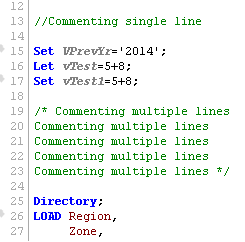
Great programmers always add comments with different segment of code. It makes easier to read and debug the code. In Qlikview scripting also, this practice is highly recommended. There are several ways to create comments in your script.
- // is for single line comments
- /* …*/ is for a block edit
Use script tabs in Qlikview scripting
To keep scripts maintainable, we do follow modular structure in coding. In similar line, we should use scripts tab to standardize our scripts. It helps in faster script editing and debugging. Qlikview scripts are run top to bottom on each tab, from the left most tab to the right.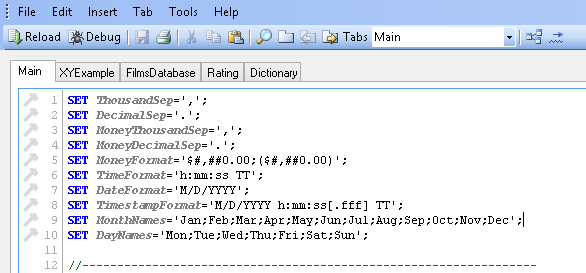 Above, you can that different tabs for XY Example, FilmsDatabase, Rating and Dictionary.
Keyboard Shortcuts
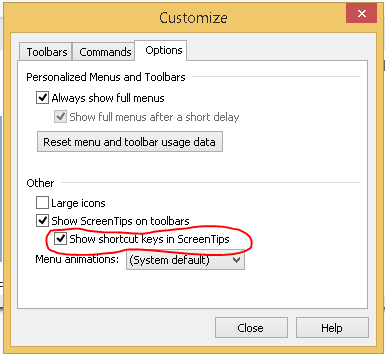
Before checking these shortcuts, first turn on “Show Shortcut keys in ScreenTips” option. With this, it will show shortcut keys whenever we hover the mouse pointer over menu icons. Just like Microsoft Excel does. This helps a lot in memorizing keyboard shortcuts.
To enable it, right click on toolbar area –> select command “Customize” –> Go to Options tab –>Check box on for “Show shortcut keys in ScreenTips”. Below are some useful keyboard shortcuts:
| Command | Action |
| CTRL + B | Add Bookmark |
| CTRL + G | Toggles layout design grid on or off. |
| CTRL + E | Edit Script |
| CTRL + N | New File |
| CTRL + O | Open File |
| CTRL + S | Save |
| CTRL + P | |
| CTRL + Q | Current Selections |
| CTRL + R | Reload |
| CTRL + T | Table Viewer |
| CTRL + SHIFT + L | Lock all selections |
| CTRL + SHIFT + U | Unlock all selection |
| CTRL + SHIFT + D | Clear all selection |
| CTRL + SHIFT + S | All hidden sheets and sheet objects visible |
| CTRL + ALT + D | Document Properties |
| CTRL + ALT + S | Sheet Properties |
| CTRL + ALT + V | Variable Overview |
| CTRL + ALT + E | Expression Overview |
| CTRL + M | Edit Module (Macro coding) |
| ALT + ENTER | Properties… (opens the Properties dialog in active object) |
| F6 | Activates the sheet to the right of the active sheet |
| F7 | Activates the sheet to the left of the active sheet |
End Notes
Not only these tips will make you work faster. But, you’ll also get more time to explore new things at your end. Visualizing data is equally important as analyzing data. Hence, you should strive to become better day by day in data visualization.
In this article, we looked at QlikView tips and tricks which will enhance your dashboard development experience. Here, I have mostly covered tips and tricks related associated with front end or designer point of view like copying objects & expression, work with chart components, selecting multiple objects, limit dimension, visualization with table, conditionally show or hide objects, scripting best practices and finally keyboard shortcuts.
Did you find this article useful ? Do you want to add some more tips and tricks ? Feel free to share your experience with us, I’d love to hear you.


Very informative and good explanation of qlikview for the beginners