Overview
- Image augmentation is a super effective concept when we don’t have enough data with us
- We can use image augmentation for deep learning in any setting – hackathons, industry projects, and so on
- We’ll also build an image classification model using PyTorch to understand how image augmentation fits into the picture
Introduction
The trick to do well in deep learning hackathons (or frankly any data science hackathon) often comes down to feature engineering. How much creativity can you muster when you’re given data that simply isn’t enough to build a winning deep learning model?
I’m talking from my own experience of participating in multiple deep learning hackathons where we were given a dataset of a few hundred images – simply not enough to win or even finish in the top echelons of the leaderboard. So how can we deal with this problem?
The answer? Well, that lies deep in a data scientist’s skillset! This is where our curiosity and creativity come to the fore. That’s the idea behind feature engineering – how well we can come up with new features given existing ones. And the same idea applies when we’re working with image data.
And that’s where image augmentation plays a major role. This concept isn’t limited to hackathons – we use it in the industry and in real-world deep learning projects all the time!

I love how image augmentation helps spruce up my existing dataset with more data without having to put manual time taking efforts. And I’m sure you’re going to find this technique very helpful for your own projects.
So in this article, we will understand the concept of image augmentation, why it’s helpful, and what are the different image augmentation techniques. We’ll also implement these image augmentation techniques to build an image classification model using PyTorch.
This is the fifth article of PyTorch for beginners series which I have been working on. You can access the previous articles here:
- A Beginner-Friendly Guide to PyTorch and How it Works from Scratch
- Build an Image Classification Model using Convolutional Neural Networks in PyTorch
- Deep Learning for Everyone: Master the Powerful Art of Transfer Learning using PyTorch
- 4 Proven Tricks to Improve your Deep Learning Model’s Performance
Table of Contents
- Why Do We Need Image Augmentation?
- Different Image Augmentation Techniques
- Basic Guidelines for Selecting the Right Augmentation Technique
- Case Study: Solving an Image Classification Problem using Image Augmentation
Why Do We Need Image Augmentation?
Deep learning models usually require a lot of data for training. In general, the more the data, the better the performance of the model. But acquiring massive amounts of data comes with its own challenges. Not everyone has the deep pockets of the big firms.
And the problem with a lack of data is that our deep learning model might not learn the pattern or function from the data and hence it might not give a good performance on unseen data.
So what can we do in that case? Instead of spending days manually collecting data, we can make use of Image Augmentation techniques.
Image Augmentation is the process of generating new images for training our deep learning model. These new images are generated using the existing training images and hence we don’t have to collect them manually.

There are multiple image augmentation techniques and we will discuss some of the common and most widely used ones in the next section.
Different Image Augmentation Techniques
Image Rotation
Image rotation is one of the most commonly used augmentation techniques. It can help our model become robust to the changes in the orientation of objects. Even if we rotate the image, the information of the image remains the same. A car is a car even if we see it from a different angle:
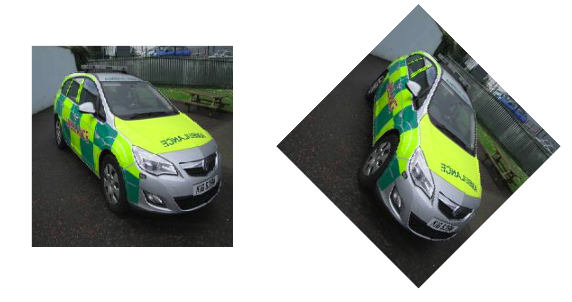
Hence, we can use this technique to increase the size of our data by creating rotated images from the original ones. Let’s see how we can rotate images:
I will be using this image to demonstrate different image augmentation techniques. You can try other images as well as per your requirement.
Let’s import the image and visualize it first:

This is the original image. Let’s now see how we can rotate it. I will use the rotate function of the skimage library to rotate the image:
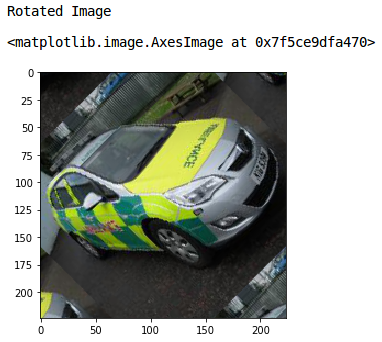
Nice! Setting mode as ‘wrap’ fills the points outside the boundaries of the input with the remaining pixels of the image.
Shifting Images
There might be scenarios when the objects in the image are not perfectly central aligned. In these cases, image shift can be used to add shift-invariance to the images.
By shifting the images, we can change the position of the object in the image and hence give more variety to the model. This will eventually lead to a more generalized model.
Image shift is a geometric transformation that maps the position of every object in the image to a new location in the final output image.
After the shift operation, an object present at a location (x,y) in the input image is shifted to a new position (X, Y):
- X = x + dx
- Y = y + dy
Here, dx and dy are the respective shifts along different dimensions. Let’s see how we can apply shift to an image:

The translation hyperparameter defines the number of pixels by which the image should be shifted. Here, I have shifted the image by (25, 25) pixels. You can play around with the values of this hyperparameter.
Again I have used the mode as ‘wrap’ which fills the points outside the boundaries of the input with the remaining pixels of the image. In the output above, you can see that both the height and width of the image have been shifted by 25 pixels.
Flipping Images
Flipping is an extension of rotation. It allows us to flip the image in the left-right as well as up-down direction. Let’s see how we can implement flipping:

Here, I have used the fliplr function of NumPy to flip the image from left to right. It flips the pixel values of each row and the output confirms the same. Similarly, we can flip the images in an up-down direction:

This is how we can flip the image and make more generalized models that will learn the patterns of the original as well as the flipped images. Adding random noise to the images is also an image augmentation technique. Let’s understand it using an example.
Adding Noise to Images
Image noising is an important augmentation step that allows our model to learn how to separate signal from noise in an image. This also makes the model more robust to changes in the input.
We will use the random_noise function of the skimage library to add some random noise to our original image.
I will take the standard deviation of the noise to be added as 0.155 (you can change this value as well). Just keep in mind that increasing this value will add more noise to the image and vice versa:
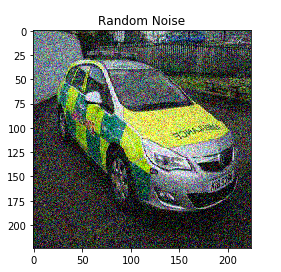
We can see that random noise has been added to our original image. Play around with the standard deviation value and see the different results you get.
Blurring Images
All photography lovers will instantly understand this idea.
Images come from different sources. And hence, the quality of the images will not be the same from each source. Some images might be of very high quality while others might be just plain bad.
In such scenarios, we can blur the image. How will that help? Well, this helps make our deep learning model more robust.
Let’s see how we can do that. We will use a Gaussian filter for blurring the image:

Sigma here is the standard deviation for the Gaussian filter. I have taken it as 1. The higher the sigma value, the more will be the blurring effect. Setting Multichannel to true ensures that each channel of the image is filtered separately.
Again, you can try different sigma values to change the magnitude of blurriness.
These are some of the image augmentation techniques which help to make our deep learning model robust and generalizable. This also helps increase the size of the training set.
We’re almost at the implementation part of this tutorial. Before that, let’s look at some of the basic guidelines for deciding the right image augmentation technique.
Basic Guidelines for Selecting the Right Augmentation Technique
There are a few guidelines that I think are important while deciding the augmentation technique based on the problem that you are trying to solve. Here is a brief summary of these guidelines:
- The first step in any model building process is to make sure that the size of our input matches what is expected by the model. We also have to make sure that the size of all the images should be similar. For this, we can resize our images to the appropriate size.
- Let’s say you are working on a classification problem and have relatively less number of data samples. In such scenarios, you can use different augmentation techniques like image rotation, image noising, flipping, shift, etc. Remember all these operations are applicable for classification problems where the location of objects in the image does not matter.
- If you are working on an object detection task, where the location of objects is what we want to detect, these techniques might not be appropriate.
- Normalizing image pixel values is always a good strategy to ensure better and faster convergence of the model. If there are some specific requirements of the model, we must pre-process the images as per the model’s requirement.
Now, without waiting further, let’s move on to the model building part. We will apply the augmentation techniques that are discussed in this article to generate images and then use those images to train the model.
Case Study: Solving an Image Classification Problem and Applying Image Augmentation
We will be working on the emergency vs non-emergency vehicle classification problem. You should be familiar with the problem statement if you’ve gone through my previous PyTorch articles.
The aim of this project is to classify the images of vehicles as emergency or non-emergency. And you guessed it – it’s an image classification problem. You can download the dataset from here.
Loading the dataset
Let’s begin! We’ll start by loading the data into our notebook. Then, we’ll apply image augmentation techniques and finally, build a convolutional neural network (CNN) model.
Let’s import the required libraries:
Now, we will read the CSV file that contains the names of images and their corresponding labels:

0 here represents that the vehicle is non-emergency and 1 means it’s an emergency vehicle. Let’s now import all the images from our dataset:
![]()
We have a total of 1,646 images in the dataset. Let’s split this data into training and validation set. We will use the validation set to evaluate how well the model will perform on unseen data:
![]()
I have kept the test_size as 0.1 and hence 10% data will be randomly selected as the validation set and the remaining 90% will be used to train the model. We have 1,481 images in the training set which is quite less to train a deep learning model.
So next, we will augment these training images to increase the training set and possibly improve our model’s performance.
Augmenting the Images
We will be using the image augmentation techniques we discussed earlier:
![]()
We have generated 4 augmented images for each of the 1,481 images in the training set. Let’s convert the images in the form of an array and verify the size of our dataset:
![]()
This confirms that we have augmented the images and increased the size of our training set. Let’s visualize these augmented images:

The first image here is the original image from the dataset. The remaining four images are generated using different image augmentation techniques – rotation, left-to-right flip, up-down flip and adding random noise respectively.
Our dataset is now ready. It’s time to define the architecture of our deep learning model and then train it on the augmented training set. Let’s first import all the functions from PyTorch:
We’ll have to convert both the training and validation sets into PyTorch format:
Similarly, we will convert the validation set:
Model Architecture
Next, we will define the architecture of the model. This is a bit complex since the architecture has 4 convolutional blocks and then 4 fully connected dense layers:
Let’s define the other hyperparameters of the model as well, including the optimizer, learning rate, and the loss function:

Training the Model
Let’s train our deep learning model for 20 epochs:

This is a summary of the training phase. You’ll notice that the training loss decreases as we increase the epochs. Let’s save the weights of the trained model so we can use them in the future without retraining the model:
If you do not wish to train the model at your end, you can download the weights of the model which I trained for 20 epochs using this link.
Next, let’s load this model:
Checking Our Model’s Performance
Finally, let’s make predictions for the training and validation set and check the respective accuracy:
![]()
We got an accuracy of more than 91% on the training set! That’s quite promising. But let’s wait before we celebrate. We need to check the same for the validation set:
![]()
The validation accuracy is around 78%. That’s quite good!
End Notes
This is how we can use image augmentation techniques when we are given less training data to begin with.
In this article, we covered most of the commonly used image augmentation techniques. We learned how to rotate, shift, and flip images. We also learned how we can add random noise to images or blur them. Then we discussed basic guidelines for selecting the right augmentation technique.
You can try these image augmentation techniques on any image classification problem and then compare the performance with and without augmentation. Feel free to share your results in the comments section below.
And if you’re new to deep learning, computer vision and image data in general, I suggest going through the below course:
My research interests lies in the field of Machine Learning and Deep Learning. Possess an enthusiasm for learning new skills and technologies.


Amazing and very interesting article. Thank you. Silvia
Thank you Silvia!
Interesting and insightful article Pulkit :)
Thank you Anand!!
Nice article. I got an error while doing `final_train = np.array(final_train_data)` , saying "Memory Error". My python is running on 64 bit and on 16gb ram. Do you have any idea or solution for this?
Hi Purna, Try to switch to Google Colab. The error that you are getting is due to less available memory.