Introduction
In deep learning, Residual Networks (ResNets) have become a revolutionary architecture, enabling the development of exceptionally deep neural networks by addressing the problem of vanishing gradients. Whether a machine learning enthusiast or a seasoned professional, understanding how to build a ResNet from scratch in TensorFlow will enhance your knowledge of neural network architectures and improve your skills in creating complex deep learning models. This article is a step-by-step process of learning ResNet from scratch using TensorFlow.
Overview:
- Explore the core principles behind ResNet, including residual learning and how skip connections address the vanishing gradient problem in deep neural networks.
- Get detailed instructions on how to code each component of a ResNet, from convolutional layers to skip connections, using TensorFlow’s robust framework.
- Discover how to adjust ResNet parameters, such as the number of layers and filters, to create tailored versions of ResNet for different use cases.
- Learn how to train your ResNet model on a dataset, apply appropriate optimizers, and evaluate its performance for image classification tasks.
- Get practical tips on debugging common issues when coding ResNet and on optimizing the model for faster training and better accuracy.
This article was published as a part of the Data Science Blogathon.
What are ResNets and their Types?
ResNets are called Residual Networks. They are a special type of convolutional neural network (CNN) used for tasks such as image recognition. Kaiming He, Xiangyu Zhang, Shaoqing Ren, and Jian Sun first introduced ResNet in 2015 in their paper “Deep Residual Learning for Image Recognition.”
Different types of ResNets can be developed based on the depth of the network, such as ResNet-50 or ResNet-152. The number at the end of ResNet specifies the number of layers in the network or how deep the networks are. We can design a ResNet with any depth using the basic building blocks of a ResNet that we will be looking ahead:
A ResNet can be called an upgraded version of the VGG architecture. The difference between them is the skip connections used in ResNets. In the figure below, we can see the architecture of the VGG as well as the 34-layer ResNet.

Why Use a Skip Connection and What Is It Purpose?
You might wonder why we use a skip connection and its purpose. So the answer to your question would be, in earlier CNN architectures as more and more layers were added to the Neural Network it was observed that the performance of the model started dropping, this was because of the vanishing gradient problem. As we went deeper into a network, the vanishing gradient problem became more and more significant, and the solution to this problem was using a skip connection. You can refer to this paper to learn more about skip connections and the math behind them.

In Figure 2, we can see how a skip connection works. The skip connection skips training from a few layers and then connects it to the output. This helps the network skip the layers, hurting the model’s performance. This allows us to go deeper into the network without facing the problem of vanishing gradients.
Figure 2 shows two types of skip connections: the left-side block is called an Identity block, and the right-side block is called a Bottleneck / Convolutional block. The difference between the two blocks is that the Identity block directly adds the residue to the output. In contrast, the Convolutional block performs a convolution followed by Batch Normalisation on the residue before adding it to the output.
Identity Block Structure and Code
Now, let’s understand this identity block. Every identity block has the following architecture/algorithm: (Refer to Fig 3.)
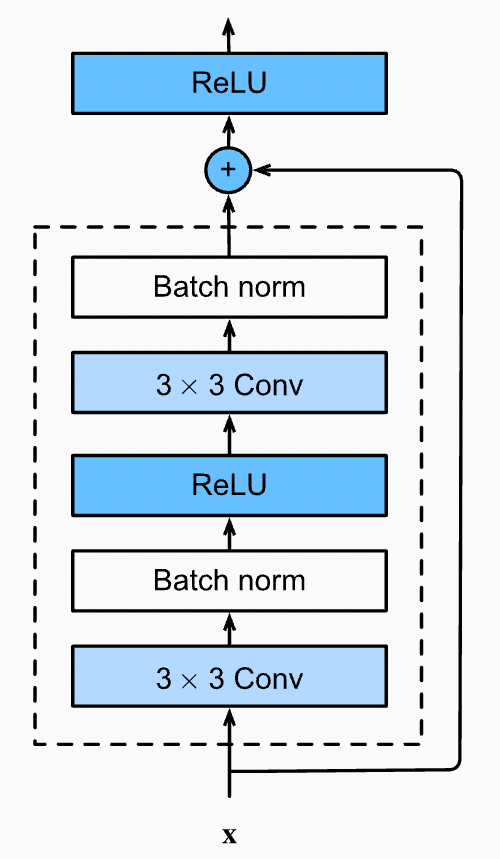
Algorithm for Identity Block
X_skip = Input

 Convolutional Layer (3X3) (Padding=’same’) (Filters = f) →(Input)

 Batch Normalisation →(Input)

 Relu Activation →(Input)

 Convolutional Layer (3X3) (Padding = ‘same’) (Filters = f) →(Input)

 Batch Normalisation →(Input)

 Add (Input + X_skip)

 Relu Activation
You might wonder why we have taken padding as ‘same’ only for all Convolution layers. This is because we have to maintain the shape of our input until we add it to the residue. If the input’s shape changes, we will get a Numpy Error saying- “Two arrays with different shapes cannot be added”.
For example, consider the input size = (24 * 24), so the shape of our residue = (24 * 24) when we apply a kernel of (3, 3) on this input, the output shape = (22 * 22) but the shape of our residue will still be (24 * 24) which will make it impossible to Add as their shapes are different. Note that the layers having a conv filter of (1,1) don’t require padding, as the kernel size (1 * 1) will not alter the shape of the input. Look at this formula for reference to the above example.

Code for Identity Block
Now, let’s code this block in Tensorflow with Keras’s help. To execute this code, you will need to import the following:
import tensorflow as tf
import numpy as np
import matplotlib.pyplot as plt
Moving on to the code, the code for the identity block is as shown below:
def identity_block(x, filter):
    # copy tensor to variable called x_skip
    x_skip = x
    # Layer 1
    x = tf.keras.layers.Conv2D(filter, (3,3), padding = 'same')(x)
    x = tf.keras.layers.BatchNormalization(axis=3)(x)
    x = tf.keras.layers.Activation('relu')(x)
    # Layer 2
    x = tf.keras.layers.Conv2D(filter, (3,3), padding = 'same')(x)
    x = tf.keras.layers.BatchNormalization(axis=3)(x)
    # Add Residue
    x = tf.keras.layers.Add()([x, x_skip])
    x = tf.keras.layers.Activation('relu')(x)
    return x
Convolutional Block Structure and Code
Now that we have coded the identity block, let’s move on to the convolutional block. The architecture/algorithm for the Convolutional Block is as follows: (Refer to Fig 5.)
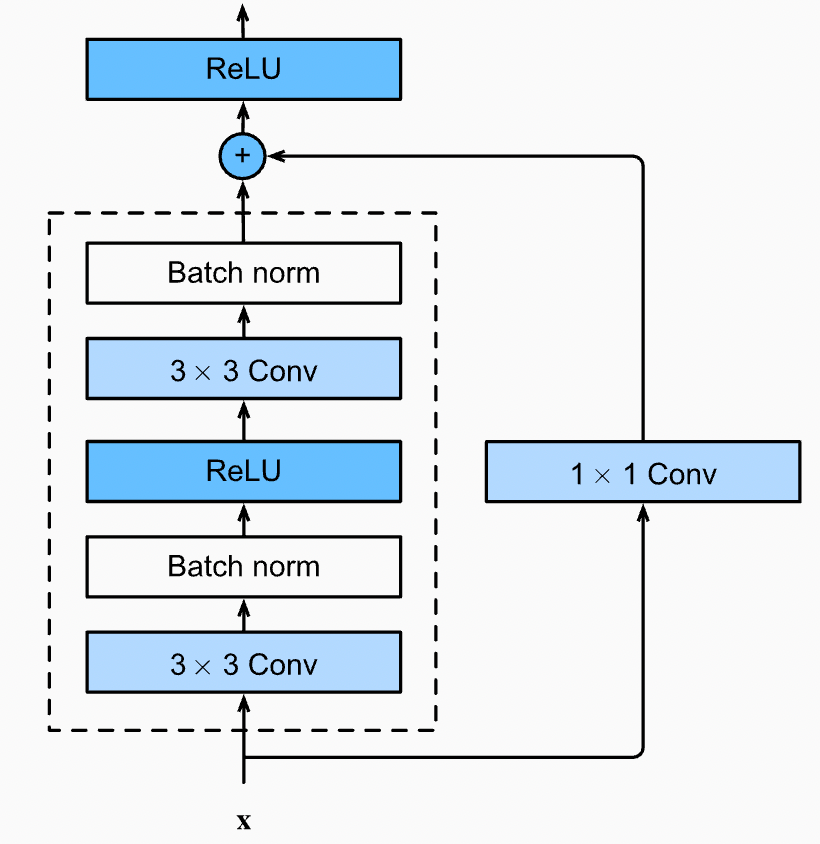
Algorithm for Convolutional Block
X_skip = Input

 Convolutional Layer (3X3) (Strides = 2) (Filters = f) (Padding = ‘same’) →(Input)

 Batch Normalisation →(Input)

 Relu Activation →(Input)

 Convolutional Layer (3X3) (Filters = f) (Padding = ‘same’) →(Input)

 Batch Normalisation →(Input)

 Convolutional Layer (1X1) (Filters = f) (Strides = 2) →(X_skip)

 Add (Input + X_skip)

 Relu Activation
One point to note in this convolution block is that the residue is not directly added to the output but is passed through a Convolution Layer. The strides in these layers are used to minimize the size of the image. Similar to the Identity block, we must ensure that the Shape of the Input and Residue are the same, so let us confirm this with an example. Refer to Fig 4 for cross-checking the calculations.
Input Shape = (24, 24), Residue Shape = (24, 24)
After ConvInput1 → Input Shape = (13, 13) *stride = 2
After ConvInput2 → Input Shape = (13, 13)
After ConvResidue1 → Residue Shape = (13, 13) *stride = 2
As we can see, the Input Shape and the Residue Shape end with the same dimensions, so we can now start coding this block.
Code for Convolutional Block
def convolutional_block(x, filter):
    # copy tensor to variable called x_skip
    x_skip = x
    # Layer 1
    x = tf.keras.layers.Conv2D(filter, (3,3), padding = 'same', strides = (2,2))(x)
    x = tf.keras.layers.BatchNormalization(axis=3)(x)
    x = tf.keras.layers.Activation('relu')(x)
    # Layer 2
    x = tf.keras.layers.Conv2D(filter, (3,3), padding = 'same')(x)
    x = tf.keras.layers.BatchNormalization(axis=3)(x)
    # Processing Residue with conv(1,1)
    x_skip = tf.keras.layers.Conv2D(filter, (1,1), strides = (2,2))(x_skip)
    # Add Residue
    x = tf.keras.layers.Add()([x, x_skip])
    x = tf.keras.layers.Activation('relu')(x)
    return x
ResNet-34 Structure and Code

Now let us follow the architecture in Fig 6. and build a ResNet-34 model. While coding this block, we must remember that the first block of every block in the ResNet will have a Convolutional Block followed by Identity Blocks except the conv2 block. For example, in the architecture mentioned in Fig 6. the conv3 block has four sub-blocks. So, the 1st sub-block will be the Convolutional Block, followed by 3 Identity Blocks. For reference, you can see Fig 1. where the solid black lines represent an Identity Block. The dotted black line represents a Convolutional Block.
We will combine the Identity and Convolutional Blocks we coded earlier to build the ResNet-34. So, let’s code this now.
def ResNet34(shape = (32, 32, 3), classes = 10):
    # Step 1 (Setup Input Layer)
    x_input = tf.keras.layers.Input(shape)
    x = tf.keras.layers.ZeroPadding2D((3, 3))(x_input)
    # Step 2 (Initial Conv layer along with maxPool)
    x = tf.keras.layers.Conv2D(64, kernel_size=7, strides=2, padding='same')(x)
    x = tf.keras.layers.BatchNormalization()(x)
    x = tf.keras.layers.Activation('relu')(x)
    x = tf.keras.layers.MaxPool2D(pool_size=3, strides=2, padding='same')(x)
    # Define size of sub-blocks and initial filter size
    block_layers = [3, 4, 6, 3]
    filter_size = 64
    # Step 3 Add the Resnet Blocks
    for i in range(4):
        if i == 0:
            # For sub-block 1 Residual/Convolutional block not needed
            for j in range(block_layers[i]):
                x = identity_block(x, filter_size)
        else:
            # One Residual/Convolutional Block followed by Identity blocks
            # The filter size will go on increasing by a factor of 2
            filter_size = filter_size*2
            x = convolutional_block(x, filter_size)
            for j in range(block_layers[i] - 1):
                x = identity_block(x, filter_size)
    # Step 4 End Dense Network
    x = tf.keras.layers.AveragePooling2D((2,2), padding = 'same')(x)
    x = tf.keras.layers.Flatten()(x)
    x = tf.keras.layers.Dense(512, activation = 'relu')(x)
    x = tf.keras.layers.Dense(classes, activation = 'softmax')(x)
    model = tf.keras.models.Model(inputs = x_input, outputs = x, name = "ResNet34")
    return model
You can now put the code together and run it. Also, have a look at the model summary. This can be done using the ‘model. summary()’ that will show you the details of all the layers in our architecture. You can also try building different types of ResNets using the basics now!
I trained this model on the CIFAR-10 dataset for 15 epochs without any image augmentation. The results I obtained are as follows. To see the code I used, visit this Jupyter Notebook on Kaggle.

Conclusion
Building a ResNet from scratch in TensorFlow offers a deep dive into one of the most impactful architectures in deep learning. You gain valuable insights into constructing robust neural networks by understanding the underlying principles of residual learning and skip connections and mastering the implementation of identity and convolutional blocks. This hands-on approach enhances your technical skills and equips you to experiment with customized versions of ResNet for various applications. Keep exploring and refining your models; with each iteration, you’ll continue improving their performance and accuracy. Happy coding!
The media shown in this article are not owned by Analytics Vidhya and are used at the Author’s discretion.
Frequently Asked Questions
Q1. What is ResNet in TensorFlow?
A. ResNet in TensorFlow refers to the implementation of Residual Networks, a deep learning architecture that uses skip connections to alleviate the vanishing gradient problem. TensorFlow’s API allows for easy construction of ResNet models by stacking identity and convolutional blocks for deep neural networks.
Q2. How long does it take to train ResNet from scratch?
A. The time to train a ResNet model from scratch depends on factors like dataset size, hardware (GPU vs. CPU), network depth (e.g., ResNet-34 vs. ResNet-152), and batch size. On average, training on large datasets like ImageNet can take hours to days on powerful GPUs.
Q3. Is ResNet better than CNN?
A. ResNet is an improvement over traditional CNNs, particularly for deeper networks. It addresses the vanishing gradient problem using skip connections, enabling much deeper architectures without performance degradation. As a result, ResNet generally outperforms standard CNNs in complex tasks like image recognition and classification.
Q4. How much does it cost to train ResNet?
A. The cost of training ResNet varies based on factors like the dataset’s size, the model’s depth, and the hardware used (e.g., cloud services like AWS or Google Cloud). On average, training large models on GPUs can cost hundreds of dollars, depending on resource usage and time.
Q5. Is ResNet pre-trained?
A. Yes, ResNet models are often available as pre-trained versions on large datasets like ImageNet. These pre-trained models can be fine-tuned for specific tasks, saving computational resources and time compared to training from scratch. TensorFlow provides access to pre-trained ResNet models for transfer learning.


hello, great piece! but the notebook isn't showing when i click on the kaggle link. any help on that please??