Pose detection is an active field of study in computer vision. You can find hundreds of research papers and several models that try to solve the problem of pose detection. So many machine learning enthusiasts are attracted to pose estimations because of their wide variety of applications and usefulness. This article will cover one application of pose detection and estimation using machine learning and some useful Python libraries.
Overview:
- Understand various models, such as Blaze Pose, OpenPose, and DensePose, and how they are used to detect human poses in different applications.
- Learn how key points such as elbows, knees, and shoulders are extracted and used for pose tracking and posture comparison.
- Discover how Python libraries like MediaPipe are used to build and implement pose estimation models efficiently.
- Learn to apply pose estimation models in real-time applications such as yoga pose detection, sports analytics, and healthcare.
This article was published as a part of the Data Science Blogathon
Table of contents
What is Pose estimation?
Pose estimation is a computer vision technique for tracking the movements of a person or an object. It is usually performed by finding the location of key points for the given objects. We can compare various movements and postures based on these key points and draw insights. Pose estimation is used in augmented reality, animation, gaming, and robotics.
Several models are present today to perform pose estimation. Some of the methods for pose estimation are given below:
- Open pose
- Pose net
- Blaze pose
- Deep Pose
- Dense pose
- Deep cut
Choosing one model over another may depend upon the application. Factors like running time, size of the model, and ease of implementation can also be reasons for choosing a specific model. So, knowing your requirements from the start and choosing the model is better.
This article will use the Blaze pose to detect human poses and extract key points. The model can be easily implemented through a helpful library called Media Pipe.
Media Pipe
Media Pipe is an open-source, cross-platform framework for building multimodel machine learning pipelines. It can implement cutting-edge models such as human face detection, multi-hand tracking, hair segmentation, object detection and tracking, etc.
Blaze Pose Detector
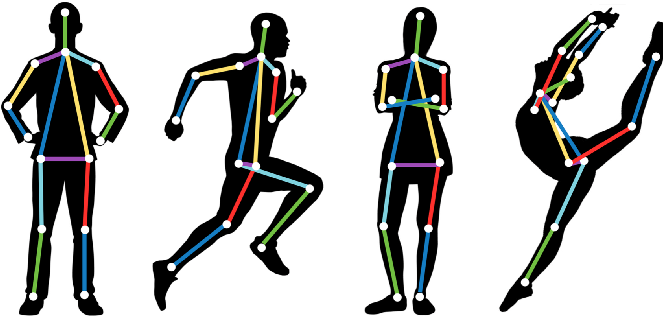
Where most pose detection relies on COCO topology consisting of 17 key points, the blaze pose detector predicts 33 human key points, including the torso, arms, leg, and face. Including more key points is necessary for succeeding applications of domain-specific pose estimation models, like for hands, face, and feet. Each key point is predicted with three degrees of freedom and the visibility score. The blaze pose is a sub-millisecond model and can be used for real-time applications with better accuracy than most existing models. The model is available in two versions, Blaze Pose Lite and Blaze Pose Fully, to balance speed and accuracy.
Blaze Pose offers several applications, including fitness and yoga trackers. These applications can be implemented using an additional classifier like the one we will build in this article.
You can learn more about the blaze pose detector here.
2D vs 3D Pose Estimation
Pose estimation can be done in 2D or 3D. 2D pose estimation predicts the key points from the image through pixel values, whereas 3D pose estimation predicts the three-dimensional spatial arrangement of the key points as its output.
Preparing Dataset for Pose Estimation
In the previous section, we learned that key points of the human pose can be used to compare different postures. In this section, we will prepare the dataset using the media pipe library itself. We will take images of two yoga poses, extract key points from them, and store them in a CSV file.
You can download the dataset from Kaggle using this link. The dataset consists of 5 yoga poses; however, I am using only two poses in this article. You can use all of them if you want; the procedure will remain the same.
import mediapipe as mp
import cv2
import time
import numpy as np
import pandas as pd
import os
mpPose = mp.solutions.pose
pose = mpPose.Pose()
mpDraw = mp.solutions.drawing_utils # For drawing keypoints
points = mpPose.PoseLandmark # Landmarks
path = "DATASET/TRAIN/plank" # enter dataset path
data = []
for p in points:
        x = str(p)[13:]
        data.append(x + "_x")
        data.append(x + "_y")
        data.append(x + "_z")
        data.append(x + "_vis")
data = pd.DataFrame(columns = data) # Empty dataset
In the above code snippet, we have first imported the necessary libraries to help create the dataset. Then in the next four lines, we import the modules required to extract key points and their draw utils. Next, we create an empty pandas data frame and enter the columns. The columns include the thirty-three key points the blaze pose detector will detect. Each keypoint contains four attributes that are x and y coordinates of the keypoint(normalized from 0 to 1), z coordinate that represents landmark depth with hips as the origin and same scale as that of x, and lastly the visibility score. The visibility score represents the probability that the landmark is visible in the image.
Code
count = 0

for img in os.listdir(path):

        temp = []

        img = cv2.imread(path + "/" + img)

        imageWidth, imageHeight = img.shape[:2]

        imgRGB = cv2.cvtColor(img, cv2.COLOR_BGR2RGB)

        blackie = np.zeros(img.shape) # Blank image

        results = pose.process(imgRGB)

        if results.pose_landmarks:

                # mpDraw.draw_landmarks(img, results.pose_landmarks, mpPose.POSE_CONNECTIONS) #draw landmarks on image

                mpDraw.draw_landmarks(blackie, results.pose_landmarks, mpPose.POSE_CONNECTIONS) # draw landmarks on blackie

                landmarks = results.pose_landmarks.landmark

                for i,j in zip(points,landmarks):

                        temp = temp + [j.x, j.y, j.z, j.visibility]

                data.loc[count] = temp

                count +=1

        cv2.imshow("Image", img)

        cv2.imshow("blackie",blackie)

        cv2.waitKey(100)

data.to_csv("dataset3.csv") # save the data as a csv file
In the above code, we are iterating through the pose images individually, extracting the key points using the blaze pose model and storing them in a temporary array ‘temp’. After completing the iteration, we append this temporary array as a new record in our dataset. You can also see these landmarks using the drawing utils in the media pipe. In the above code, I have drawn these landmarks on the image as well as on a blank image ‘blackie’ to focus on the results of the blaze pose model only. The blank image ‘blackie’ has the same shape as that of the given image. One thing that should be noticed is that the blaze pose model takes RGB images instead of BGR (read by OpenCV).
After getting the key points of all the images, we have to add a target value that will act as a label for our machine-learning model. You can make the target value for the first pose 0 and the other 1. After that, we can just save this data to a CSV file, which we will use to create a machine-learning model in the later steps.

You can observe how the dataset looks like from the above image.
Creating the Pose Estimation model
Now we have created our dataset, we have to pick a machine-learning algorithm to classify the poses. In this step, we will take an image, run the blaze pose model (that we used earlier for creating the dataset) to get the key points of the person present in that image and run our model on that test case. The model is expected to give the correct results with a high confidence score. I will use the SVC(Support Vector Classifier) from the sklearn library to perform the classification task in this article.
from sklearn.svm import SVC
data = pd.read_csv("dataset3.csv")
X,Y = data.iloc[:,:132],data['target']
model = SVC(kernel = 'poly')
model.fit(X,Y)
mpPose = mp.solutions.pose
pose = mpPose.Pose()
mpDraw = mp.solutions.drawing_utils
path = "enter image path"
img = cv2.imread(path)
img = cv2.cvtColor(img, cv2.COLOR_BGR2RGB)
results = pose.process(imgRGB)
if results.pose_landmarks:
        landmarks = results.pose_landmarks.landmark
        for j in landmarks:
                temp = temp + [j.x, j.y, j.z, j.visibility]
        y = model.predict([temp])
        if y == 0:
            asan = "plank"
        else:
            asan = "goddess"
        print(asan)
        cv2.putText(img, asan, (50,50), cv2.FONT_HERSHEY_SIMPLEX,1,(255,255,0),3)
        cv2.imshow("image",img)
In the above lines of code, we have first imported the SVC (Support Vector Classifier) from the sklearn library. We trained the dataset we built earlier on SVC with the target variable as the Y label. Then, we read the input image and extracted the key points, as we did while creating the dataset. Lastly, we input the temporary variable and use the model to predict. The pose can now be detected using simple if-else conditions.
Results of the Model
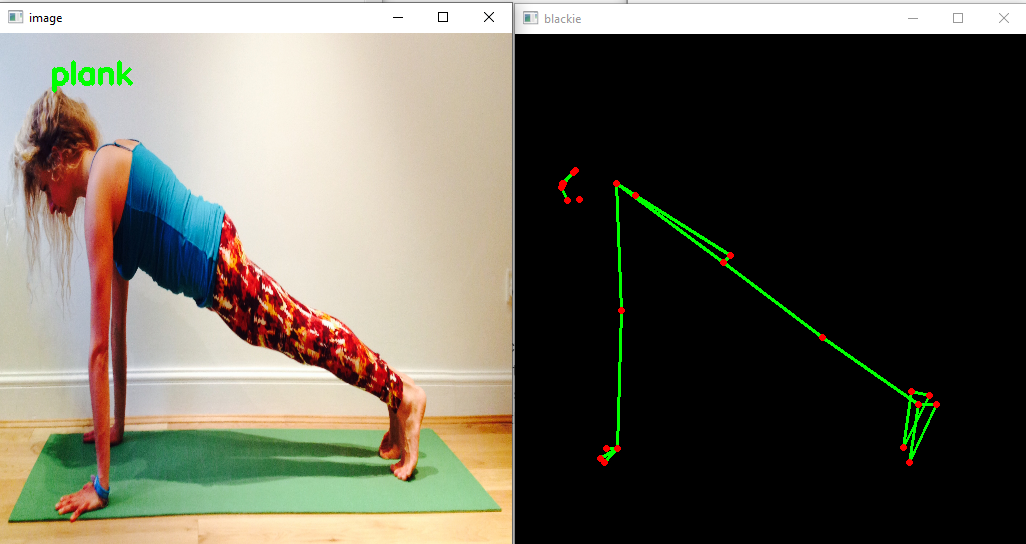
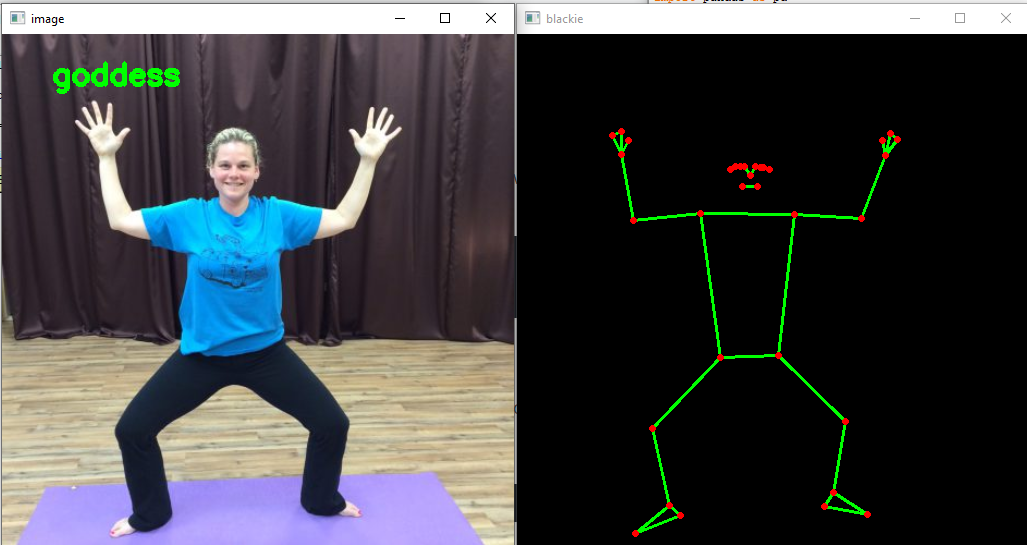
From the above images, you can observe that the model has correctly classified the pose. You can also see the pose detected by the blaze pose model on the right side. In the first image, some key points aren’t visible if you observe closely, but the pose is still classified correctly. This could be possible because of the visibility of the critical points attribute given by the blaze pose model.
Conclusion
Pose detection is an active area of research in machine learning and offers several real-life applications. In this article, we tried to work on one such application and get our hands dirty with pose detection. We learned about pose detection and several models that can be used for pose detection. We selected the blaze pose model for our purpose and learned about its pros and cons over other models. Ultimately, we built a classifier to classify yoga poses using the support vector classifier from the sklearn library. We also built our dataset for this purpose, which could be extended easily using more images.
You can also try other machine learning algorithms instead of SVM and compare the results accordingly.
Thank you. Hope you enjoyed reading the article.
Frequently Asked Questions
Q1. Which algorithm is used for pose estimation?
A. Pose estimation typically uses deep learning algorithms, such as convolutional neural networks (CNNs) and variations like OpenPose or DensePose. These models detect key points (joints) in images to estimate human body poses.
Q2. What are key points in pose estimation?
A. Key points in pose estimation are specific human body parts (e.g., elbows, knees, shoulders) represented as coordinates in an image. These points are crucial for determining a person’s posture and movement in a frame.
Q3. What is the best pose estimation model?
A. OpenPose and DeepLabCut are considered among the best pose estimation models. OpenPose is widely used for multi-person pose estimation, while DeepLabCut is favoured for animal behaviour tracking. Both leverage deep learning techniques for accurate results.
Q4. What is the application of human pose estimation?
A. Human pose estimation is used in sports analytics, healthcare (rehabilitation, physical therapy), virtual reality, animation, and human-computer interaction. It tracks body movements to provide insights into physical performance, assist medical diagnostics, or enhance interactive experiences.
The media shown in this article is not owned by Analytics Vidhya and are used at the Author’s discretion.
Hi there. Writing and exploring are some of my hobbies. I love Machine learning because of its endless applications and scope for improvement. I enjoy problem-solving and learning about new things. I believe to learn any new skill one should have the will to learn it. Ask the right questions and the rest, Google search will take care of it. In my free time, I like listening to music and jamming on my guitar.
You can connect with me on LinkedIn, and send me any suggestions or questions. I'll be happy to reply.
Keep Learning


keep help me how to add target column for above code ?
Sir , I have worked on this projec t , The classification results are incorrect for most of the cases ...Even I done all steps Correctly ... please help me sir my mail: [email protected]
Hello, I tried your code, unfortuntely, it doesn't work. model.predict([temp]) is always [0] Is there a way to make this work correct? Greetings