Introduction
You’ve probably heard of TensorFlow if you’re a machine learning student. It has become an industry norm and is one of the most common tools for machine learning and deep learning experts.
TensorFlow is a free and open-source library for creating machine learning models. It is a fantastic platform for everyone interested in working with machine learning and artificial intelligence.
This means that if you really want to work in the industry of Machine learning and artificial intelligence, you must be comfortable with this tool. If you’re thinking about what TensorFlow Python is and how it functions, you’ve arrived at the right because the following article will provide you with a complete description of this technology.
In this article, you will understand how to use TensorFlow Python by exploring various TensorFlow examples. Learning TensorFlow Python will enhance your machine learning skills and enable powerful data analysis.
This article was published as a part of the Data Science Blogathon.
Table of contents
What is TensorFlow?
TensorFlow is an end-to-end open-source machine learning platform with a focus on deep neural networks. Deep learning is a subtype of machine learning that analyses massive amounts of unstructured data. Since it works with structured data, deep learning is different from normal machine learning.
TensorFlow provides a diverse and complete set of libraries, tools, and community resources. It allows developers to create and deploy state-of-the-art machine learning-powered applications. One of the most appealing aspects of TensorFlow is that it makes use of Python to create a nice front-end API for developing applications that run in high-performance, optimized C++.
The TensorFlow Python deep-learning library was first created for internal use by the Google Brain team. Since then, the open-source platform’s use in R&D and production systems have risen.

How to install TensorFlow ?
To Install TensorFlow Python here is the list
Check if Python is Installed: First, ensure you have Python installed on your computer. You can check this by opening a command prompt or terminal and typing Python Version. If you don’t have Python installed, you must download and install it from the official Python website.
Install TensorFlow: TensorFlow is a library for machine learning and artificial intelligence. You can install it using a tool called pip, which comes with Python. Open a command prompt or terminal and type:
pip install tensorflow
If you have a good graphics card in your computer, you can install the version of TensorFlow that can make use of it by typing:
pip install tensorflow-gpu
Check Installation: Once the installation is complete, you can check if TensorFlow is installed correctly by opening a Python interpreter. You can do this by typing Python in your command prompt or terminal. Then, type the following commands:
import tensorflow as tf
print(tf.__version__)
This should print the version number of TensorFlow Python that you installed.
That’s it! Now you have TensorFlow Python installed on your computer and you’re ready to start using it for machine learning projects.
Some TensorFlow Fundamentals
We can now dive into more detail on TensorFlow now because we have a baseline understanding of what it is.
The following is a quick overview of several key TensorFlow principles. Let’s begin with tensors, which are the foundational elements of TensorFlow and the platform’s title.
Tensors
A tensor is an array that represents the types of data in the TensorFlow Python deep-learning library. A tensor, as compared to a one-dimensional vector or array or a two-dimensional matrix, can have n dimensions. The values in a tensor contain identical data types with a specified shape. Dimensionality is represented by the shape. A vector, for example, is a one-dimensional tensor, a matrix is a two-dimensional tensor, and a scalar is a zero-dimensional tensor.

Shape
In the TensorFlow Python library, the shape corresponds to the dimensionality of the tensor. In simple terms, the number of elements in each dimension defines a tensor’s shape. During the graph creation process, TensorFlow automatically infers shapes. The rank of these inferred shapes could be known or unknown. If the rank is known, the dimensions’ sizes may be known or unknown.

Type
The type represents the type of data that tensor values can hold. Typically, all values in a tensor have the same data type. TensorFlow datatypes are as follows:
- integers
- floating point
- unsigned integers
- booleans
- strings
- integer with quantized
ops - complex numbers
Graph
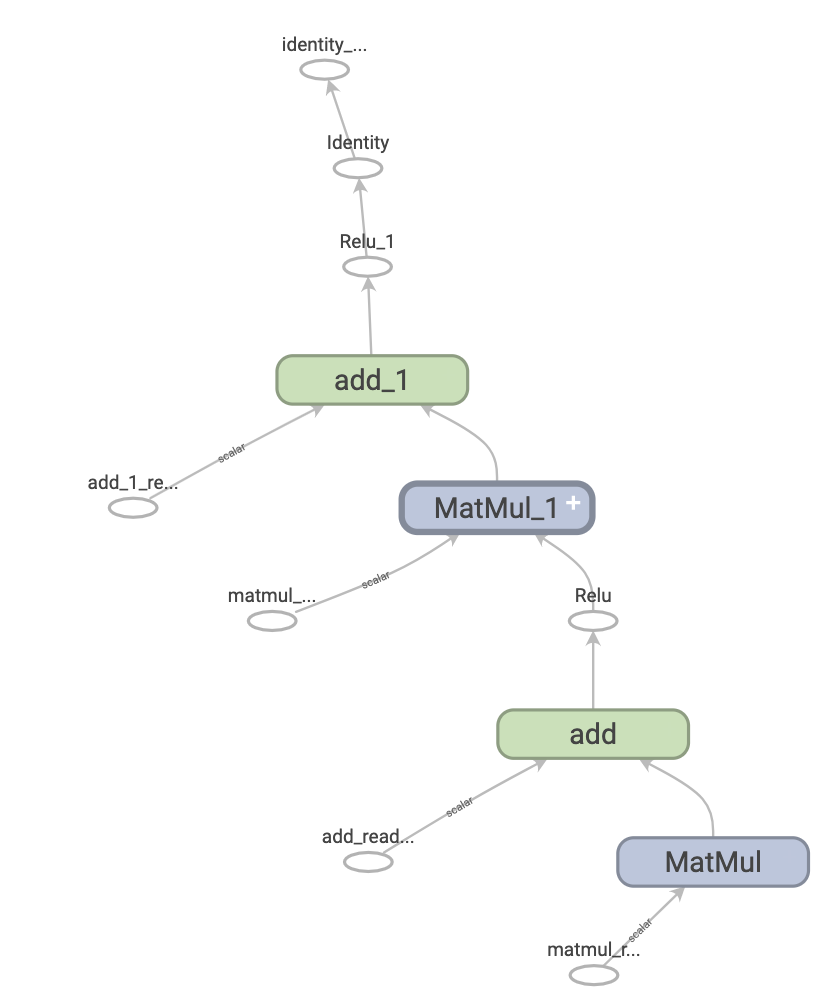
Graphs are data structures that contain a collection of tf.Operation objects, which describe computation units, and tf.Tensor objects, which represent data units that flow between operations. They are specified in the context of tf.Graph. As these graphs are data structures, they can be saved, executed, and restored without requiring the original Python code.
When displayed on TensorBoard, a TensorFlow Python graph representing a two-layer neural network looks like this.

The benefits of graphs
A graph provides a huge amount of versatility. TensorFlow graphs may be used in domains that do not have a Python interpreter, such as mobile applications, embedded devices, and backend servers.
Graphs can also be easily optimized, allowing the compiler to perform transformations such as:
- Fold constant nodes in your computations to deduce the value of tensors statically (“constant folding”).
- Divides sub-parts of a computation that are independent and split them among threads or devices.
- Eliminate common subexpressions to simplify arithmetic operations.
Session
Session in TensorFlow carries out the operations in the graph. It is used to evaluate the nodes in a graph.
Let’s look at an example:
Defining the Graph:
A graph containing a variable and three operations are defined: variable returns the variable’s current value. initialize gives the variable the value 42 at the start. assign gives the variable a new value of 13.
graph = tf.Graph()
with graph.as_default():
  variable = tf.Variable(42, name='foo')
  initialize = tf.global_variables_initializer()
  assign = variable.assign(13)
On a side note, TensorFlow generates a default graph for you, thus the first two lines of code above are optional. When no graph is specified, the sessions in the following section use the default graph.
Using a Session to Run Computations:
To perform any of the three described operations on a graph, we must first construct a session for it. The session will additionally allocate memory to save the variable’s current value.
with tf.Session(graph=graph) as sess:
  sess.run(initialize)
  sess.run(assign)
  print(sess.run(variable))
# Output: 13
As you can see, our variable’s value is only valid for one session. TensorFlow will report an error if we try to query the value again in a second session because the variable is not initialized there.
with tf.Session(graph=graph) as sess:
  print(sess.run(variable))
# Error: Attempting to use uninitialized value
Of course, we can utilize the graph in many sessions; all we have to do is re-initialize the variables. The values in the new session will be entirely different from those in the previous one:
with tf.Session(graph=graph) as sess:
  sess.run(initialize)
  print(sess.run(variable))
# Output: 42
Operators
In TensorFlow Operators are pre-defined mathematical operations. TensorFlow includes all of the fundamental operations.
The following is a list of frequently used operations:
- tf.add(a, b)
- tf.substract(a, b)
- tf.multiply(a, b)
- tf.div(a, b)
- tf.pow(a, b)
- tf.exp(a)
- tf.sqrt(a)
You may start with something basic. To compute the square of a value, you can use the TensorFlow technique. This procedure is simple because the tensor can be constructed using only one argument. The square of a number is calculated with tf.sqrt(x), where x is a floating number.
x = tf.constant([2.0], dtype = tf.float32)
print(tf.sqrt(x))
Output:
Tensor("Sqrt:0", shape=(1,), dtype=float32)
It should be noted that the output was a tensor object rather than the result of the square of 2. In the example, you print the tensor definition rather than the actual evaluation of the operation.
# Add
tensor_a = tf.constant([[1,2]], dtype = tf.int32)
tensor_b = tf.constant([[3, 4]], dtype = tf.int32)
tensor_add = tf.add(tensor_a, tensor_b)print(tensor_add)
Output:
Tensor("Add:0", shape=(1, 2),
dtype=int32)
Code Explanation:
Create two tensors:
- one tensor with 1 and 2
- one tensor with 3 and 4
You add up both tensors.
How Do TensorsFlow Work?
TensorFlow enables users to build dataflow graphs, which are structures that represent how data flows across a graph or a set of processing nodes. Each node in the graph symbolizes a mathematical process, and each link or edge between nodes represents a tensor, which is a multidimensional data array.
TensorFlow makes all this available to developers via the Python language. Python is simple to learn and use, and it offers straightforward ways to define how high-level abstractions can be linked together. TensorFlow nodes and tensors are Python objects, and TensorFlow applications are Python programs.
Python, on the other hand, does not do actual math operations. The transforming libraries made accessible by TensorFlow Python are developed in high-performance C++ binaries. Python simply routes communication between the components and offers high-level programming abstractions to connect them.
TensorFlow Python applications may be launched on almost any suitable target: a local system, a cloud cluster, iOS, and Android devices, CPUs, or GPUs. If you utilize Google’s cloud, you can accelerate TensorFlow by running it on Google’s TensorFlow Python Processing Unit (TPU) hardware. TensorFlow-generated models, on the other hand, may be installed on almost any device and used to deliver projections.
TensorFlow 2.0, launched in October 2019, improved the framework in many areas based on user input, making it easier to use (for example, by leveraging the comparatively basic Keras API for model training) and highly functional. A fresh API enables distributed training easier to implement, and support for TensorFlow Lite allows models to be deployed on a wider range of systems. To take full use of new TensorFlow 2.0 capabilities, code developed for previous versions of TensorFlow should be rewritten—sometimes very slightly, sometimes extensively.
.png)
TensorFlow Python applications can be run on a variety of platforms, including CPUs, GPUs, cloud clusters, local machines, and Android and iOS devices.
TensorFlow Computation Graph
In TensorFlow, a computation graph is a network of nodes, which each node performs multiplication, addition, or evaluates a multivariate equation. Codes are written in TensorFlow Python to create a graph, run a session, and execute the graph. Every variable we assign becomes a node where we can execute mathematical operations such as addition and multiplication and addition.
Here’s an example of how to make a computation graph:
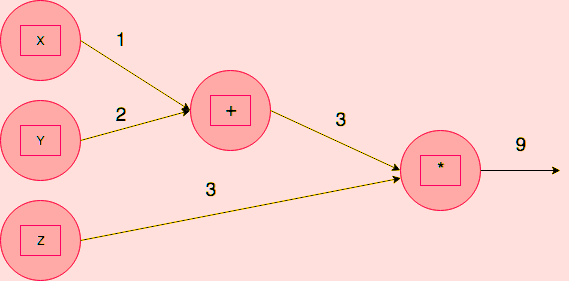
Let’s say we wish to perform the following calculation: F(x,y,z) = (x+y)*z.
In the graph below, the three variables x, y, and z are represented by three nodes:

Step 1: Define the variables. here In this example, the values are:
x = 1, y = 2, and z = 3
Step 2: Add x and y.
Step 3: Now Multiply z with the sum of x and y.
Finally, the result comes as ‘9’.
In addition to the nodes where we have allocated the variables, the graph has two more nodes — one for addition and the other for multiplication. As a result, there are five nodes in all.
TensorFlow’s Basic Programming Elements
TensorFlow Python allows us to assign data to three kinds of data elements: constants, variables, and placeholders.
Let’s take a closer look at what each of these data components represents.
1. Constants
Constants, as the name implies, are parameters with fixed values. A constant in TensorFlow is defined using the command tf.constant(). Constant values cannot be altered during computation.
Here’s an example:
c = tf.constant(2.0,tf.float32)
d = tf.constant(3.0)
Print (c,d)
2. Variables
Variables allow new parameters to be added to the graph. The tf.variable() command defines a variable that must be initialized before the graph can be run in a session.
Here’s an example:
Y = tf.Variable([.4],dtype=tf.float32)
a = tf.Variable([-.4],dtype=tf.float32)
b = tf.placeholder(tf.float32)
linear_model = Y*b+a
3. Placeholders
Data can be fed into a model from the outside using placeholders. It later permits the assignment of values. A placeholder is defined using the command tf.placeholder().
Here’s an example:
c = tf.placeholder(tf.float32)
d = c*2
result = sess.run(d,feed_out={c:3.0})
The placeholder is mostly used to input data into a model. Data from the outside are fed into a graph via a variable name (in the above example, the variable name is fed out). Following that, we specify how we want to feed the data to the model while executing the session.
Example of a session:
The graph is executed by launching a session. The TensorFlow runtime is used to evaluate the nodes in the graph. The command sess = tf. Session() begins a session.
Example:
x = tf.constant(3.0)
y = tf.constant(4.0)
z = x+y
sess = tf.Session() #Launching Session
print(sess.run(z)) #Evaluating the Tensor z
There are three nodes in the preceding example: x, y, and z. The mathematical operation is performed at node ‘z,’ and the result is received afterward. When you start a session and run the node z, the nodes x and y are produced first. The addition operation will then occur at node z. As a result, we will get the answer ‘7.’
How to Create TensorFlow Pipeline
The following are the steps to creating a TensorFlow pipeline:
Step 1) Creating the data
To begin, let’s utilize the NumPy library to produce two random values.
import numpy as np
x_input = np.random.sample((1,2))
print(x_input)
Step 2) Creating the placeholder
We will build a placeholder called X. We must clearly declare the tensor’s form. In this scenario, In this scenario, we’ll load an array containing only two inputs. The shape can be written as shape=. [1,2]
# using a placeholder
x = tf.placeholder(tf.float32, shape=[1,2], name = 'X')
Step 3) Defining the dataset method
Following that, we must establish the Dataset in which we may supply the value of the placeholder x. for that, we can use the method tf.data. Dataset.from_tensor_slices
dataset = tf.data.Dataset.from_tensor_slices(x)Step 4) Creating the pipeline
In step four, we will set up the pipeline through which the data will travel. We have to use make initializable iterator to generate an iterator. Then, get next, this iterator is now used to deliver the next batch dataset. we call this phase get_next. But here in our case, we have only one batch of datasets consisting of two values.
iterator = dataset.make_initializable_iterator()
get_next = iterator.get_next()
Step 5) Executing the operation
in this step, We firstly, start a session and then use the operation iterator. The value created by NumPy is fed into the feed_dict. These two values will be used to fill the placeholder x. The result is then printed using get_next.
with tf.Session() as sess:
    # feed the placeholder with data
    sess.run(iterator.initializer, feed_dict={ x: x_input })
    print(sess.run(get_next)) # output [ 0.52374458  0.71968478]
output: [0.8835775 0.23766978]
Conclusion
TensorFlow is a prominent AI tool, and if you want to work in AI or machine learning, you should be familiar with it.
Machine learning and artificial intelligence are two examples of technological applications that are playing a major part in the world’s progress. Things that formerly looked like a science fiction film storyline are now a reality. Machine learning affects all aspects of our life, from suggesting Netflix movies and virtual assistants to self-driving cars.TensorFlow, the open-source library is undoubtedly beneficial to developers and aspiring professionals working on machine learning-driven technologies.
Becoming a Master in the field of machine learning is one of the most difficult tasks. However, a big thanks to Google’s for developing a toolkit like TensorFlow, Gathering data, building models, and predicting in the field of machine learning has become easier than ever before thanks to TensorFlow, and it also aids in optimizing possible trends, which was previously one of the most challenging jobs.
Hope you find this information helpful as you embark on your journey to learn TensorFlow Python! With plenty of TensorFlow examples available, you’ll quickly discover how to use TensorFlow effectively.
TensorFlow is a library for machine learning using Python. It uses graphs with nodes for math and edges for data. TensorFlow is flexible, can use CPUs or GPUs, and has APIs for web and mobile. It’s popular for image recognition, language processing, and AI. Many people use it and there are lots of guides.
TensorFlow is a popular open-source tool for machine learning. It’s used to build and train models for tasks like image recognition, language processing, and more. Key benefits include flexibility, scalability, performance, and a large community.


