This article was published as a part of the Data Science Blogathon.
Overview
In this article, we will be discussing the face detection process using the Dlib HOG detection algorithm. Though in this article we will not only test the frontal face but also different angles of the image and see where our model will perform well and where not along with that we will be computing the total time taken by the HOG detector model to detect the faces in the image.

Application of Face Detection
- Security purpose: Face recognition is turning out to be the most common method to maintain the security of the individual/organization.
- Ride-sharing companies: It will help them to check whether the right person was picked by the driver or not.
- Home automation: To maintain security, especially in a home that is driven by technology face detection and recognition is essential.
Import the Libraries
We will first import the required libraries.
import cv2
import dlib
from time import time
import matplotlib.pyplot as plt
Dlib HoG Face Detection
If we want to know about the HOG face detection then first let’s break down the term which is the Histogram of oriented gradients which is not only a face detection algorithm but also a complete object detection method in general. HOG is basically a feature descriptor that is performed both for image processing and computer vision techniques.
HOG uses mainly 5 filters during the preprocessing step they are as follows:
- Frontal face
- Right side turned face
- Left side turned face
- The frontal face but rotated right
- The frontal face but rotated left

Image Source: Dlib C++
Loading the HOG Face Detector
We have by far understood what is HOG face detector but to use it we have to first load the face detector i.e. dlib.get_frontal_face_detector() function which is a pre-trained method and this function has the dlib library beforehand so we don’t even need to include the main model file.
hog_face_detector = dlib.get_frontal_face_detector()
hog_face_detector
Output:
<_dlib_pybind11.fhog_object_detector at 0x1d669827770>
HoG Face Detection Function
So now it’s time to create a HOG Face detection function that will be very much reliable in the long run; for the testing purpose, we will be using different types of head/face positions, so for that time, we won’t be required to perform the same task again and again.
Syntax of our function
- results = hog_face_detector(sample_image, up_sample)
Parameters of the function
- Image: This parameter will hold the sample image on which we need to perform the face detection.
- Upsample: This parameter is the optional one and it will be responsible to upsample the input image before executing the face detection.
How will this Function Return?
- Results: The result will be in the format of the array data structure which will be holding the coordinates of the bounding boxes of the detected face/faces.
When do we Need to Upsample the Image?
- As this HOG algorithm is trained with the purpose to detect a face size of at least 8×80 so whenever we think of detecting a face smaller than that we need to upsample the image which will increase the resolution of the image.
def hogDetectFaces(image, hog_face_detector, display = True):

    height, width, _ = image.shape

    output_image = image.copy()

    imgRGB = cv2.cvtColor(image, cv2.COLOR_BGR2RGB)

    start = time()

    results = hog_face_detector(imgRGB, 0)

    end = time()

    for bbox in results:

        x1 = bbox.left()
        y1 = bbox.top()
        x2 = bbox.right()
        y2 = bbox.bottom()

        cv2.rectangle(output_image, pt1=(x1, y1), pt2=(x2, y2), color=(0, 255, 0), thickness=width//200)

    if display:

        cv2.putText(output_image, text='Time taken: '+str(round(end - start, 2))+' Seconds.', org=(10, 65),
                    fontFace=cv2.FONT_HERSHEY_COMPLEX, fontScale=width//700, color=(0,0,255), thickness=width//500)

        plt.figure(figsize=[15,15])
        plt.subplot(121);plt.imshow(image[:,:,::-1]);plt.title("Original Image");plt.axis('off');
        plt.subplot(122);plt.imshow(output_image[:,:,::-1]);plt.title("Output");plt.axis('off');

    else:

        return output_image, results
Code Breakdown
- At the very first step, we will be getting the height and width of the image using the shape function.
- Creating a copy of the image so that we could perform all the tasks on the copy image rather than on the original image.
- Then we have converted our sample image from BGR to RGB format.
- As in this article, we are calculating the time taken for detection by the algorithm so for that, we accessed the current time.
- Now we will be using the hog_face_detector to perform the face detection.
- Along with the start time, we will also retrieve the end time.
- Now we will loop through the bounding boxes and retrieve the (X1, Y1) and (X2, Y2) coordinates of the bounding box then based on these coordinates we will draw the bounding boxes.
- Here comes a slight validation part where we will check whether we will display the input and resultant image or not.
- If yes, we will give the exact time that our algorithm took to perform the face detection and then display both the images.
- Else, we will simply give the results and the output image.
As we have created our face detection function i.e hogDetectFaces so let’s utilize it now to detect the faces using the HOG algorithm.
Reading the Sample Image for Frontal Face Detection
image = cv2.imread('media/1.jpg')
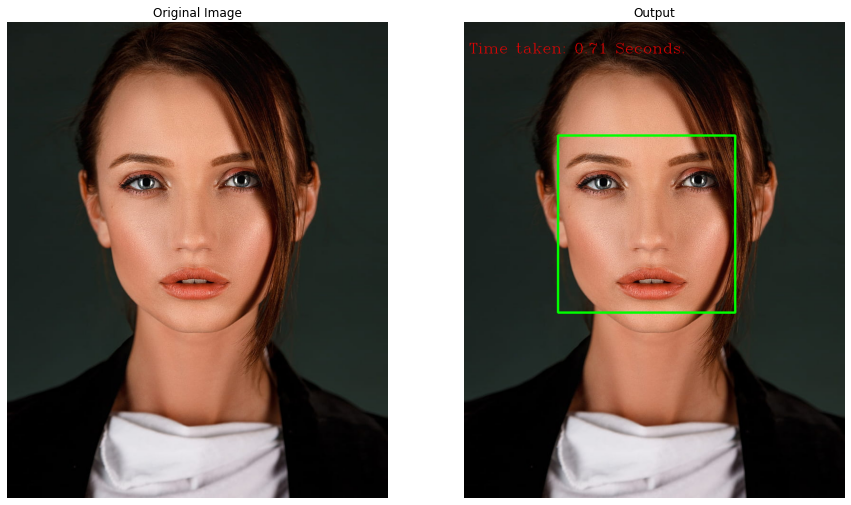
hogDetectFaces(image, hog_face_detector, display=True)
Output:

Image Source: Peakpx
In the above image, you can see that our model has perfectly detected the face in 0.71 seconds which shows that along with being accurate it is faster as well.
Reading Images to Detect Multiple Faces
image = cv2.imread('media/2.jpg')
hogDetectFaces(image, hog_face_detector, display=True)
Output:

Image Source: Wallpaperfare
In the above output, we can see that our model has predicted and drawn the bounding boxes on the image accurately and efficiently.
Reading Tilted Face Sample Image
image = cv2.imread('media/3.png')
hogDetectFaces(image, hog_face_detector, display=True)
Output:

Image Source: prorehabchiro
So from the above output, we can conclude that the HOG face detection model not only detects the frontal face but tilted face as well with ease and efficiency, and that too pretty fast.
<h2 id=”Reading-image-which-have-face-sizeReading Images that have Face size<80×80
image = cv2.imread('media/4.jpg')
hogDetectFaces(image, hog_face_detector, display=True)
Output:

Image Source: Dreamstime
As in the introduction part of the HOG face detector, it will not be able to detect faces that are smaller than 80×80 size. But if we still want to detect those faces then we have to upscale the image using the upsample argument of the HOG face detector which is there in hogDetectFaces() though the computing time will also increase after this process.
Conclusion
So we have finally tested our function which was built over the DLIB face detector and also saw the limitations and advantages of the same now let’s have a look at what we have covered by far.
- The very first takeaway from this article is that we have learned altogether different algorithms/methods to do face detection i.e. HOG face detection.
- Then we have also tested our model with a variety of images and draw insight from it regarding how well it performed.
- Along with the accuracy of detection, we also learned how to keep a track of the fast processing of detection.
Want to learn how to build a face detection system? Head on to our blog!
The media shown in this article is not owned by Analytics Vidhya and is used at the Author’s discretion.

