This article was published as a part of the Data Science Blogathon.
Introduction
Data acclimates to countless shapes and sizes to complete its journey from a source to a destination. Be it a streaming job or a batch job, ETL and ELT are irreplaceable.
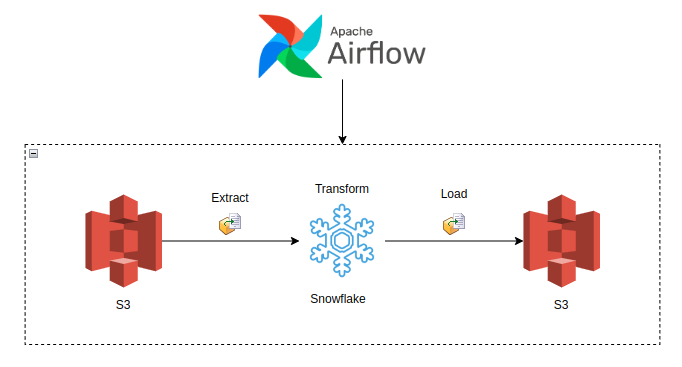
Before designing an ETL job, choosing optimal, performant, and cost-efficient tools is imminent. Keeping that in mind, we have chosen AWS S3 as our storage layer, Snowflake as our Cloud Data warehouse, and Apache airflow as our data pipeline orchestration tool.

This post illustrates a straightforward way to develop an ETL job locally, but the methodology and the steps can be applied to complex data pipeline.
Prerequisites
- AWS Account with IAM role access
- Snowflake Trail/Business account
- Airflow local setup/AWS MWAA
Step 1: Data Exploration
For tackling a problem/use case, understanding what we are dealing with before blindly implementing it can take us a long way with efficient results.
Our data is a simple e-commerce sales sample in a JSON file.
{
 "id": "0001",
 "type": "Purchase",
 "name": "Blazer",
 "timestamp": "1657713510",
 "image":
  {
   "url": "images/0001.jpg",
   "width": 200,
   "height": 200
  },
 "thumbnail":
  {
   "url": "images/thumbnails/0001.jpg",
   "width": 32,
   "height": 32
  }
}
The JSON contains purchase-related information at the top level and has all the display-related data about images and thumbnails in the nested layer.
We will flatten the JSON, write it to a snowflake table and perform feature engineering to transform and extract some meaningful facts.
The flattened data is fed into the columns after appending the name of the nested columns.
| ID |
| TYPE |
| NAME |
| TIMESTAMP |
| IMAGE_URL |
| IMAGE_WIDTH |
| IMAGE_HEIGHT |
| THUMBNAIL_URL |
| THUMBNAIL_WIDTH |
| THUMBNAIL_HEIGHT |
Step 2: AWS Setup
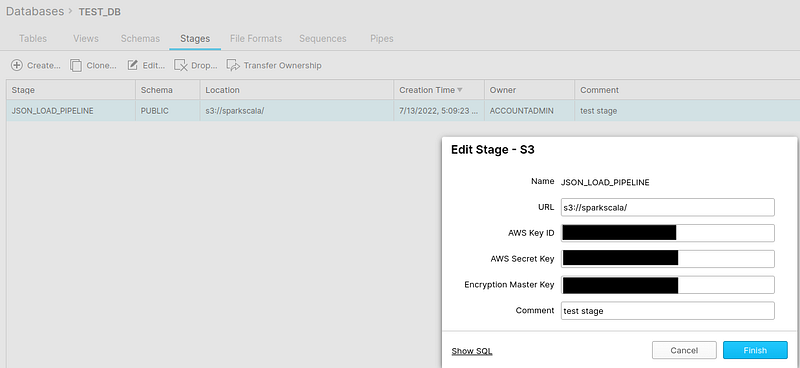
Accessing S3 data from Snowflake can be accomplished by creating stages. The required field to create a Snowflake stage are the AWS access key and token.
Follow the below brief steps to create the role, detailed explanation of creating IAM roles and other configurations is out of the scope of this post. Please check AWS docs for more information.
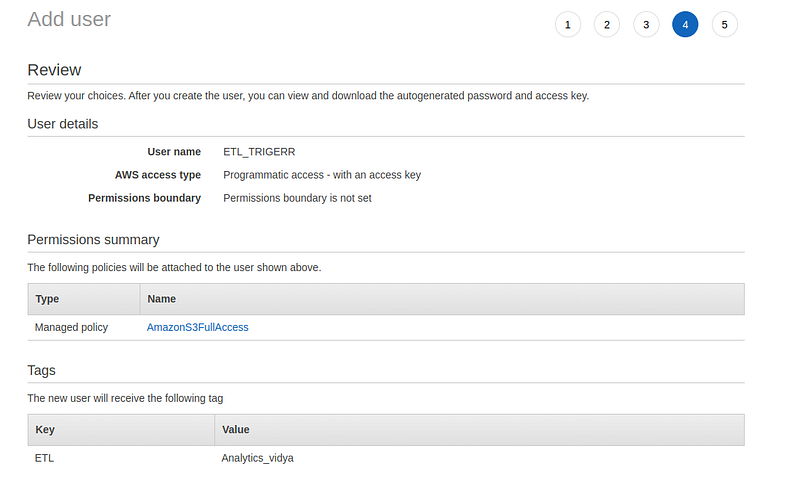
Go to IAM -> user -> Create user -> follow the self-explanatory steps and generate the key and token as per the below snapshot.
Make sure to add the S3FullAccess policy and set the access type to programmatic access with an access key.

The next step would be to create two S3 buckets, one acting as the source to place our JSON and one for writing the transformed data back.
Step 3: Snowflake Setup
Snowflake’s cloud data warehouse offers flexible and optimal features to handle data. The platform has gained a tremendous reputation and support for its out-of-the-box functionalities.
Our ETL job needs a database, schema, and table to store the information.
Let’s get at it and create the database and schema,
create database TEST_DB;
create schema public;
The next step would be to create our table to load/copy the data from S3. Accomplishing this task needs some configurations, as discussed in step 2, and creating a stage to connect to S3 and query our files.
create stage TEST_DB.public.JSON_LOAD_PIPELINE
                          url='s3://sparkscala/'
                          credentials=(aws_key_id='********' aws_secret_key='********')
                          encryption=(type='****' kms_key_id = 'aws/********');
Note: above queries can be executed in one go without trial and error through Snowflake’s console. Explore a little in the classic console and documentation to find your way through.
Quick peek below to display how we can create our stage easily from the classic console.

Step 4: Table creation
The best practice in any data pipeline is to preserve the source data as it is, in a table or location, and apply transformations from the preserved table to extract insights.
Our next step will be creating two snowflake tables to load and transform data.
Snowflake presents a very efficient data type (VARIANT) to handle any data. As our JSON is semi-structured, we need to leverage this data type to load our data.
Table 1
CREATE OR REPLACE TABLE etl_view(v VARIANT);
Data load into table 1.
Snowflake has a COPY INTO operation to load the data directly from cloud object storage through STAGES.
COPY into etl_view FROM @JSON_LOAD_PIPELINE/ETL.json ON_ERROR=’CONTINUE’
                        file_format = (type = ‘JSON’);
COPY INTO execution will load the data into the table, as shown below.

Table 2
Common thinking would make us create a table first and load the data during transformation. But an efficient way would be to use CREATE OR REPLACE TABLE AS (CRAS) approach.
We can fetch data of JSON by parsing over the keys using the VARIANT column name.
SELECT v:id from etl_view;

Before creating our second table, we will perform feature engineering.
The timestamp format is Unix time. Let’s convert it into date time using snowflake’s to_timestamp method.
to_timestamp(v:timestamp) as timestamp
We have the image and thumbnail URL. We can extract the name of the files and save them in a new column.
substr(v:image:url, 8, 15) as image_name
substr(v:thumbnail:url, 19, 26) as thumbnail_name
Putting it all together in CRAS,
CREATE OR REPLACE TABLE ETL_TEST AS SELECT v:id::STRING as id, v:type::STRING as type,
                                           v:name::STRING as name, to_timestamp(v:timestamp) as timestamp,
                                           v:image:url::STRING as image_url , substr(v:image:url, 8, 15) as image_name,
                                           v:image:width as image_width, v:image:height as image_height,
                                           v:thumbnail:url::STRING as thumbnail_url, substr(v:thumbnail:url, 19, 26) as thumbnail_name,
                                           v:thumbnail:width as thumbnail_width, v:thumbnail:height as thumbnail_height from etl_view;
CRAS will create, transform and load the data as below,

Writing to S3
COPY INTO method and S3 STAGE we created for data loading can act as a data writer to load the data back to our S3.
COPY into @JSON_LOAD_PIPELINE/snowflakewrite/JSON_TRANSFORMED from ETL_TEST file_format = (type = ‘parquet’, compression=’NONE’);
Here, we are writing the data into a new folder of our S3 bucket and skipping the Parquet’s snappy compression.

Our write query successfully loaded the transformed data into S3 as a parquet file.

Step 5: Stored Procedure Creation
Data pipelines have to execute SQL queries to fulfill business requirements. Stored procedures present an efficient way to wrap the queries for sequential execution.
We will develop our Stored procedure in JAVASCRIPT for better performance and functions.
CREATE OR REPLACE PROCEDURE ETL_TRIGGER()
 RETURNS STRING
 LANGUAGE JAVASCRIPT
 AS
 $$
 var create_load_table = “create or replace table etl_view(v variant);”;
 var create_load_table_stmt = snowflake.createStatement( {sqlText: create_load_table} ).execute();
 var extract_data = “copy into etl_view from @JSON_LOAD_PIPELINE/ETL.json ON_ERROR=’CONTINUE’ file_format = (type = ‘JSON’);”;
 var extract_data_stmt = snowflake.createStatement( {sqlText: extract_data} ).execute();
 var transform_data = “create or replace table ETL_TEST as select v:id::string as id, v:type as type, v:name as name, to_timestamp(v:timestamp) as timestamp, v:image:url as image_url , substr(v:image:url, 8, 15) as image_name, v:image:width as image_width, v:image:height as image_height, v:thumbnail:url as thumbnail_url, substr(v:thumbnail:url, 19, 26) as thumbnail_name, v:thumbnail:width as thumbnail_width, v:thumbnail:height as thumbnail_height from etl_view;”;
 var transform_data_stmt = snowflake.createStatement( {sqlText: transform_data} ).execute();
 var load_data = “copy into @JSON_LOAD_PIPELINE/snowflakewrite/JSON_TRANSFORMED from ETL_TEST file_format = (type = ‘parquet’, compression=’NONE’);”;
 var load_data_stmt = snowflake.createStatement( {sqlText: load_data} ).execute();
 $$;
We can trigger our stored procedure from any supported environment.
CALL ETL_TRIGGER();
With our stored procedure in place, it’s time to develop our Airflow DAG to trigger the stored procedure.
Step 6: Airflow DAG Creation
As we have already set up the Airflow standalone on our machine, we need to install the following packages.
pip3 install snowflake-connector-python
pip3 install snowflake-sqlalchemy
pip3 install apache-airflow-providers-snowflake
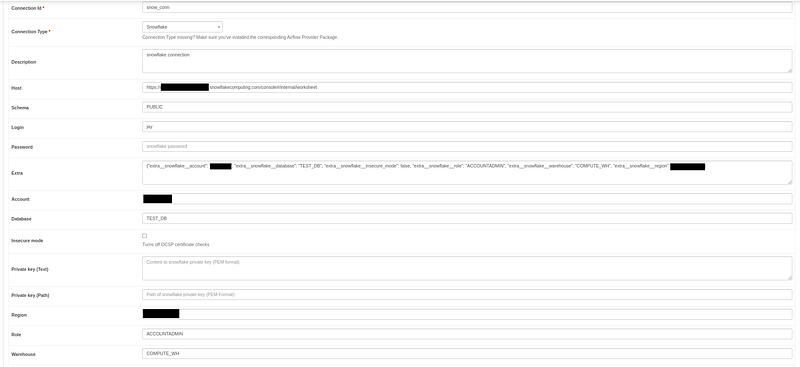
Before we create our DAG and push it to the Airflow server, set up the Snowflake connection and Email SMTP details as shown below.

To simplify the process, I have only used two operators for triggering the stored procedure and emailing the success notification.
import logging
from datetime import datetime, timedelta
import airflow
from airflow import DAG
from airflow.operators.email_operator import EmailOperator
from airflow.contrib.operators.snowflake_operator import SnowflakeOperator

logging.basicConfig(level=logging.INFO)
logger = logging.getLogger(__name__)
default_args = {
    'owner': 'Jay',
    'email': '[email protected]',
    'depends_on_past': False,
    'email_on_failure': False,
    'email_on_retry': False,
    'retries': 0,
    'retry_delay': timedelta(minutes=5)
}

procedure_call = "call ETL_TRIGGER();"

success_email_body = f"""
Hey you,

Our Job has completed successfully at {datetime.now()}.
"""

with DAG('call_snowflake_sprocs',
         start_date=datetime(2022, 7, 14),
         max_active_runs=2,
         schedule_interval='@daily',
         default_args=default_args,
         catchup=False
         ) as dag:

            call_proc = SnowflakeOperator(
                task_id="snowfalke_task",
                sql=procedure_call,
                snowflake_conn_id="snow_conn",
            )
            send_mail = EmailOperator(
                task_id="send_mail",
                to=email,
                subject='ETL Success: Data Loaded',
                html_content=success_email_body
            )

call_proc >> send_mail
After chaining the tasks and uploading them to the Airflow server, the sweet green color indicates that our DAG has been successfully triggered and sent a success email.

Conclusion
ETL is the pillar of building a Data pipeline. Understanding how to integrate multiple tools to optimally extract value with cost-effective approaches is one of the key responsibilities of a data engineer.
Key Takeaway:
- AWS S3 is an efficient and popular cloud object storage at an inexpensive price. Leveraging cloud storage can cut down costs with increased security and scaling benefits.
- Snowflake is the go-to cloud data warehouse and is the only provider in the market presenting useful and state-of-the-art features at exceptionally reasonable prices.
- Airflow is the most sophisticated tool that has become a benchmark for orchestrating data pipelines with the advantage of python and its libraries.
- Integrating AWS, Snowflake, and Apache Airflow presents a mature umbrella to design and deliver complex data pipeline with ease.
The media shown in this article is not owned by Analytics Vidhya and is used at the Author’s discretion.


