This article was published as a part of the Data Science Blogathon.
Introduction
Imagine you build a complex smart contract and want to test a specific part of the functionality. So you head to the Remix IDE and find you can’t do it as it’s not supported.
Don’t worry; blockchain and Web3.0 developers always run into these issues. That’s why they use something called Local Development Environment.
Out in the wild, there are many Ethereum development environments. Still, Hardhat & Truffle stands out due to their box advantages for developers.
In this article, we will learn about Hardhat, an Ethereum development that allows editing, compiling, debugging, and deploying your smart contracts and dApps. Here are a few learning outcomes you can expect from this read:
Learning Objectives
Though there are many more, we will focus specifically on these aspects:
Theory
- Understand what hardhat is?
- Components that make up hardhat.
- What benefits does it provide to developers?
Practical
- Initialize a new hardhat project.
- How to perform unit tests using Hardhat.
- How to deploy smart contracts to Hardhat Network & Testnets.
Note📑
Before heading ahead, make sure you have some knowledge about solidity and Javascript (intermediate) as we will extensively use them in practical part!
Although theory & practical part are written separately, we will use them in mix format : Theory + Practical to build up our knowledge base!

Source: https://hardhat.org/
What Is Hardhat?
As mentioned earlier, Hard-Hat is an Ethereum development environment for local usage. It comes pre-loaded with an Ethereum network designed for development (Hardhat Network) and 20 default accounts, allowing easy deployment and debugging along with a task-runner.
Apart from these, it also helps in project editing, compilation, and overall development. But how does it achieve so much?
The answer lies in the components that make up hardhat!
Hardhat Components
Hardhat consist of 3 major components:
1. Hardhat Runner
The tasks runner or the main interface for interaction with the environment. It is very flexible and extensible, which helps in the management & automation of recurring tasks.
2. Tasks
Ya, you can think of it as an extension of Hardhat Runner!
Every time one runs a command or program in hardhat, It is called a task. The most basic example can be a: simple command to initialize a project.
Apart from these, tasks can call other tasks, allowing for defining complex workflows. However, Users & Plugins can override these tasks, forming more customizable and extendable workflows.
3. Plugins
If you think of runner & task as brain, think of plugins as the heart of the environment!
Plugins are reusable pieces of code that can be included in the project to add extra features to the main environment. In general, they are called libraries and contain specific functionalities.
Also, 2 types of libraries can be utilized, official ones (ethers, chai-matches) and community-created ones (hardhat-deploy-ethers).
Anyways, you need to know to set up your First Project in a hardhat.
Create a new Hardhat Project
Note📑
Please ensure to have Node.js installed for contuning this section
Instead of creating simple, we are kind of organizing things here. This is a good practice as a developer, and we are not breaking that here.
So head over to the terminal and create a new directory using:
mkdir learn-hardhat
Next, navigate to the guide using:
cd learn-hardhat
Now we are good to initialize our project. Let’s do this by initializing a node js project :
npm init --yes
Once successful, a package.json file containing the project’s metadata will be created and used to manage dependencies, versions, scripts, etc.

package.json file
Now let’s install hardhat using npm:
npm install --save-dev hardhat
Output:
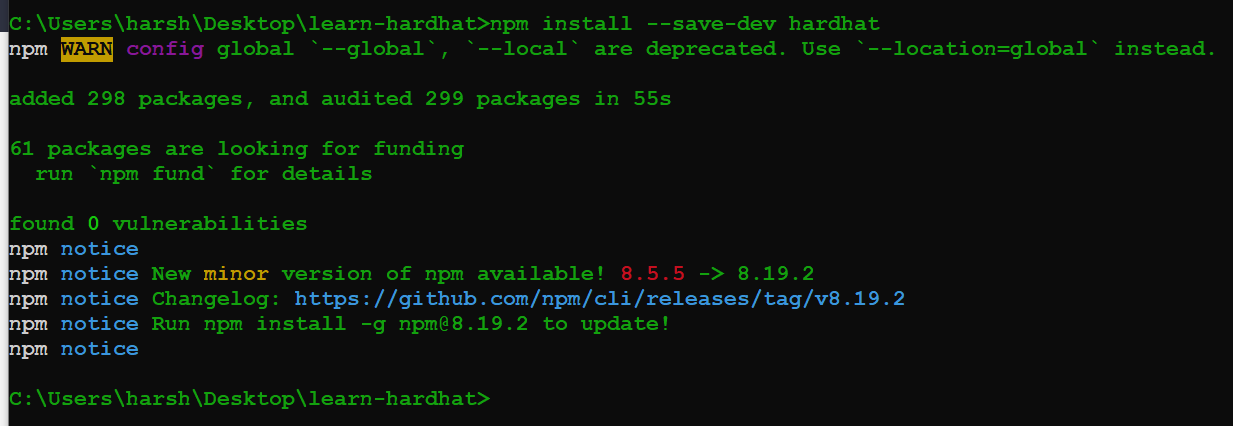
Installation
To verify, open package.json, and under devDependency, you can find hardhat installed as:

check
Once this is done, let’s fulfill the main purpose of the section!
To create a project, just type in:
npx hardhat
When prompted, select: Create an empty hardhat.config.js and done!
Output:
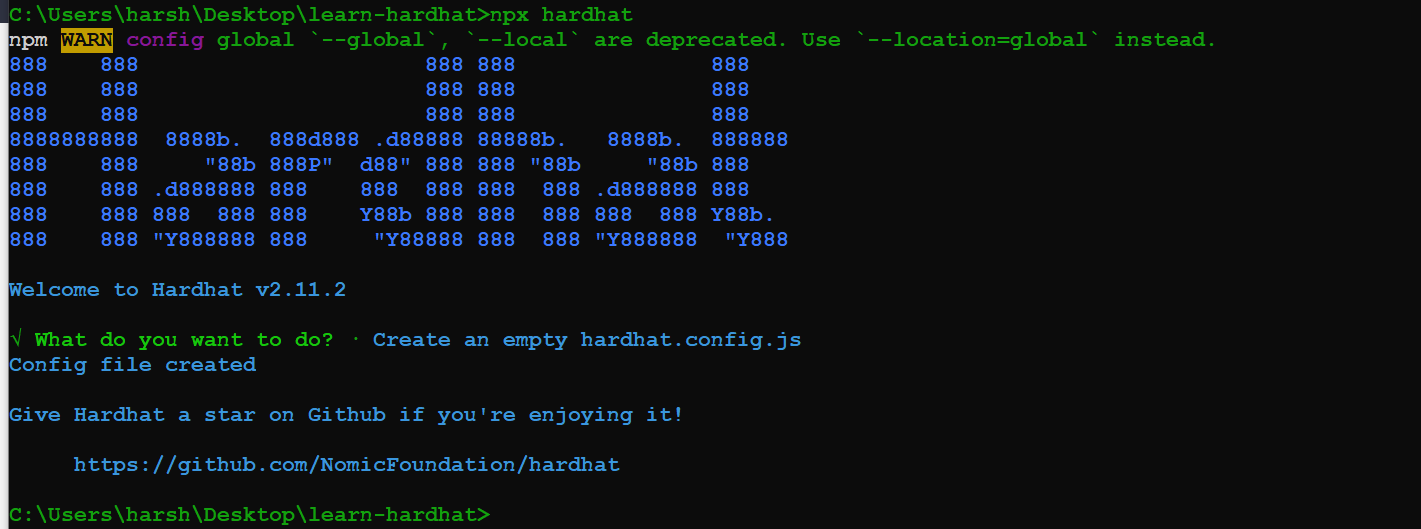
init-project
To confirm, visit the directory, and you will see a hardhat.config.js file. This file contains the entire setup of the development environment.
So by the end, you should have a structure something like this:

Dir- Structure
So congrats, you have done your 1st hardhat project, but now what?
Well, you can work on your project, but let us look at certain cool features of the environment lacking online IDE in the next section.
Hardhat Benefits for Developers
In general, hardhat provides developers a lot of benefits, but the 2 most commonly used are :
- Unit Testing
- Deployment.
So we will be focusing on the same!
Unit Testing Intro
Unit testing is not a new concept. It is an old software development method in which we perform individual tests on the smallest portion of code (units) to check for any bugs.
It is essential as it helps detect flaws early in the development process. As the size of a project becomes big, it becomes too hard to do the same thing.
In hardhat, each unit is tested in an isolated environment to ensure the lack of dependencies in code. This is done by creating multiple tests in a test.js file (Yes, Javascript!)
So we are going to follow the same convention here.
Unit Testing Using Hardhat
Since we are developing locally, we need to set up a few things before we run unit tests. They are in particular order:
- Folders
- Plugins for tests
- Smart contract + Compile
- Test.js
Folders
For organizing, we will keep things separate in the folder again. Make 2 directory: Contracts & Tests:
mkdir contracts
mkdir test
Inside folders ⬇
contracts make a file named – Token.sol
test make a file named – Token.js
For all this I will suggest VS Code with Solidity plugin installed
Plugins
Before writing tests, we need to install 2 plugins to ease our testing process:
- Ethers – Facilitates interaction with Ethereum blockchain
- Chai – Testing library for JavaScript.
You can install it using this one-liner:
npm install --save-dev @nomiclabs/hardhat-ethers ethers
npm install --save-dev @nomicfoundation/hardhat-chai-matchers
Output:

Chai & ethers Install
That’s not all; we even need to configure hardhat.config.js to include these plugins:
At the very top, import all the plugins as:
/** @type import('hardhat/config').HardhatUserConfig */
require("@nomicfoundation/hardhat-chai-matchers");
require("@nomiclabs/hardhat-ethers");
module.exports = {
 solidity: "0.8.9",
};
And that’s it; you are good to set up smart contracts.
Smart Contract – Token.sol
Inside Token. sol paste the following lines:
// SPDX-License-Identifier: MIT

pragma solidity ^0.8.0;


contract Token {

string public name = "My SU Token";

string public symbol = "SU";


uint256 public totalSupply = 100000;

address public owner;


mapping(address => uint256) balances;


constructor() {

balances[msg.sender] = totalSupply;

owner = msg.sender;

}


function transfer(address to, uint256 amount) external {

require(balances[msg.sender] >= amount, "not enough tokens");

balances[msg.sender] -= amount;

balances[to] += amount;

}


function balanceOf(address account) external view returns (uint256) {

return balances[account];

}

}
Though it looks complex, all it does is the following:
1. Token.sol implements a token that can be transferred
2. There is a total fixed supply of tokens that can’t be changed – total supply
3. The entire supply is assigned to the address that deploys the contract- owner & constructor()
4. Anyone can receive tokens, and the balances are recorded – balances
5. Anyone with at least one token can transfer tokens – transfer()
6. The balance of token holders can be retrieved – the balanceof()
Once done, head over to the terminal and hit:
npx hardhat compile
Output:

compile
This will compile the project and generate 2 new folders – artifacts and cache. It also generates an ABI code found at (artifacts/contracts/Token.sol/Token.json), an Ethereum way of interacting with contracts outside the blockchain or contract-contract interaction.
Now let’s setup our test script:
Test – Test.js
Before writing a test, let’s understand how we will write out a test.
- Each test segment is identified using describe() block
- Each test is defined with its () block
- Each test is coupled with the beforeEach() block to deploy the smart contract before every test.
- Each test has async() and await. Which listens to even and then performs the desired event.
So enough talk, let’s add our code:
// Store expect and ethers objects in variables.
const { expect } = require('chai');
const { ethers } = require('hardhat');
// Intialize variables to be used later
let tokenFactory, token, owner, addr1, addr2;
//fn to deploy smart contract before each test - before_each()
beforeEach(async () => {
  tokenFactory = await ethers.getContractFactory("Token"); // ContractFactory -  as abstraction of token, to create multiple instances using TokenFactory
  token = await tokenFactory.deploy(); //deploy contract
  [owner, addr1, addr2, _] = await ethers.getSigners(); //Signer - ethereum account to be used
});
// writing tests using deploy & it() blocks

describe("Deployment", () => {

it("Should set the right owner", async () => {

expect(await token.owner()).to.equal(owner.address);

});

it("Should assign the total supply of tokens to the owner", async () => {

const ownerBal = await token.balanceOf(owner.address);

expect(await token.totalSupply()).to.equal(ownerBal);

});
Combining all we get:
const { expect } = require("chai");

const { ethers } = require("hardhat");
describe("Token contract", () => {

let tokenFactory, token, owner, addr1, addr2;
beforeEach(async () => {

tokenFactory = await ethers.getContractFactory("Token");

token = await tokenFactory.deploy();

[owner, addr1, addr2, _] = await ethers.getSigners();

});
// writing tests using deploy & it() blocks

describe("Deployment", () => {

it("Should set the right owner", async () => {

expect(await token.owner()).to.equal(owner.address);

});

it("Should assign the total supply of tokens to the owner", async () => {

const ownerBal = await token.balanceOf(owner.address);

expect(await token.totalSupply()).to.equal(ownerBal);

});

});

})
Code✔
Now that we have our test script ready, let’s perform the unit tests. This is done by running a hardhat task – test as:
npx hardhat test
Output:
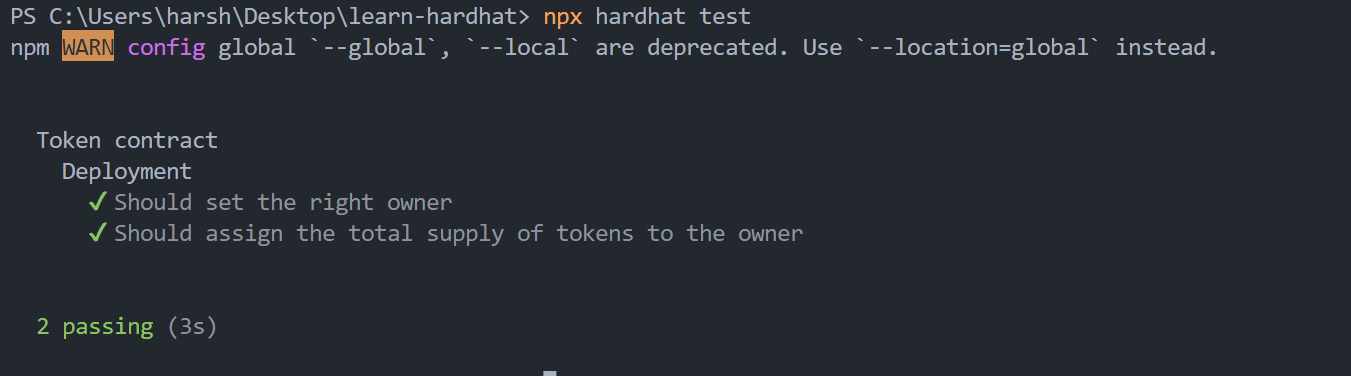
unit_test 1
Let’s add a couple of more test which represents a more general case scenario:
Transfer Functionality Test:
- Basic,
- Specific Caller,
- Negative Tests
Basic
A general scenario where a test passes if an owner passes a certain amount(50) to another user(add1.address):
describe('Transactions', () => {
    it('Should transfer between accounts', async() => {
      await token.transfer(addr1.address, 50);
      const initialAddr1Bal = await token.balanceOf(addr1.address);
      expect(initialAddr1Bal).to.equal(50);
    })
  })
Note: This should be just below the last described block with brackets replaced.
Specific Caller
A scenario where the user passes a token from one account(addr1) to another (addr2). Since it is related to a transaction, we will include it in the above block.
describe("Transactions", () => {

it("Should transfer between accounts", async () => {

await token.transfer(addr1.address, 50);

const initialAddr1Bal = await token.balanceOf(addr1.address);

expect(initialAddr1Bal).to.equal(50);
//new additions

await token.connect(addr1).transfer(addr2.address, 20);

const addr2Bal = await token.balanceOf(addr2.address);

expect(addr2Bal).to.equal(20);
const finalAddr1Bal = await token.balanceOf(addr1.address);

expect(finalAddr1Bal).to.equal(initialAddr1Bal - 20);

});

});

});
Note: This should be just below the last described block with brackets replaced.
Negative Tests
Negative tests are also essential for validating that it throws errors as expected.
For, e.g., no transfer of the amount if the account balance is 0. In general, this should return an error. Wrapping with the test, this should return pass too!.
it("Should fail if sender doesnt have enough tokens", async () => {

const initialOwnerBal = await token.balanceOf(owner.address);
await expect(

token.connect(addr1).transfer(addr2.address, 10)

).to.be.revertedWith("not enough tokens");

expect(await token.balanceOf(owner.address)).to.equal(initialOwnerBal);

});
Let’s now perform the same drill again:
npx hardhat test
Output:
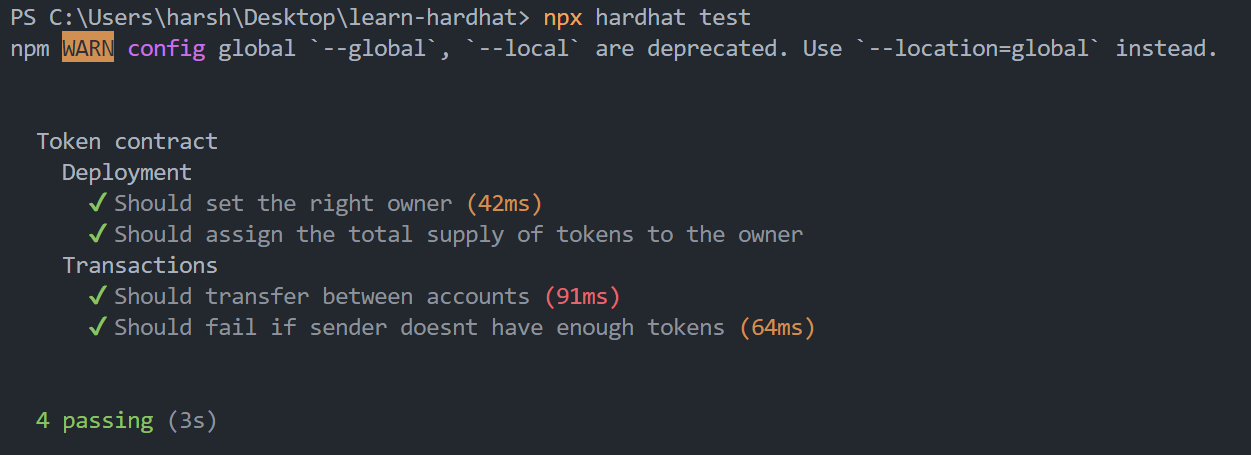
test_2
All tests passed, voila, you did it🤩.
Now let’s look at another aspect of development – Deployment!
Debugging – Intro & Practical
Debugging refers to finding bugs and removing them via printing logs in general. Failing to do so can lead to unwanted errors, ultimately leading the program to crash.
Debugging in solidity Is quite challenging In itself as there is no convenient method to print log messages. Fret not; the hardhat allows wrapping the logs in console.log, making it work like js.
Here is a quick Demo:
Change the solidity as below
pragma solidity ^0.8.0;

import "hardhat/console.sol";


contract Token {

string public name = "My SU Token";

string public symbol = "SU";


uint256 public totalSupply = 100000;

address public owner;


mapping(address => uint256) balances;


constructor() {

balances[msg.sender] = totalSupply;

console.log("Owner: %s", msg.sender);

owner = msg.sender;

}


function transfer(address to, uint256 amount) external {

console.log(

"Trying to send %s tokens from %s to %s",

amount,

msg.sender,

to

);

console.log("Initial sender balance: %s tokens", balances[msg.sender]);


require(balances[msg.sender] >= amount, "not enough tokens");

balances[msg.sender] -= amount;

balances[to] += amount;


console.log("Final sender balance: %s tokens", balances[msg.sender]);

}


function balanceOf(address account) external view returns (uint256) {

return balances[account];

}

}
Note we now included console.log(“info”) to print values in each step.
Let’s now debug it.
npx hardhat test
Output:
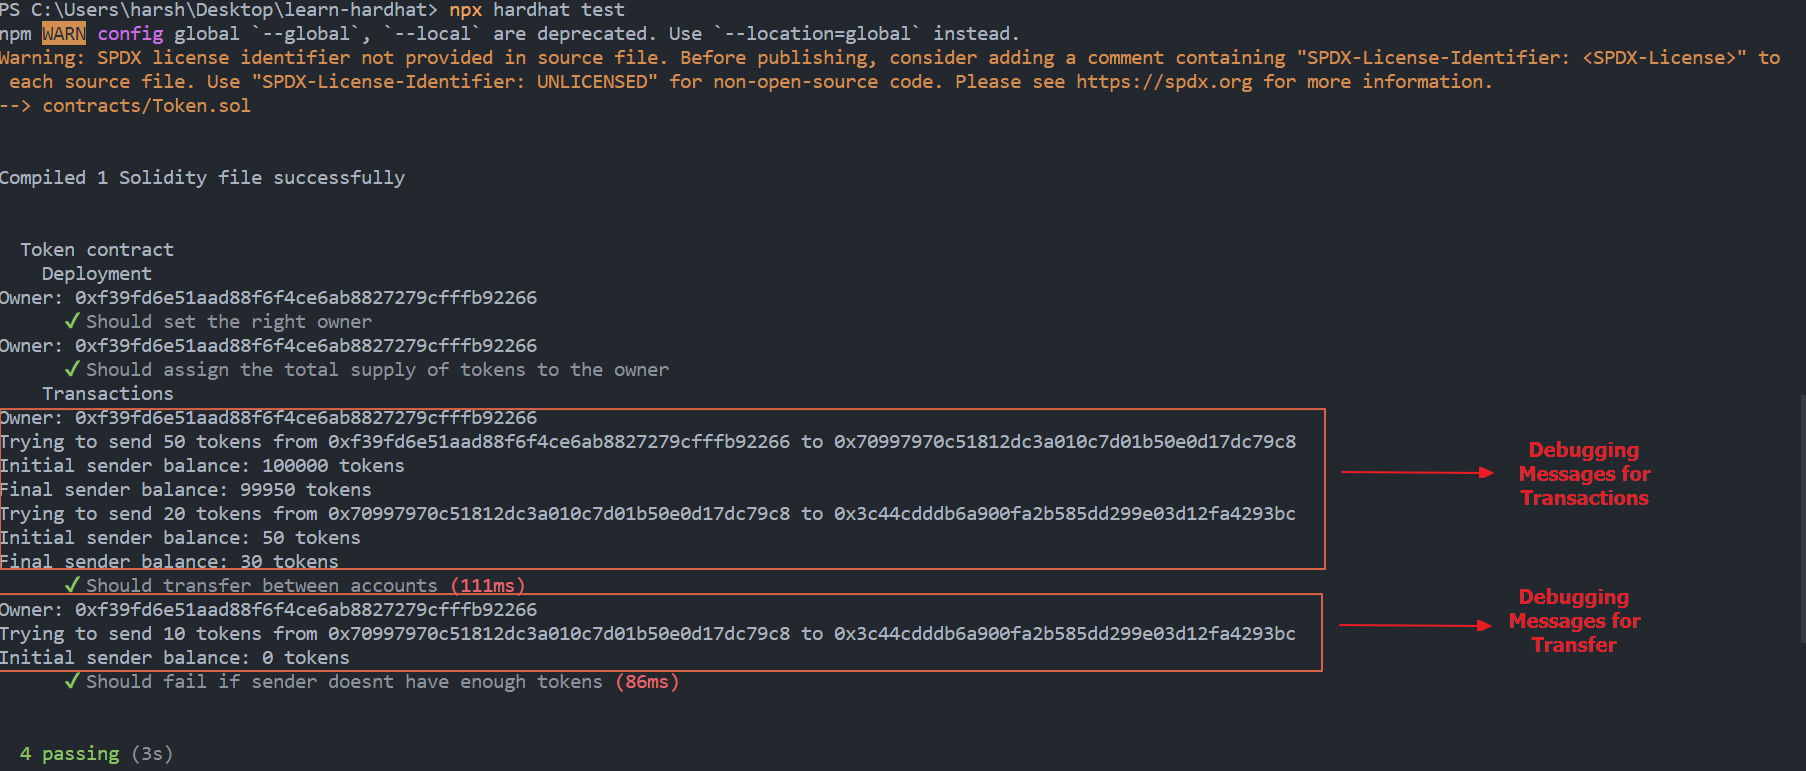
debug-output
So you printed all the messages and debugged them to be ready for deployment. Moving on to the deployment section.
Highly suggested to revert back to original solidity code once debugging is done!
Deployment – Introduction
So finally, we have come to the most interesting and important part of this article/guide, The deployment.
In general, deployment is a software development term that refers to hosting your files for internet / public visibility and interaction.
In the context of blockchain and its products, deployment happens via the blockchain nodes. It is referenced through the contract addresses of that node/contract.
In the case of Hardhat, one can deploy a product/smart contract in 2 ways.
- Deployment on Hardhat Network
- Deployment on Ethereum Network – Main & Tests.
Ya, I know you are pretty hungry for practicals. Let’s move on to that next.
Deployment using Hardhat
Here are the steps one needs to perform to deploy on a hardhat.
Basic – Hardhat network
- Create a deploy script – scripts/deploy.js
- Deploy!
Advanced – Ethereum Networks
- Spin up a local node / Use 3rd party API
- Modify network settings.
- Get Test Ether
- Deploy!
Again we will be looking at both aspects of deployment.
Hardhat Network
1. Deploy Script – deploy.js
Create a new folder called scripts. You can use the command line too!
mkdir scripts
Inside this folder, create a java-script file – deploy.js. This file will hold all the logic for deployment.
Fill in the file with the code below – think of it as a boilerplate:
const { ethers } = require("hardhat");


async function main() {

const [deployer] = await ethers.getSigners();

console.log(`Deploying contracts with the account: ${deployer.address}`);


const balance = await deployer.getBalance();

console.log(`Account balance: ${balance.toString()}`);


const Token = await ethers.getContractFactory("Token");

const token = await Token.deploy();

console.log(`Token address: ${token.address}`);

}


main()

.then(() => process.exit())

.catch((error) => {

console.error(error);

process.exit(1);

});
By now, I hope you are pretty much able to understand the code by yourself. If you still have issues understanding a certain part of code, you can dm me on Twitter or LinkedIn.
2. Deploy
Now let’s deploy the code using Harhdhat Networks, consisting of 20 accounts, each with 10K tests.
To deploy, in terminal hit.
npx hardhat run scripts/deploy.js
Output:

Deployment on hardhat network
Note that the contract deployment address is represented using the Token address & not the owner. Rest are self-explanatory.
Ethereum Networks
Deploying on the rebuild network is good, but generally, we don’t use them. We either use eminent, or testnets specifically built for development purposes.
Let’s now look at how to perform the same using hardhat.
1. Setup Local node or 3rd part API.
Spinning up a local blockchain node requires very powerful hardware, space, and communicational unit and puts a lot of processing burden. Hence we will be using 3rd part APIs like Alchemy, Infura, etc.
API are ways to interact with applications and perform the required computation on the fly. In this case, these providers do all the heavy lifting and provide tools to make our life easier.
Since we are using Infura, I highly suggest making an account there, creating an application(network – rinkeby), and getting the test net API key. In case of an issue, refer to this medium article.
Note: You need to change the mainnet to testnet before copying the key!
Assuming you have got your key, let’s change the network settings!
2. Modify Network Settings
To modify network settings, let’s visit our old friend hardhat.config.js and change a few things:
Add a few constants: – API * PRIVATE-KEY
const INFURA_URL = 'API key'

const PRIVATE_KEY = 'Wallet Private Key'
Follow this doc if you are wondering how to get a private key.
Change the below line to:
module.exports = {

solidity: "0.8.9",

networks: {

rinkeby: {

url: INFURA_URL,

accounts: [`0x${PRIVATE_KEY}`],

},

},

};
As you can see, we are using the network as rinkeby, which will point to Infura using Infura API (INFURA_URL ) and will be authenticated with the wallet’s private key (PRIVATE_KEY ).
Once done, let’s now gather some test ETH.
Note: Using URL and Private key in same file as constant is not a good practice. Try to use .env file instead and then call those values using dotenv package
3. Get Test ETH
Head over to ETH-faucet, and paste your wallet address. Pass the captcha and press Send Me ETH.
A few seconds/ minutes later, you will receive 0.1 ETH in your wallet. If you are not seeing it, make sure you use the network as testnet.
Now that we have all things sorted, let’s deploy the contract.
4. Deploy
Onto our regular command – hit:
npx hardhat run scripts/deploy.js --network rinkeby
Output:

Deployed on rinkeby
Voila, you have just deployed your smart contract to z rinkeby test network.
Now, if you go and paste the Token address on Ethereum Block Explorer, you can see all the history for the same like below:
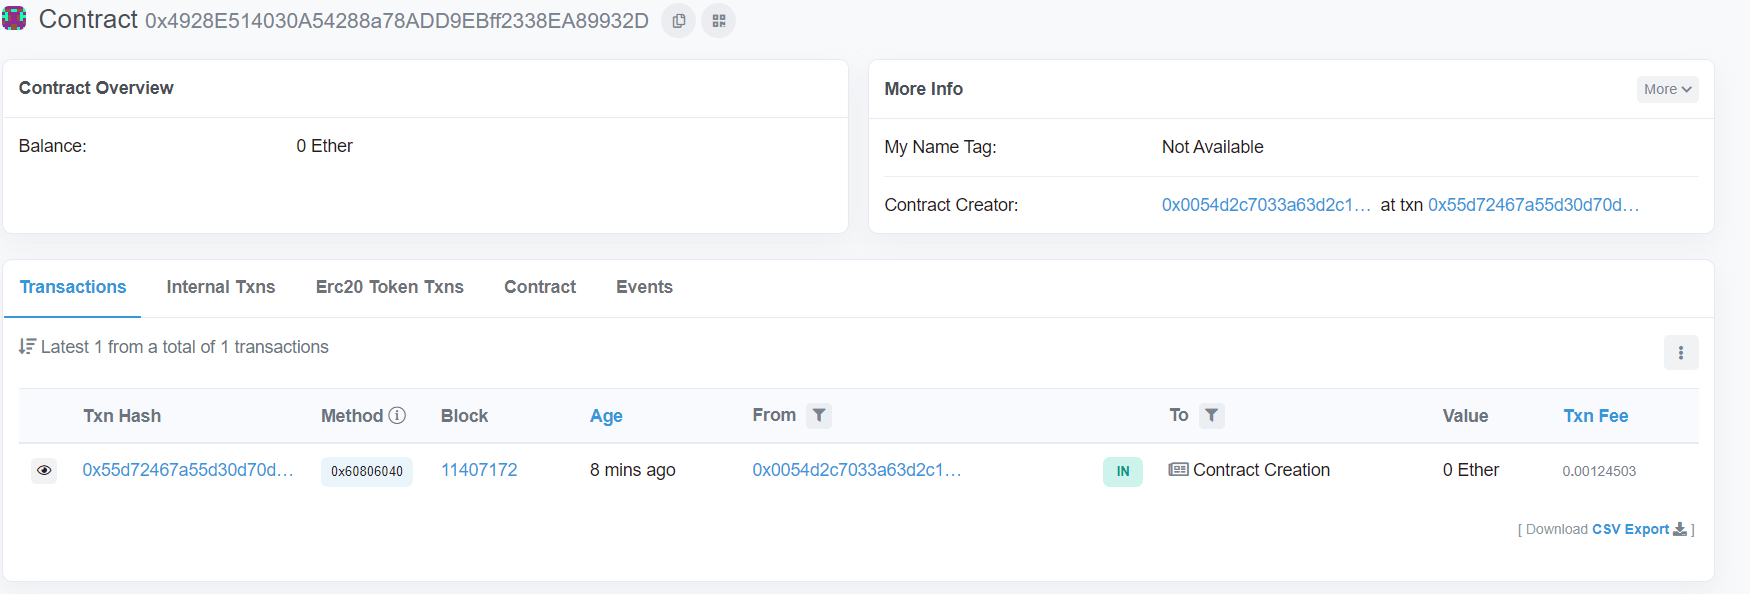
deploy proof
Conclusion
Here are a few key takeaways from this article:
- We learned how to use hardhat, why to use it, how it can benefit the developers, including you, and why it stands above all.
- Again we looked at some common practices to be used with hardhat, like unit testing, debugging, deployment, and how to perform the same in various situations.
- Also, we learned how to organize & modularise our code for an effective development process.
So what are you waiting for? Go out and build awesome products!
Thanks🙏
The media shown in this article is not owned by Analytics Vidhya and is used at the Author’s discretion.
A dynamic and enthusiastic individual with a proven track record of delivering high-quality content around Data Science, Machine Learning, Deep Learning, Web 3.0, and Programming in general.
Here are a few of my notable achievements👇
🏆 3X times Analytics Vidhya Blogathon Winner under guides category.
🏆 Stackathon by Winner Under Circle API Usage Category - My Detailed Guide
🏆 Google TensorFlow Developer ( for deep learning) and Contributor to Open Source
🏆 A Part Time Youtuber - Programing Related content coming every week!
Feel free to contact me if you wanna have a conversation on Data Science, AI Ethics & Web 3 / share some opportunities.


