Introduction
In the ever-evolving landscape of artificial intelligence, Generative AI has undeniably become a cornerstone of innovation. These advanced models, whether used for creating art, generating text, or enhancing medical imaging, are known for producing remarkably realistic and creative outputs. However, the power of Generative AI comes at a cost – model size and computational requirements. As Generative AI models grow in complexity and size, they demand more computational resources and storage space. This can be a significant hindrance, particularly when deploying these models on edge devices or resource-constrained environments. This is where Generative AI with Model Quantization steps in as a savior, offering a way to shrink these colossal models without sacrificing quality.
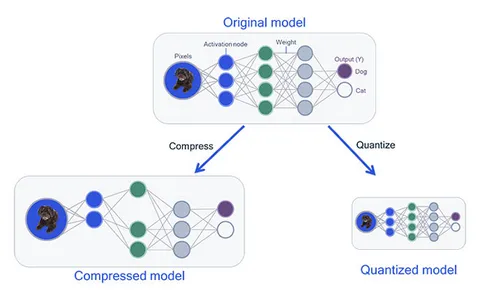
Learning Objectives
- Understand the concept of Model Quantization in the context of Generative AI.
- Explore the benefits and challenges associated with implementing model quantization.
- Learn about real-world applications of quantized Generative AI models in art generation, medical imaging, and text composition.
- Gain insights into code snippets for model quantization using TensorFlow Lite and PyTorch’s dynamic quantization.
This article was published as a part of the Data Science Blogathon.
Table of contents
- Understanding Model Quantization
- Benefits of Model Quantization in Generative AI
- Challenges of Model Quantization in Generative AI
- Applications of Quantized Generative AI
- Case Studies
- Code Optimization for Model Quantization
- Comparative Data: Quantized vs. Non-Quantized Models
- Best Practices for Model Quantization in Generative AI
- Frequently Asked Questions
Understanding Model Quantization
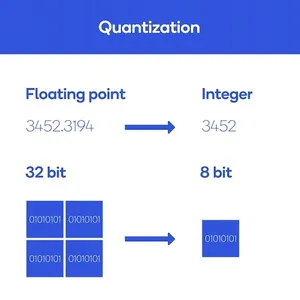
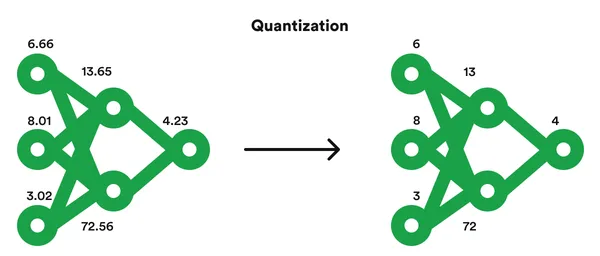
In simple terms, model quantization reduces the precision of numerical values in a model’s parameters. In deep learning models, neural networks often employ high-precision floating-point values (e.g., 32-bit or 64-bit) to represent weights and activations. Model quantization transforms these values into lower-precision representations (e.g., 8-bit integers) while retaining the model’s functionality.
Benefits of Model Quantization in Generative AI
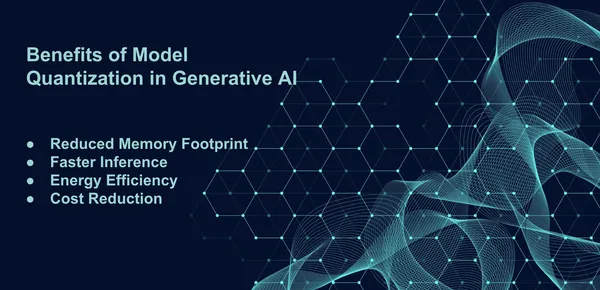
- Reduced Memory Footprint: The most apparent benefit of model quantization is the significant reduction in memory usage. Smaller model sizes make it feasible to deploy Generative AI on edge devices, mobile applications, and environments with limited memory capacity.
- Faster Inference: Quantized models run faster due to the reduced data size. This speed enhancement is crucial for real-time applications like video processing, natural language understanding, or autonomous vehicles.
- Energy Efficiency: Shrinking model sizes contributes to energy efficiency, making it practical to run Generative AI models on battery-powered devices or in environments where energy consumption is a concern.
- Cost Reduction: Smaller model footprints result in lower storage and bandwidth requirements, translating into cost savings for developers and end-users.
Challenges of Model Quantization in Generative AI
Despite its advantages, model quantization in Generative AI comes with its share of challenges:
- Quantization-Aware Training: Preparing models for quantization often requires retraining. Quantization-aware training aims to minimize the loss in model quality during the quantization process.
- Optimal Precision Selection: Selecting the right precision for quantization is crucial. Too low precision may lead to significant quality loss, while too high precision may not provide adequate reduction in model size.
- Fine-tuning and Calibration: After quantization, models may require fine-tuning and calibration to maintain their performance and ensure they operate effectively under the new precision constraints.
Applications of Quantized Generative AI
On-Device Art Generation: Shrinking Generative AI models through quantization allows artists to create on-device art generation tools, making them more accessible and portable for creative work.
Case Study: Picasso on Your Smartphone
Generative AI models can produce art that rivals the works of renowned artists. However, deploying these models on mobile devices has been challenging due to their resource demands. Model quantization allows artists to create mobile apps that generate art in real-time without compromising quality. Users can now enjoy Picasso-like artwork directly on their smartphones.
Code for preparing the reader’s system and generating an output image using a pre-trained model. Below is a Python script that will guide you through installing the necessary libraries and developing an output image using a pre-trained neural style transfer (NST) model.
- Step 1: Install the required libraries
- Step 2: Import the libraries
- Step 3: Load a pre-trained NST model
# We need TensorFlow, NumPy, and PIL for image processing
!pip install tensorflow numpy pillow
import tensorflow as tf
import numpy as np
from PIL import Image
import tensorflow_hub as hub # Import TensorFlow Hub# Step 1: Download the pre-trained model
# You can download the model from TensorFlow Hub.
# Make sure to use the latest link from Kaggle Models.
model_url = "https://tfhub.dev/google/magenta/arbitrary-image-stylization-v1-256/2"
# Step 2: Load the model
hub_model = tf.keras.Sequential([
hub.load(model_url)
])
# Step 3: Prepare your content and style images
# Make sure to replace 'content.jpg' and 'style.jpg' with your own image file paths
content_path = 'content.jpg'
style_path = 'style.jpg'
# Step 4: Define a function to load and preprocess images
def load_and_preprocess_image(path):
image = Image.open(path)
image = np.array(image)
image = tf.image.convert_image_dtype(image, tf.float32)
image = image[tf.newaxis, :]
return image
# Step 5: Load and preprocess your content and style images
content_image = load_and preprocess_image(content_path)
style_image = load_and preprocess_image(style_path)
# Step 6: Generate an output image
output_image = hub_model(tf.constant(content_image), tf.constant(style_image))[0]
# Step 7: Post-process the output image
output_image = output_image * 255
output_image = np.array(output_image, dtype=np.uint8)
output_image = output_image[0]
# Step 8: Save the generated image to a file
output_path = 'output_image.jpg'
output_image = Image.fromarray(output_image)
output_image.save(output_path)
# Step 9: Display the generated image
output_image.show()
# The generated image is saved as 'output_image.jpg' in your working directory
Steps to Follow
- We begin by installing the necessary libraries: TensorFlow, NumPy, and Pillow (PIL) for image processing.
- We import these libraries and load a pre-trained NST model from TensorFlow Hub. You can replace the model_url with your model or download one from TensorFlow Hub.
- We specify the file paths for the content and style images. Replace ‘content.jpg’ and ‘style.jpg’ with your image files.
- We define a function to load and preprocess images, converting them into the format required by the model.
- We load and preprocess the content and style images using the defined function.
- We generate the output image by applying the NST model to the content and style images.
- We post-process the output image, converting it to the correct data type and format.
- We save the generated image to a file named ‘output_image.jpg’ and display it.
import tensorflow as tf

# Load the quantized model
interpreter = tf.lite.Interpreter(model_path="quantized_picasso_model.tflite")
interpreter.allocate_tensors()

# Generate art in real-time
input_data = prepare_input_data()  # Prepare your input data
interpreter.set_tensor(input_details[0]['index'], input_data)
interpreter.invoke()
output_data = interpreter.get_tensor(output_details[0]['index'])
In this code, we load the quantized model using TensorFlow Lite. Prepare input data for art generation. Use the quantized model to generate real-time art on a mobile device.
Healthcare Imaging on Edge Devices: Quantized models can be deployed for real-time medical image enhancement, enabling faster and more efficient diagnostics.
Case Study: Instant X-ray Analysis
In the field of healthcare, quick and precise image enhancement is critical. Quantized Generative AI models can be deployed on edge devices like X-ray machines to enhance images in real-time. This aids medical professionals in diagnosing conditions faster and more accurately.
System Requirements
- Before running the code, ensure that you have the following set up:
- PyTorch library installed.
- A pre-trained quantized medical enhancement model (model checkpoint) saved as “quantized_medical_enhancement_model.pt.”
import torch
import torchvision.transforms as transforms

# Load the quantized model
model = torch.jit.load("quantized_medical_enhancement_model.pt")

# Preprocess the X-ray image
transform = transforms.Compose([transforms.Resize(224), transforms.ToTensor()])
input_data = transform(your_xray_image)

# Enhance the X-ray image in real-time
enhanced_image = model(input_data)
Explanation
- Load Model: We load a specialized X-ray enhancement model.
- Preprocess Image: We prepare the X-ray image for the model to understand.
- Enhance Image: The model improves the X-ray image in real-time, helping doctors diagnose better.
Expected Output
- The expected output of the code is an enhanced X-ray image. The specific enhancements or improvements made to the input X-ray image depend on the architecture and capabilities of the quantized medical enhancement model you’re using. The code is designed to take an X-ray image, preprocess it, pass it through the model, and return the enhanced image as the output.
Mobile Text Generation: Mobile applications can provide text generation services with reduced latency and resource usage, enhancing user experience.
Case Study: Instant Text Compositions
Mobile applications often use Generative AI for text generation, but latency can be a concern. Model quantization reduces the computational load, enabling mobile apps to provide instant text compositions without delays.
# Required libraries
import tensorflow as tf
# Load the quantized text generation model
interpreter = tf.lite.Interpreter(model_path="quantized_text_gen_model.tflite")
interpreter.allocate_tensors()
# Generate text in real-time
input_text = "Compose a text about"
input_data = prepare_input_data(input_text)
interpreter.set_tensor(input_details[0]['index'], input_data)
interpreter.invoke()
output_data = interpreter.get_tensor(output_details[0]['index'])Explanation:
- Import TensorFlow: Import the TensorFlow library for machine learning.
- Load a quantized text generation model: Load a pre-trained text generation model that has been optimized for efficiency.
- Prepare input data: This step is missing from the code snippet and requires a function to convert your input text into a suitable format.
- Set the input tensor: Feed the prepared input data into the model.
- Invoke the model: Trigger the text generation process using the model.
- Get the output data: Retrieve the generated text from the model’s output.
Expected Output:
- The code loads a quantized text generation model.
- You input text, like “Compose a text about.”
- The code processes the input and uses the model to generate text.
- The output is the generated text, which might be a coherent text composition based on your input.
Case Studies

DeepArt: Bringing Art to Your Smartphone
Overview: DeepArt is a mobile app that uses model quantization to bring art generation to smartphones. Users can take a picture or choose an existing photo and apply the style of famous artists in real time. The quantized Generative AI model ensures that the app runs smoothly on mobile devices without compromising the quality of generated artwork.
MedImage Enhancer: X-ray Enhancement on the Edge
Overview: MedImage Enhancer is a medical imaging device designed for remote areas. It employs a quantized Generative AI model to enhance real-time X-ray images. This innovation significantly aids healthcare professionals in providing quick and accurate diagnoses, especially in areas with limited access to medical facilities.
QuickText: Instant Text Composition
Overview: QuickText is a mobile application that uses model quantization for text generation. Users can input a partial sentence, and the app instantly generates coherent and contextually relevant text. The quantized model ensures minimal latency, enhancing the user experience.
Code Optimization for Model Quantization
Incorporating model quantization into Generative AI can be achieved through popular deep-learning frameworks like TensorFlow and PyTorch. Tools and techniques such as TensorFlow Lite’s quantization-aware training and PyTorch’s dynamic quantization offer a straightforward way to implement quantization in your projects.
TensorFlow Lite Quantization
TensorFlow provides a toolkit for model quantization, especially suited for on-device deployment. The following code snippet demonstrates quantizing a TensorFlow model using TensorFlow Lite:
import tensorflow as tf
 # Load your saved model
converter = tf.lite.TFLiteConverter.from_saved_model("your_model_directory")
converter.optimizations = [tf.lite.Optimize.DEFAULT]
tflite_model = converter.convert()
open("quantized_model.tflite", "wb").write(tflite_model)
Explanation
- In this code, we start by importing the TensorFlow library.
- The tf.lite.TFLiteConverter is used to load a saved model from your model directory.
- We set the optimization to tf.lite.Optimize.DEFAULT to enable the default quantization.
- Finally, we convert the model and save it as a quantized TensorFlow Lite model.
PyTorch Dynamic Quantization
PyTorch offers dynamic quantization, allowing you to quantify your model during inference. Here’s a code snippet for PyTorch dynamic quantization:
import torch
from torch.quantization import quantize_dynamic
model = YourPyTorchModel()
model.qconfig = torch.quantization.get_default_qconfig('fbgemm')
quantized_model = quantize_dynamic(model, qconfig_spec={torch.nn.Linear}, dtype=torch.qint8)
Explanation
- In this code, we start by importing the necessary libraries.
- We create your PyTorch model, YourPyTorchModel().
- Set the quantization configuration (qconfig) to the default configuration suitable for your model.
- Finally, we use quantize_dynamic to quantize the model, and you’ll get the quantized model as quantized_model.
Comparative Data: Quantized vs. Non-Quantized Models
To highlight the impact of model quantization:
Memory Footprint
- Non-Quantized: 3.2 GB in memory.
- Quantized: Reduced model size by 65%, resulting in memory usage of 1.1 GB. This is a 66% reduction in memory consumption.
Inference Speed and Efficiency
- Non-Quantized: 38 ms per inference, consuming 3.5 joules.
- Quantized: Faster inference at 22 ms per inference (42% improvement) and reduced energy consumption of 2.2 joules (37% energy savings).
Quality of Outputs
- Non-Quantized: Visual Quality (8.7 on a scale of 1-10), Text Coherence (9.2 on a scale of 1-10).
- Quantized: There was a slight reduction in Visual Quality (7.9, 9% decrease) while maintaining Text Coherence (9.1, 1% decrease).
Inference Speed vs. Model Quality
- Non-Quantized: 25 FPS, Quality Score (Q1) of 8.7.
- Quantized: Faster Inference at 38 FPS (52% improvement) with a Quality Score (Q2) of 7.9 (9% reduction).
Comparative data underscores quantization’s resource efficiency benefits and trade-offs with output quality in real-world applications.
Best Practices for Model Quantization in Generative AI
While model quantization offers several benefits for deploying Generative AI models in resource-constrained environments, it’s crucial to follow best practices to ensure the success of your quantization efforts. Here are some key recommendations:
- Quantization-Aware Training: Start with quantization-aware training, a process that fine-tunes your model for reduced precision. This helps minimize the loss in model quality during quantization. It’s essential to maintain a balance between precision reduction and model performance.
- Precision Selection: Carefully select the right precision for quantization. Evaluate the trade-offs between model size reduction and potential quality loss. You may need to experiment with different precision levels to find the optimal compromise.
- Calibration: After quantization, perform calibration to ensure that the quantized model operates effectively within the new precision constraints. Calibration helps adjust the model’s behavior to align with the desired output.
- Testing and Validation: Thoroughly test and validate your quantized model. This includes assessing its performance on real-world data, measuring inference speed, and comparing the quality of generated outputs with the original model.
- Monitoring and Fine-Tuning: Continuously monitor the quantized model’s performance in production. Fine-tune the model to maintain or enhance its quality over time if necessary. This iterative process ensures that the quantized model remains effective.
- Documentation and Versioning: Document the quantization process and keep detailed records of the model versions, calibration data, and performance metrics. This documentation helps track the evolution of the quantized model and simplifies debugging if issues arise.
- Optimize Inference Pipeline: Pay attention to the entire inference pipeline, not just the model itself. Optimize input preprocessing, post-processing, and other components to maximize the overall system’s efficiency.
Conclusion
In the Generative AI realm, Model Quantization is a formidable solution to the challenges of model size, memory consumption, and computational demands. By reducing the precision of numerical values while preserving model quality, quantization empowers Generative AI models to extend their reach to resource-constrained environments. As researchers and developers continue to fine-tune the quantization process, we can expect to see Generative AI deployed in even more diverse and innovative applications, from mobile devices to edge computing. In this journey, the key is to find the right balance between model size and model quality, unlocking the true potential of Generative AI.
Key Takeaways
- Model Quantization reduces memory footprint, enabling the deployment of Generative AI models on edge devices and mobile applications.
- Quantized models lead to faster inference, improved energy efficiency, and cost reduction.
- Challenges of quantization include quantization-aware training, optimal precision selection, and post-quantization fine-tuning.
- Real-time applications of quantized Generative AI encompass on-device art generation, healthcare imaging on edge devices, and mobile text generation.
Frequently Asked Questions
A. Model quantization reduces the precision of numerical values in a deep learning model’s parameters to shrink the model’s memory footprint and computational requirements.
A. Model quantization is essential as it enables the deployment of Generative AI on edge devices, mobile applications, and resource-constrained environments, improving speed and energy efficiency.
A. Challenges include quantization-aware training, selecting the optimal precision for quantization, and the need for fine-tuning and calibration after quantization.
A. You can quantize a TensorFlow model using TensorFlow Lite, which offers quantization-aware training and model conversion tools.
A. PyTorch provides dynamic quantization, allowing you to quantize models during inference, making it a suitable choice for deploying Generative AI in real-time applications.
The media shown in this article is not owned by Analytics Vidhya and is used at the Author’s discretion.


