Introduction
Question and answering on custom data is one of the most sought-after use cases of Large Language Models. Human-like conversational skills of LLMs combined with vector retrieval methods make it much easier to extract answers from large documents. With some variation, we can create systems to interact with any data (Structured, Unstructured, and Semi-structured) stored as embeddings in a vector database. This method of augmenting LLMs with retrieved data based on similarity scores between query embedding and document embeddings is called RAG or Retrieval Augmented Generation. This method can make many things easier, such as reading arXiv papers.
If you are into AI and Computer Science, you must have heard “arXiv” at least once. The arXiv is an open-access repository for electronic preprints and postprints. It hosts verified but not peer-reviewed papers on various subjects, such as ML, AI, Math, Physics, Statistics, electronics, etc. The arXiv has played a pivotal role in pushing open research in AI and hard sciences. But, reading research papers is often arduous and takes a lot of time. So, can we make this a bit better by using a RAG chatbot that lets us extract relevant content from the paper and fetch us answers?
In this article, we will create a RAG chatbot for aXiv papers using an open-source tool called Haystack.

Learning Objectives
- Understand what Haystack is? And it’s components for building LLM-powered applications.
- Build a component to retrieve Arxiv papers using the “arxiv” library.
- Learn how to build Indexing and Query pipelines with Haystack nodes.
- Learn to build a chat interface with Gradio, coordinate pipelines to retrieve documents from a vector store, and generate answers from an LLM.
This article was published as a part of the Data Science Blogathon.
Table of contents
What is Haystack?
Haystack is an open-source, all-in-one NLP framework to build scalable LLM-powered applications. Haystack provides a highly modular and customizable approach to building production-ready NLP applications such as semantic search, Question Answering, RAG, etc. It is built around the concept of pipelines and nodes; the pipelines provide a very streamlined approach to arranging nodes to build efficient NLP applications.
- Nodes: The nodes are the fundamental building blocks of Haystack. A node accomplishes a single thing, such as preprocessing documents, retrieving from vector stores, answer generation from LLMs, etc.
- Pipeline: The pipeline helps connect one node to another to build a chain of nodes. This makes it easier to build applications with Haystack.
Haystack also has out-of-the-box support for leading vector stores, such as Weaviate, Milvus, Elastic Search, Qdrant, etc. Refer to the Haystack public repository for more: https://github.com/deepset-ai/haystack.
So, in this article, we will use Haystack to build a Q&A chatbot for Arxiv papers with a Gradio Interface.
Gradio
Gradio is an open-source solution from Huggingface to set up and share a demo of any Machine Learning application. It is powered by Fastapi on the backend and svelte for front-end components. It lets us write customizable web apps with Python. Ideal for building and sharing demo apps for machine learning models or proof of concepts. For more, visit Gradio’s official GitHub. To explore more on building applications with Gradio, refer to this article, “Let’s Build Chat GPT with Gradio.”
Building The Chatbot
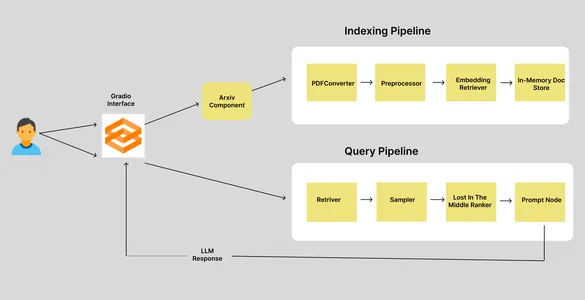
Before building the application, let’s chart out the workflow in brief. It starts with a user giving the ID of the Arxiv paper and ends with receiving answers to queries. So, here is a simple workflow of our Arxiv chatbot.

We have two pipelines: the Indexing pipeline and the Query pipeline. When a user inputs an Arxiv article ID, it goes to the Arxiv component, which retrieves and downloads the corresponding paper into a specified directory and triggers the indexing pipeline. The indexing pipeline consists of four nodes, each responsible for accomplishing a single task. So, let’s see what these nodes do.
Indexing Pipeline
In a Haystack Pipeline, the output of the preceding node will be used as the input of the current node. In an Indexing Pipeline, the initial input is the path to the document.
- PDFToTextConverter: Arxiv library lets us download papers in PDF format. But we need the data in the text. So, this node extracts the texts from the PDF.
- Preprocessor: The extracted data needs to be cleaned and processed before storing it in the vector database. This node is responsible for cleaning and chunking texts.
- EmbeddingRetriver: This node defines the Vector store where data needs to be stored and the embedding model used for getting embeddings.
- InMemoryDocumentStore: This is the vector store where embeddings are stored. In this case, we have used Haystacks default In-memory document store. But you can also use other vector stores, such as Qdrant, Weaviate, Elastic Search, Milvus, etc.
Query Pipeline
The query pipeline is triggered when the user sends queries. The query pipeline retrieves “k” nearest documents to the query embeddings from the vector store and generates an LLM response. We have four nodes in here as well.
- Retriever: Retrieves “k” nearest document to the query embeddings from vector store.
- Sampler: Filt documents based on the cumulative probability of the similarity scores between the query and the documents using top p sampling.
- LostInTheMiddleRanker: This algorithm reorders the extracted documents. It places the most relevant documents at the beginning or end of the context.
- PromptNode: PromptNode is responsible for generating answers to the queries from the context provided to the LLM.
So, this was about the workflow of our Arxiv chatbot. Now, let’s dive into the coding part.
Set-up Dev Env
Before installing any dependency, create a virtual environment. You can use Venv and Poetry to create a virtual environment.
python -m venv my-env-name

source bin/activate
Now, install the following development dependencies. To download Arxiv papers, we need the Arxiv library installed.
farm-haystack
arxiv
gradio
Now, we will import the libraries.
import arxiv
import os
from haystack.document_stores import InMemoryDocumentStore
from haystack.nodes import (
    EmbeddingRetriever,
    PreProcessor,
    PDFToTextConverter,
    PromptNode,
    PromptTemplate,
    TopPSampler
    )
from haystack.nodes.ranker import LostInTheMiddleRanker
from haystack.pipelines import Pipeline
import gradio as gr
Building Arxiv Component
This component will be responsible for downloading and storing Arxiv PDF files. So. here is how we define the component.
class ArxivComponent:
    """
    This component is responsible for retrieving arXiv articles based on an arXiv ID.
    """

    def run(self, arxiv_id: str = None):
        """
        Retrieves and stores an arXiv article for the given arXiv ID.

        Args:
            arxiv_id (str): ArXiv ID of the article to be retrieved.
        """
        # Set the directory path where arXiv articles will be stored
        dir: str = DIR

        # Create an instance of the arXiv client
        arxiv_client = arxiv.Client()

        # Check if an arXiv ID is provided; if not, raise an error
        if arxiv_id is None:
            raise ValueError("Please provide the arXiv ID of the article to be retrieved.")

        # Search for the arXiv article using the provided arXiv ID
        search = arxiv.Search(id_list=[arxiv_id])
        response = arxiv_client.results(search)
        paper = next(response)  # Get the first result
        title = paper.title  # Extract the title of the article

        # Check if the specified directory exists
        if os.path.isdir(dir):
            # Check if the PDF file for the article already exists
            if os.path.isfile(dir + "/" + title + ".pdf"):
                return {"file_path": [dir + "/" + title + ".pdf"]}
        else:
            # If the directory does not exist, create it
            os.mkdir(dir)

        # Attempt to download the PDF for the arXiv article
        try:
            paper.download_pdf(dirpath=dir, filename=title + ".pdf")
            return {"file_path": [dir + "/" + title + ".pdf"]}
        except:
            # If there's an error during the download, raise a ConnectionError
            raise ConnectionError(message=f"Error occurred while downloading PDF for \
                                            arXiv article with ID: {arxiv_id}")
The above component initializes an Arxiv client, then retrieves the Arxiv article associated with the ID and checks if it has already been downloaded; it returns the path of the PDF or downloads it to the directory.
Building the Indexing Pipeline
Now, we will define the indexing pipeline to process and store documents in our vector database.
document_store = InMemoryDocumentStore()
embedding_retriever = EmbeddingRetriever(
    document_store=document_store,
    embedding_model="sentence-transformers/All-MiniLM-L6-V2",
    model_format="sentence_transformers",
    top_k=10
    )
def indexing_pipeline(file_path: str = None):
    pdf_converter = PDFToTextConverter()
    preprocessor = PreProcessor(split_by="word", split_length=250, split_overlap=30)

    indexing_pipeline = Pipeline()
    indexing_pipeline.add_node(
        component=pdf_converter,
        name="PDFConverter",
        inputs=["File"]
        )
    indexing_pipeline.add_node(
        component=preprocessor,
        name="PreProcessor",
        inputs=["PDFConverter"]
        )
    indexing_pipeline.add_node(
        component=embedding_retriever,
        name="EmbeddingRetriever",
        inputs=["PreProcessor"]
        )
    indexing_pipeline.add_node(
        component=document_store,
        name="InMemoryDocumentStore",
        inputs=["EmbeddingRetriever"]
        )

    indexing_pipeline.run(file_paths=file_path)
First, we define our in-memory document store and then embedding-retriever. In the embedding-retriever, we specify the document store, embedding models, and number of documents to be fetched.
We have also defined the four nodes that we discussed earlier. The pdf_converter converts PDF to text, the preprocessor cleans and creates text chunks, the embedding_retriever makes embeddings of documents, and the InMemoryDocumentStore stores vector embeddings. The run method with the file path triggers the pipeline, and each node is executed in the order they have been defined. You can also notice how each node uses outputs of previous nodes as inputs.
Building the Query Pipeline
The query pipeline also consists of four nodes. This is responsible for getting embedding from queried text, finding similar documents from vector stores, and finally generating responses from LLM.
def query_pipeline(query: str = None):
    if not query:
        raise gr.Error("Please provide a query.")
    prompt_text = """
Synthesize a comprehensive answer from the provided paragraphs of an Arxiv
article and the given question.\n
Focus on the question and avoid unnecessary information in your answer.\n
\n\n Paragraphs: {join(documents)} \n\n Question: {query} \n\n Answer:
"""
    prompt_node = PromptNode(
                         "gpt-3.5-turbo",
                          default_prompt_template=PromptTemplate(prompt_text),
                          api_key="api-key",
                          max_length=768,
                          model_kwargs={"stream": False},
                         )
    query_pipeline = Pipeline()
    query_pipeline.add_node(
        component = embedding_retriever,
        name = "Retriever",
        inputs=["Query"]
        )
    query_pipeline.add_node(
        component=TopPSampler(
        top_p=0.90),
        name="Sampler",
        inputs=["Retriever"]
        )
    query_pipeline.add_node(
        component=LostInTheMiddleRanker(1024),
        name="LostInTheMiddleRanker",
        inputs=["Sampler"]
        )
    query_pipeline.add_node(
        component=prompt_node,
        name="Prompt",
        inputs=["LostInTheMiddleRanker"]
        )

    pipeline_obj = query_pipeline.run(query = query)

    return pipeline_obj["results"]
The embedding_retriever retrieves “k” similar documents from the vector store. The Sampler is responsible for sampling the documents. The LostInTheMiddleRanker ranks documents at the beginning or end of the context based on their relevancy. Finally, the prompt_node, where the LLM is “gpt-3.5-turbo”. We havealso added a prompt template to add more context to the conversation. The run method returns a pipeline object, a dictionary.
This was our backend. Now, we design the interface.
Gradio Interface
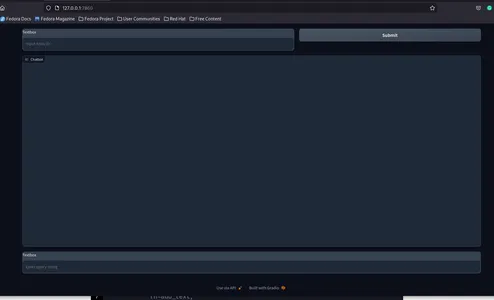
This has a Blocks class to build a customizable web interface. So, for this project, we need a text box that takes Arxiv ID as user input, a chat interface, and a text box that takes user queries. This is how we can do it.
with gr.Blocks() as demo:
    with gr.Row():
        with gr.Column(scale=60):
            text_box = gr.Textbox(placeholder="Input Arxiv ID",
                                  interactive=True).style(container=False)
        with gr.Column(scale=40):
            submit_id_btn = gr.Button(value="Submit")
    with gr.Row():
        chatbot = gr.Chatbot(value=[]).style(height=600)

    with gr.Row():
        with gr.Column(scale=70):
            query = gr.Textbox(placeholder = "Enter query string",
                               interactive=True).style(container=False)
Run the gradio app.py command in your command line and visit the displayed localhost URL.

Now, we need to define the trigger events.
submit_id_btn.click(
        fn = embed_arxiv,
        inputs=[text_box],
        outputs=[text_box],
        )
query.submit(
            fn=add_text,
            inputs=[chatbot, query],
            outputs=[chatbot, ],
            queue=False
            ).success(
            fn=get_response,
            inputs = [chatbot, query],
            outputs = [chatbot,]
            )
demo.queue()
demo.launch()
To make the events work, we need to define the functions mentioned in each event. Click submit_iid_btn, send the input from the text box as a parameter to the embed_arxiv function. This function will coordinate the fetching and storing of the Arxiv PDF in the vector store.
arxiv_obj = ArxivComponent()
def embed_arxiv(arxiv_id: str):
    """
        Args:
            arxiv_id: Arxiv ID of the article to be retrieved.

        """
    global FILE_PATH
    dir: str = DIR
    file_path: str = None
    if not arxiv_id:
        raise gr.Error("Provide an Arxiv ID")
    file_path_dict = arxiv_obj.run(arxiv_id)
    file_path = file_path_dict["file_path"]
    FILE_PATH = file_path
    indexing_pipeline(file_path=file_path)

    return"Successfully embedded the file"
We defined an ArxivComponent object and the embed_arxiv function. It runs the “run” method and uses the returned file path as the parameter to the Indexing Pipeline.
Now, we move to the submit event with the add_text function as the parameter. This is responsible for rendering the chat in the chat interface.
def add_text(history, text: str):
    if not text:
         raise gr.Error('enter text')
    history = history + [(text,'')]
    return history
Now, we define the get_response function, which fetches and streams LLM responses in the chat interface.
def get_response(history, query: str):
    if not query:
        gr.Error("Please provide a query.")

    response = query_pipeline(query=query)
    for text in response[0]:
        history[-1][1] += text
        yield history, ""
This function takes the query string and passes it to the Query Pipeline to get a response. Finally, we iterate over the response string and return it to the chatbot.
Putting it all together.
# Create an instance of the ArxivComponent class
arxiv_obj = ArxivComponent()

def embed_arxiv(arxiv_id: str):
    """
    Retrieves and embeds an arXiv article for the given arXiv ID.

    Args:
        arxiv_id (str): ArXiv ID of the article to be retrieved.
    """
    # Access the global FILE_PATH variable
    global FILE_PATH

    # Set the directory where arXiv articles are stored
    dir: str = DIR

    # Initialize file_path to None
    file_path: str = None

    # Check if arXiv ID is provided
    if not arxiv_id:
        raise gr.Error("Provide an Arxiv ID")

    # Call the ArxivComponent's run method to retrieve and store the arXiv article
    file_path_dict = arxiv_obj.run(arxiv_id)

    # Extract the file path from the dictionary
    file_path = file_path_dict["file_path"]

    # Update the global FILE_PATH variable
    FILE_PATH = file_path

    # Call the indexing_pipeline function to process the downloaded article
    indexing_pipeline(file_path=file_path)

    return "Successfully embedded the file"

def get_response(history, query: str):
    if not query:
        gr.Error("Please provide a query.")

    # Call the query_pipeline function to process the user's query
    response = query_pipeline(query=query)

    # Append the response to the chat history
    for text in response[0]:
        history[-1][1] += text
        yield history

def add_text(history, text: str):
    if not text:
        raise gr.Error('Enter text')

    # Add user-provided text to the chat history
    history = history + [(text, '')]
    return history

# Create a Gradio interface using Blocks
with gr.Blocks() as demo:
    with gr.Row():
        with gr.Column(scale=60):
            # Text input for Arxiv ID
            text_box = gr.Textbox(placeholder="Input Arxiv ID",
                                  interactive=True).style(container=False)
        with gr.Column(scale=40):
            # Button to submit Arxiv ID
            submit_id_btn = gr.Button(value="Submit")

    with gr.Row():
        # Chatbot interface
        chatbot = gr.Chatbot(value=[]).style(height=600)

    with gr.Row():
        with gr.Column(scale=70):
            # Text input for user queries
            query = gr.Textbox(placeholder="Enter query string",
                               interactive=True).style(container=False)

    # Define the actions for button click and query submission
    submit_id_btn.click(
        fn=embed_arxiv,
        inputs=[text_box],
        outputs=[text_box],
    )
    query.submit(
        fn=add_text,
        inputs=[chatbot, query],
        outputs=[chatbot, ],
        queue=False
    ).success(
        fn=get_response,
        inputs=[chatbot, query],
        outputs=[chatbot,]
    )

# Queue and launch the interface
demo.queue()
demo.launch()
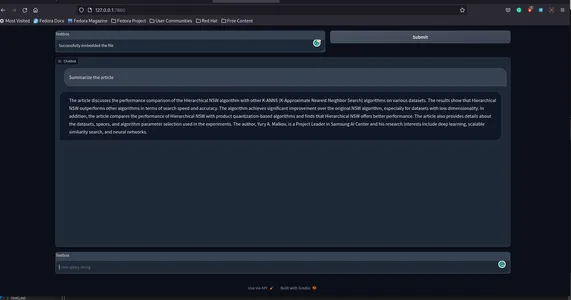
Run the Application using the command gradio app.py and visit the URL to interact with the Arxic Chatbot.
This is how it will look.

Here is the GitHub repository for the app sunilkumardash9/chat-arxiv.
Possible improvements
We have successfully built a simple application for chatting with any Arxiv paper, but a few improvements can be made.
- Standalone Vector store: Instead of using the ready-made vector store, you can use standalone vector stores available with Haystack, such as Weaviate, Milvus, etc. This will not only give you more flexibility but also significant performance improvements.
- Citations: We can add certainty to the LLM responses by adding proper citations.
- More features: Instead of just a chat interface, we can add features to render pages of PDF used as sources for LLM responses. Check out this article, “Build a ChatGPT for PDFs with Langchain“, and the GitHub repository for a similar application.
- Frontend: A better and more interactive frontend would be much better.
Conclusion
So, this was all about building a chat app for Arxiv papers. This application is not just limited to Arxiv. We can also extend this to other sites, such as PubMed. With a few modifications, we can also use a similar architecture to chat with any website. So, in this article, we went from creating an Arxiv component to download Arxiv papers to embedding them using haystack pipelines and finally fetching answers from the LLM.
Key Takeaways
- Haystack is an open-source solution for building scalable, production-ready NLP applications.
- Haystack provides a highly modular approach to building real-world apps. It provides nodes and pipelines to streamline information retrieval, data preprocessing, embedding, and answer generation.
- It is an open-source library from Huggingface to quickly prototype any application. It provides an easy way to share ML models with anyone.
- Use a similar workflow to build chat apps for other sites, such as PubMed.
Frequently Asked Questions
A. Build custom AI chatbots using modern NLP frameworks like Haystack, Llama Index, and Langchain.
A. Question-answering chatbots are purpose-built using cutting-edge NLP methods to answer questions on custom data, such as PDFs, Spreadsheets, CSVs, etc.
A. Haystack is an open-source NLP framework for building LLM-based applications, such as AI agents, QA, RAG, etc.
A. Arxiv is an open-access repository for publishing research papers on various categories, including but not limited to Math, Computer Science, Physics, statistics, etc.
A. AI chatbots employ cutting-edge Natural Language Processing technologies to offer human-like conversation abilities.
A. Create a chatbot for free using open-source frameworks like Langchain, haystack, etc. But inferencing from LLM, like get-3.5, costs money.
The media shown in this article is not owned by Analytics Vidhya and is used at the Author’s discretion.


