Introduction
In the not-so-distant past, the idea of having a personal AI assistant felt like something out of a sci-fi movie. Picture a tech-savvy inventor named Alex, who dreamed of having a smart companion to answer questions and provide insights, without relying on the cloud or third-party servers. With advancements in small language models (SLMs), Alex’s dream became a reality. This article will take you on Alex’s journey to build an AI Chat CLI application using Huggingface’s innovative SmolLM model. We’ll blend the power of SmolLM with LangChain’s flexibility and Typer’s user-friendly interface. By the end, you’ll have a functional AI assistant, just like Alex, capable of chatting, answering queries, and saving conversations—all from your terminal. Let’s dive into this exciting new world of on-device AI and see what you can create.
Learning Outcomes
- Understand Huggingface SmolLM models and their applications.
- Leverage SLM models for on-device AI applications.
- Explore Grouped-Query Attention and its role in SLM architecture.
- Build interactive CLI applications using the Typer and Rich libraries.
- Integrate Huggingface models with LangChain for robust AI applications.
This article was published as a part of the Data Science Blogathon.
Table of contents
What is Huggingface SmolLM?
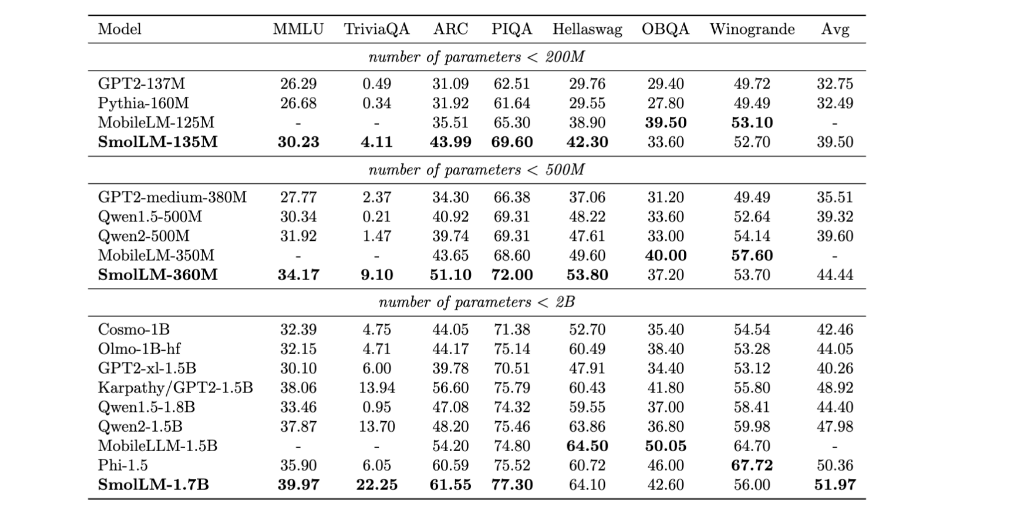
SmolLM is a series of state-of-the-art small language models available in three sizes 135M, 360M, and 1.7B parameters. These models are built on a high-quality training corpus named Cosmopedia V2 which is the collection of synthetic textbooks and stories generated by Mixtral (28B tokens), Python-Edu educational Python samples from The Stack (4B tokens), and FineWeb-Edu, an educational web samples from FineWeb(220B tokens)according to Huggingface these models outperform other models in the size categories across a various benchmark, testing common sense reasons, and world knowledge.
Performance Comparison Chart
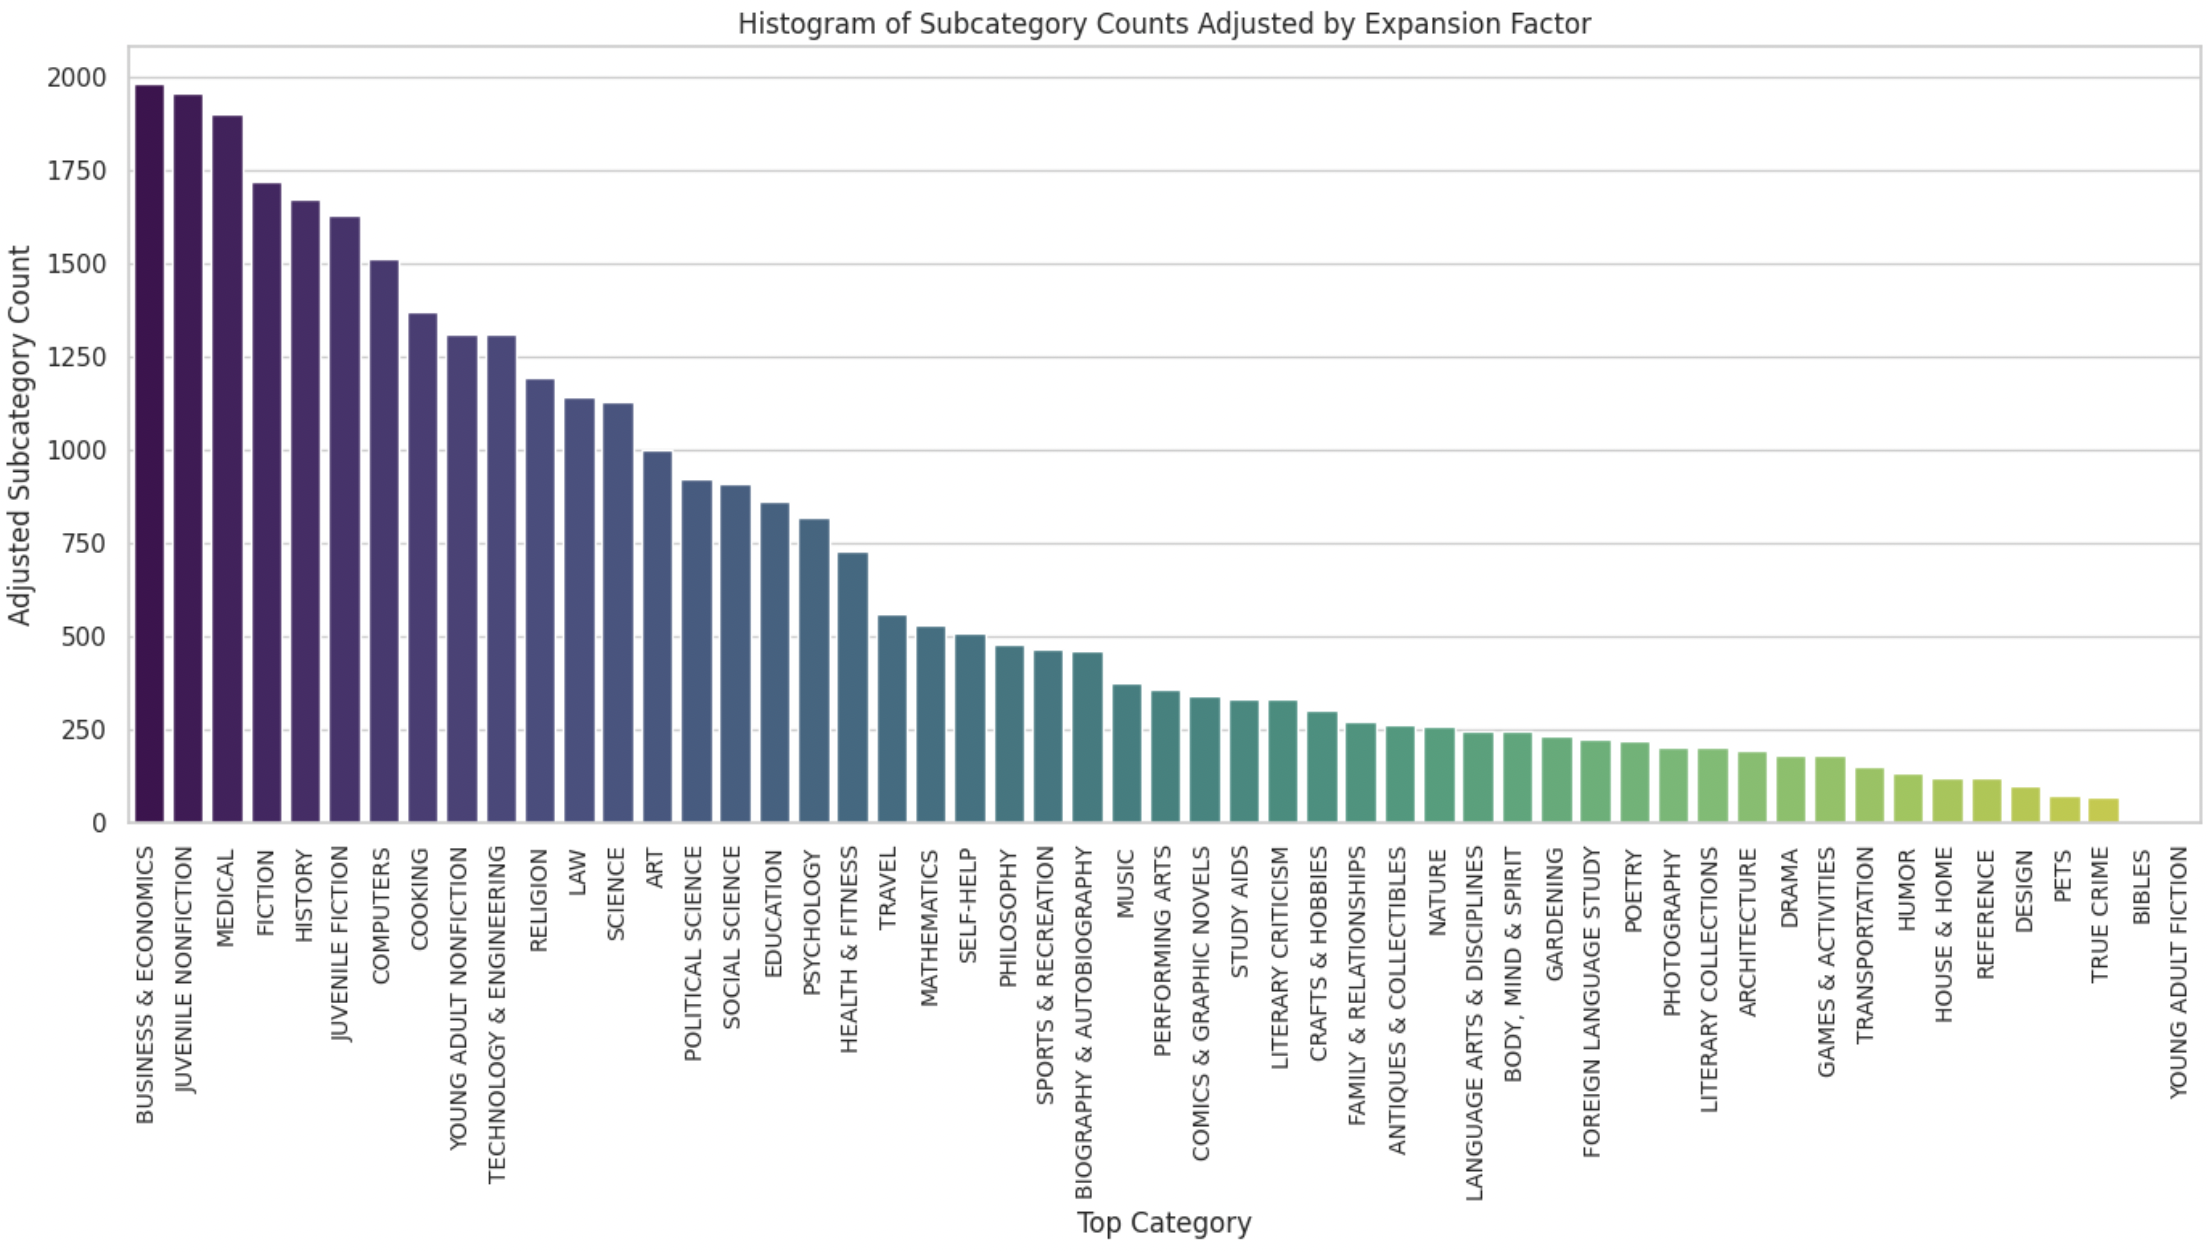
It uses 5000 topics belonging to 51 categories generated using Mixtral to create subtopics for certain topics, and the final distribution of subtopics is below:
The architecture of 135M and 260M parameter models, uses a design similar to MobileLLM, incorporating Grouped-Query Attention (GQA) and prioritizing depth over width.
What is Grouped-Query-Attention?
There are three types of Attention architecture:
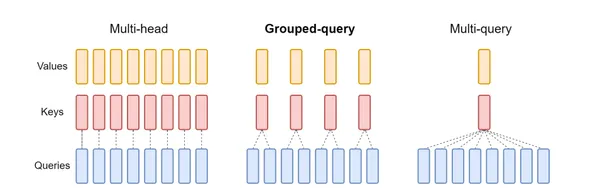
- Multi-Head Attention (MHA): Each attention head has its own independent query, key, and value heads. This is computationally expensive, especially for large models.
- Multi-Query Attention (MQA): Shares key and value heads across all attention heads, but each head has its query, This is more efficient than MHA but can still be computationally intensive.
- Group-Query Attention(GQA): Imagine you have a team working on a big project. Instead of every team member working independently, you decide to form smaller groups. Each group will share some tools and resources. This is similar to what Grouped-Query Attention (GQA) does in a Generative Model Building.
Understanding Grouped-Query Attention (GQA)
GQA is a technique used in models to process information more efficiently. It divides the model’s attention heads into groups. Each group shares a set of key and value heads. This is different from traditional methods where each attention head has its own key and value heads.
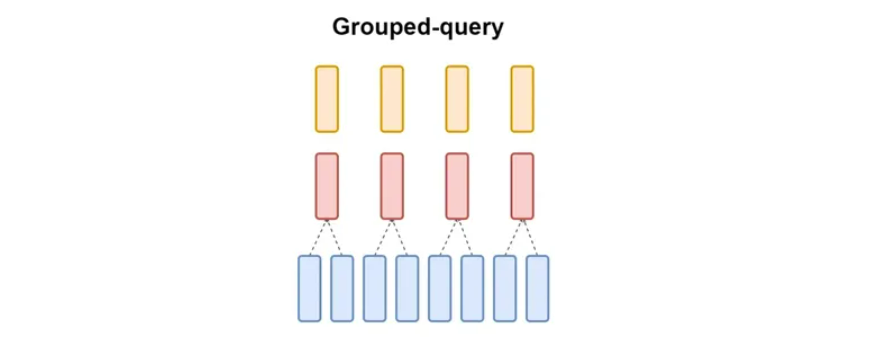
Key Points:
- GQA-G: This means GQA with G groups.
- GQS-1: This is a special case where there’s only one group. It’s similar to another method called Multi-Query Attention (MQA)
- GQA-H: In this case, the number of groups is equal to the number of attention heads. This is similar to Multi-Head Attention (MHA).
Why Use GQA?
- Speed: GQA can process information faster than traditional methods in large models.
- Efficiency: It reduces the amount of data the model needs to handle, saving memory and processing power.
- Balance: GQA finds a sweet spot between speed and accuracy.
By grouping attention heads, GQA helps large models work better without sacrificing much speed or accuracy.
How to use SmolLM?
Install the necessary libraries Pytorch, and Transformers using pip. and then we will put that code into the main.py file.
Here , I used SmolLM 360M instruct model you can use higher parameter models such as SmolLM-1.7B
from transformers import AutoModelForCausalLM, AutoTokenizer
checkpoint = "HuggingFaceTB/SmolLM-360M-Instruct"
device = "CPU" # GPU, if available
tokenizer = AutoTokenizer.from_pretrained(checkpoint)
model = AutoModelForCausalLM.from_pretrained(checkpoint)
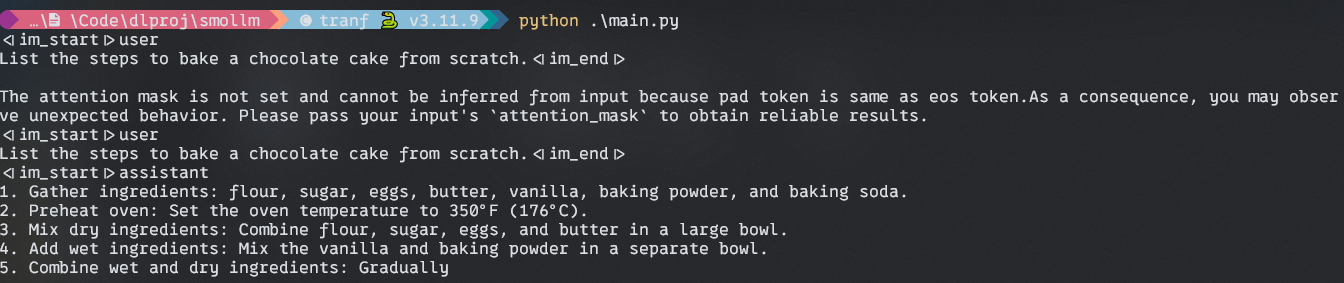
messages = [
{"role": "user", "content": "List the steps to bake a chocolate cake from scratch."}
]
input_text = tokenizer.apply_chat_template(messages, tokenize=False)
print(input_text)
inputs = tokenizer.encode(input_text, return_tensors="pt").to("cpu")
outputs = model.generate(
inputs, max_new_tokens=100, temperature=0.6, top_p=0.92, do_sample=True
)
print(tokenizer.decode(outputs[0]))Output:
What is Typer?
Typer is a library for building Command Line (CLI) applications. It was built by Tiangolo who developed the highly performant Python web framework FastAPI. Typer for the CLI as FastAPI for the web.
What are the benefits of using it?
- User-Friendly and Intuitive:
- Easy to Write: Thanks to excellent editor support and code completion everywhere, you’ll spend less time debugging and reading documentation.
- Simple for Users: Automatic help and completion for all shells make it straightforward for end users.
- Efficient:
- Concise Code: minimize code duplication with multiple features from each parameter declaration. leading to fewer bugs.
- Start Small: You can get started with just 2 lines of code: one import and one function call.
- Scalable:
- Grow a Needed: Increase complexity as much as you want, creating complex command trees and subcommands with options and arguments.
- Flexible:
- Run Scripts: Typer includes a command/program to run scripts, automatically converting them to CLIs, even if they don’t use Typer internally.
How to use Typer?
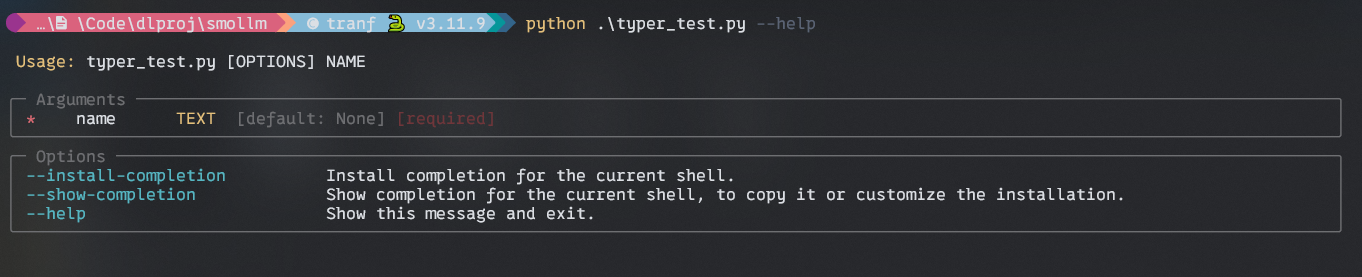
A simple Hello CLI using Typer. First, install Typer using pip.
$ pip install typerNow create a main.py file and type below code
import typer

app = typer.Typer()
@app.command()
def main(name: str):
    print(f"Hello {name}")
if __name__ == "__main__":
    app()
In the above code, we first import Typer and then create an app using “typer.Typer()” method.
The @app.command() is a decorator, decorator in Python does something(user-defined) with the function on which it is placed. Here, in Typer, it makes the main() into a command.
Output:
FIsrt with –help argument and the with –name argument.

Setting Up Project
To get started with our Personal AI Chat CLI application, we need to set up our development environment and install the necessary dependencies. Here’s how to do it
Create a Conda Environment
# Create a conda env
$ conda create --name slmdev python=3.11

# Start your env
$ conda activate slmdev
Create a new directory for the project
$ mkdir personal-ai-chat
$ cd personal-ai-chat
Install the required packages
pip install langchain huggingface_hub trabsformers torch richImplementing the Chat Application
First, create a main.py file in your project directory.
Let’s import the necessary modules and initialize our application.
import typer
from langchain_huggingface.llms import HuggingFacePipeline
from langchain.prompts import PromptTemplate
from transformers import AutoTokenizer, AutoModelForCausalLM, pipeline
import torch
from rich.console import Console
from rich.panel import Panel
from rich.markdown import Markdown
import json
from typing import List, Dict

app = typer.Typer()
console = Console()
Now, we will set up our SmolLM model and a text-generation pipeline
# Initialize smolLM model
model_name = "HuggingFaceTB/SmolLM-360M-Instruct"
tokenizer = AutoTokenizer.from_pretrained(model_name)
model = AutoModelForCausalLM.from_pretrained(model_name, torch_dtype=torch.float32)

# Create a text-generation pipeline
pipe = pipeline(
    "text-generation",
    model=model,
    tokenizer=tokenizer,
    max_length=256,
    truncation=True,
    temperature=0.7,
    do_sample=True,
    repetition_penalty=1.2,
)

# Create a LangChain LLM
llm = HuggingFacePipeline(pipeline=pipe)
In the above code, We set our model name SmolLM 360M Instruct, and use AutoTokenizer for tokenization. After that, we initiate the model using Huggingface AutoModelForCasualLM.
Then we set up a HuggingFace Pipeline for running the llm.
Crafting the Prompt Template and LangChain
Now we have to create a prompt template for our assistance. In this application, we will devise a concise and informative answer prompt.
# Create a prompt template
template = """
You are a helpful assistant. Provide a concise and informative answer to the following query:

Query: {query}

Answer:
"""

prompt = PromptTemplate(template=template, input_variables=["query"])

# Create a LangChain
chain = prompt | llm
If you have followed me till now, congratulations.
Now we will implement the core functionality of our application.
Create a Function called generate_response
def generate_response(query: str) -> str:
    try:
        with console.status("Thinking...", spinner="dots"):
            response = chain.invoke(query)
        return response
    except Exception as e:
        print(f"An error occurred: {e}")
        return "Sorry, I encountered an issue. Please try rephrasing your query."
In this function, we will create a console status that will display a loading message “Thinking..” and a spinner animation while a response is being generated. This provides visual feedback to the user.
Then we will call langchain’s “chain.invoke” method to pass the user’s query as input. This will query the smolLM and produce a response.
In the exception block handle any exception that might arise during the response generation process.
Generating Responses and Handling Conversations
Next, create a function for saving the conversations.
def save_conversation(conversation: List[Dict[str, str]]):
    """Save the conversation history to a JSON file."""
    filename = typer.prompt(
        "Enter a filename to save the conversation (without extension)"
    )
    try:
        with open(f"{filename}.json", "w") as f:
            json.dump(conversation, f, indent=2)
        console.print(f"Conversation saved to {filename}.json", style="green")
    except Exception as e:
        print(f"An error occurred while saving: {e}")
In the above code snippets, we will create a conversation-saving function. Here, the user can enter a filename, and the function will save all the conversation into a JSON file.
Implementing the CLI Application Command
## Code Block 1
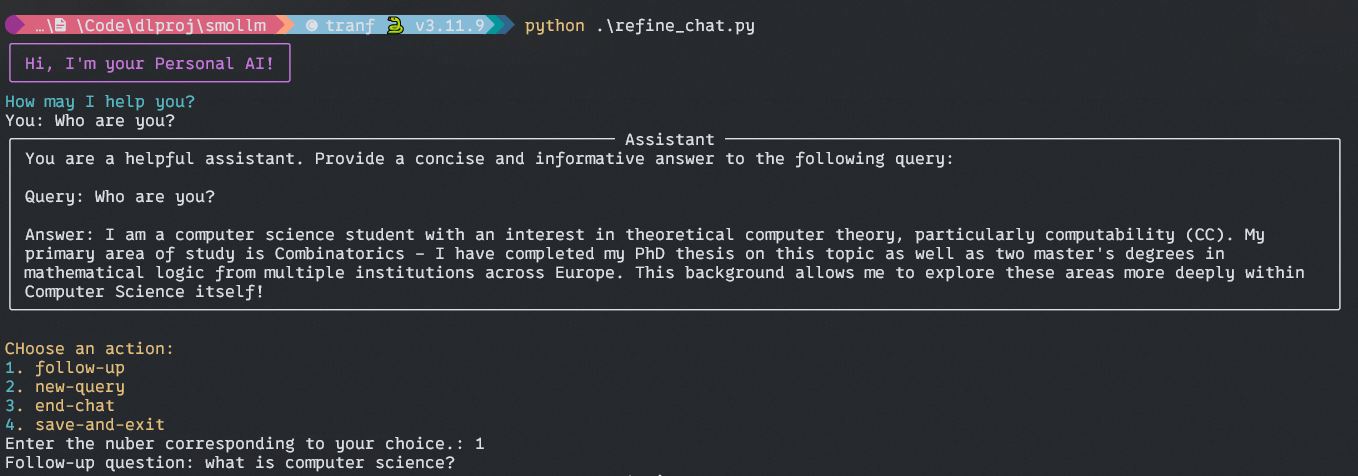
@app.command()
def start():
console.print(Panel.fit("Hi, I'm your Personal AI!", style="bold magenta"))
conversation = []
## Code Block 2
while True:
console.print("How may I help you?", style="cyan")
query = typer.prompt("You")
if query.lower() in ["exit", "quit", "bye"]:
break
response = generate_response(query)
conversation.append({"role": "user", "content": query})
conversation.append({"role": "assistant", "content": response})
console.print(Panel(Markdown(response), title="Assistant", expand=False))
## Code Block 3
while True:
console.print(
"\nCHoose an action:",
style="bold yellow",
)
console.print(
"1. follow-up\n2. new-query\n3. end-chat\n4. save-and-exit",
style="yellow",
)
action = typer.prompt("Enter the nuber corresponding to your choice.")
if action == "1":
follow_up = typer.prompt("Follow-up question")
query = follow_up.lower()
response = generate_response(query)
conversation.append({"role": "user", "content": query})
conversation.append({"role": "assistant", "content": response})
console.print(
Panel(Markdown(response), title="Assistant", expand=False)
)
elif action == "2":
new_query = typer.prompt("New query")
query = new_query.lower()
response = generate_response(query)
conversation.append({"role": "user", "content": query})
conversation.append({"role": "assistant", "content": response})
console.print(
Panel(Markdown(response), title="Assistant", expand=False)
)
elif action == "3":
return
elif action == "4":
save_conversation(conversation)
return
else:
console.print(
"Invalid choice. Please choose a valid option.", style="red"
)
## Code Block 4
if typer.confirm("Would you like to save this conversation?"):
save_conversation(conversation)
console.print("Good Bye!! Happy Hacking", style="bold green")Code Block 1
Introduction and welcome message, here
- The code starts with a ” start ” function triggered when you run the application. the decorator “@app.command” makes this start function into a command in our CLI application.
- It displays colorful welcome messages using a library called Rich.
Code Block 2
The main conversation loop, here
- The code enters a loop that continues until you exit the conversation
- Inside that loop
- It asks you “How may I help you?” using the color prompt.
- It captures your query using “typer.prompt” and converts it into lowercase
- It also checks if your query is an exit command like “exit”, “quit” or “bye”. If so it exits the loop.
- Otherwise, it calls the “generate_response” function to process your query and get a response.
- It stores your query and response in the conversation history.
- It displays the assistant’s response in a formatted box using libraries like Rich’s console and Markdown.
Output:
Code Block 3
Handling User Choice
- Here in this while loop, most of the things are the same as before, the only difference is that you can choose a different option for further conversation, such as follow-up questions, new query, end chat, saving the conversation, etc.
Code Block 4
Saving the conversation and farewell message
Here, the assistant will ask you to save your chat history as a JSON file for further analysis. Ask you for a file name without “.json”. and save your history in your root directory.
And then a farewell message for you.
Output:

Output of Saved File:

Conclusion
Building your own Personal AI CLI application using Huggingface SmoLM is more than just a fun project. It is the gateway to understanding and applying cutting-edge AI technologies in a practical, accessible way. Through this article, we have explored how to use the power of compact SLM to create an engaging user interface right in your terminal.
All the code used in this Personal AI CLI
Key Takeaways
- Article demonstrates that building a personal AI assistant is within reach for developers of various skill levels. and hardware levels.
- By utilizing SmolLM, a compact yet capable language model, the project shows how to create an AI chat application that doesn’t require heavy computational resources and makes it suitable for small, low-power hardware.
- The project showcases the power of integrating different technologies to create a functional feature-rich application.
- Through the use of Typer and Rich libraries, the article emphasizes the importance of creating an intuitive and visually appealing command-line interface, enhancing user experience even in a text-based environment.
Frequently Asked Questions
Q1. Can I customize the AI’s response or train it on my data?
A. Yes, You can tweak the prompt template to your domain-specific choice of assistance. Experiment with prompt, and model parameters like temperature and max_lenght to adjust the style responses. For, training with your data you should try PEFT style training such as LORA, or you can use RAG type application to use your data immediately without changing model weights.
Q2. Is this Personal AI chat secure for handling sensitive information?
A. This personal AI chat is designed for Local Use, so your data stays personal as long as you update your model weight by fine-tuning it with your data. Because while fine-tuning if your training data contain any personal information it will have an imprint on the model weight. So, be careful and sanitize your dataset before fine-tuning.
Q3. How does the SmolLM model compare to a larger language model like GPT-3?
A. SLM models are built using high-quality training data for small devices, it has only 100M to 3B parameters, while LLM is trained on and for large computationally heavy hardware and consists of 100B to trillions of parameters. Those LLMs are training on data available on the internet. So, SML will not compete with the LLM in width and depth. But SLM performance is well in its size categories.
The media shown in this article is not owned by Analytics Vidhya and is used at the Author’s discretion.
A self-taught, project-driven learner, love to work on complex projects on deep learning, Computer vision, and NLP. I always try to get a deep understanding of the topic which may be in any field such as Deep learning, Machine learning, or Physics. Love to create content on my learning. Try to share my understanding with the worlds.


