In today’s data-driven world, organizations rely on data analysts to interpret complex datasets, uncover actionable insights, and drive decision-making. But what if we could enhance the efficiency and scalability of this process using AI? Enter the Data Analysis Agent, to automate analytical tasks, execute code, and adaptively respond to data queries. LangGraph, CrewAI, and AutoGen are three popular frameworks used to build AI Agents. We will be using and comparing all three in this article to build a simple data analysis agent.
Table of Contents
- Working of Data Analysis Agent
- Building a Data Analysis Agent with LangGraph
- Steps to Build a Data Analysis Agent with LangGraph
- 1. Import the necessary libraries.
- 2. Let’s define the state.
- 3. Define the LLM and the code execution function and bind the function to the LLM.
- 4. Define the function for the agent to reply and add it as a node to the graph.
- 5. Define the ToolNode and add it to the graph.
- 6. Let us also add the memory so that we can chat with the agent.
- 7. Compile and display the graph.
- 8. Now we can start the chat. Since we have added memory, we will give each conversation a unique thread_id and start the conversation on that thread.
- Building a Data Analysis Agent with CrewAI
- 1. Import the necessary libraries.
- 2. We will build one agent for generating the code and another for executing that code.
- 3. To execute the code, we will use PythonREPL(). Define it as a crewai tool.
- 4. Define executing agent and tasks with access to repl and FileReadTool()
- 5. Build the crew with both agents and corresponding tasks.
- 6. Run the crew with the following inputs.
- Building a Data Analysis Agent with AutoGen
- 1. Import the necessary libraries.
- 2. Define the code executor and an agent to use the code executor.
- 3. Define an agent to write the code with a custom system message.
- 4. Define the problem to solve and initiate the chat.
- 5. We can also print the questions asked by us and their answers, if required, using this code.
- LangGraph vs CrewAI vs AutoGen
- Frequently Asked Questions
Working of Data Analysis Agent
The data analysis agent will first take the query from the user and generate the code to read the file and analyze the data in the file. Then the generated code will be executed using the Python repl tool. The result of the code is sent back to the agent. The agent then analyzes the result received from the code execution tool and replies to the user query. LLMs can generate arbitrary code, so we must carefully execute the LLM-generated code in a local environment.
Building a Data Analysis Agent with LangGraph
If you are new to this topic or wish to brush up on your knowledge of LangGraph, here’s an article I would recommend: What is LangGraph?
Pre-requisites
Before building agents, ensure you have the necessary API keys for the required LLMs.
Load the .env file with the API keys needed.
from dotenv import load_dotenv

load_dotenv(./env)
Key Libraries Required
langchain – 0.3.7
langchain-experimental – 0.3.3
langgraph – 0.2.52
crewai – 0.80.0
Crewai-tools – 0.14.0
autogen-agentchat – 0.2.38
Now that we’re all set, let’s begin building our agent.
Steps to Build a Data Analysis Agent with LangGraph
1. Import the necessary libraries.
import pandas as pd
from IPython.display import Image, display
from typing import List, Literal, Optional, TypedDict, Annotated
from langchain_core.tools import tool
from langchain_core.messages import ToolMessage
from langchain_experimental.utilities import PythonREPL
from langchain_openai import ChatOpenAI
from langgraph.graph import StateGraph, START, END
from langgraph.graph.message import add_messages
from langgraph.prebuilt import ToolNode, tools_condition
from langgraph.checkpoint.memory import MemorySaver
2. Let’s define the state.
class State(TypedDict):
	messages: Annotated[list, add_messages]
graph_builder = StateGraph(State)
3. Define the LLM and the code execution function and bind the function to the LLM.
llm = ChatOpenAI(model="gpt-4o-mini", temperature=0.1)

@tool
def python_repl(code: Annotated[str, "filename to read the code from"]):
    """Use this to execute python code read from a file. If you want to see the output of a value,
    Make sure that you read the code from correctly
    you should print it out with `print(...)`. This is visible to the user."""

    try:
        result = PythonREPL().run(code)
        print("RESULT CODE EXECUTION:", result)
    except BaseException as e:
        return f"Failed to execute. Error: {repr(e)}"
    return f"Executed:\n```python\n{code}\n```\nStdout: {result}"

llm_with_tools = llm.bind_tools([python_repl])
4. Define the function for the agent to reply and add it as a node to the graph.
def chatbot(state: State):
    return {"messages": [llm_with_tools.invoke(state["messages"])]}

graph_builder.add_node("agent", chatbot)
5. Define the ToolNode and add it to the graph.
code_execution = ToolNode(tools=[python_repl])

graph_builder.add_node("tools", code_execution)
If the LLM returns a tool call, we need to route it to the tool node; otherwise, we can end it. Let’s define a function for routing. Then we can add other edges.
def route_tools(state: State,):
    """
    Use in the conditional_edge to route to the ToolNode if the last message
    has tool calls. Otherwise, route to the end.
    """
    if isinstance(state, list):
        ai_message = state[-1]
    elif messages := state.get("messages", []):
        ai_message = messages[-1]
    else:
        raise ValueError(f"No messages found in input state to tool_edge: {state}")
    if hasattr(ai_message, "tool_calls") and len(ai_message.tool_calls) > 0:
        return "tools"
    return END

graph_builder.add_conditional_edges(
    "agent",
    route_tools,
    {"tools": "tools", END: END},
)

graph_builder.add_edge("tools", "agent")
6. Let us also add the memory so that we can chat with the agent.
memory = MemorySaver()

graph = graph_builder.compile(checkpointer=memory)
7. Compile and display the graph.
graph = graph_builder.compile(checkpointer=memory)

display(Image(graph.get_graph().draw_mermaid_png()))
8. Now we can start the chat. Since we have added memory, we will give each conversation a unique thread_id and start the conversation on that thread.
config = {"configurable": {"thread_id": "1"}}

def stream_graph_updates(user_input: str):
    events = graph.stream(
        {"messages": [("user", user_input)]}, config, stream_mode="values"
    )
    for event in events:
        event["messages"][-1].pretty_print()

while True:
    user_input = input("User: ")
    if user_input.lower() in ["quit", "exit", "q"]:
        print("Goodbye!")
        break
    stream_graph_updates(user_input)
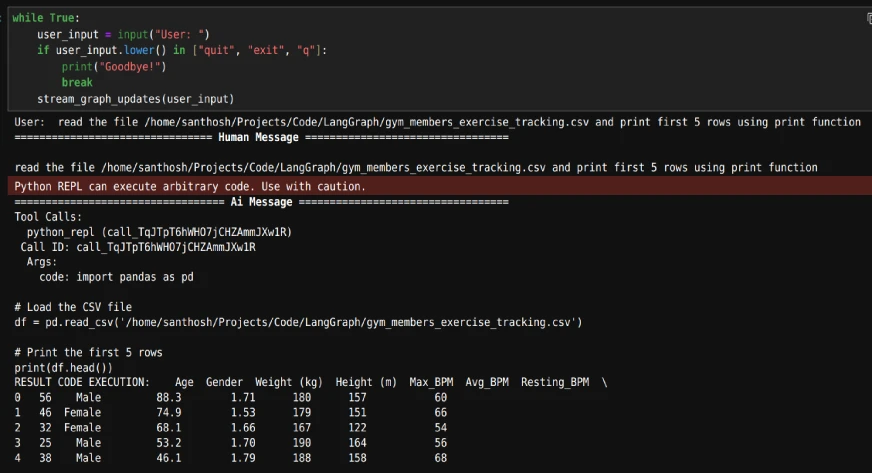
While the loop is running, we start by giving the path of the file and then asking any questions based on the data.
The output will be as follows:

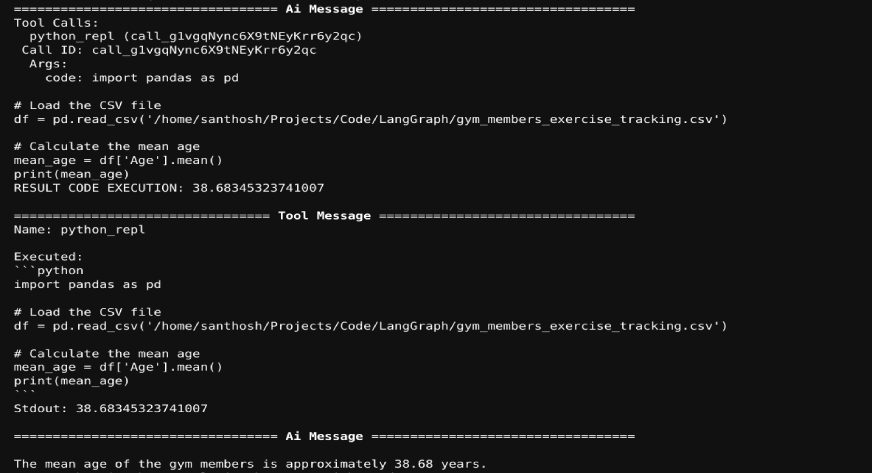
As we have included memory, we can ask any questions on the dataset in the chat. The agent will generate the required code and the code will be executed. The code execution result will be sent back to the LLM. An example is shown below:

Also Read: How to Create Your Personalized News Digest Agent with LangGraph
Building a Data Analysis Agent with CrewAI
Now, we will use CrewAI for data analysis task.
1. Import the necessary libraries.
from crewai import Agent, Task, Crew
from crewai.tools import tool
from crewai_tools import DirectoryReadTool, FileReadTool
from langchain_experimental.utilities import PythonREPL
2. We will build one agent for generating the code and another for executing that code.
coding_agent = Agent(
	role="Python Developer",
	goal="Craft well-designed and thought-out code to answer the given problem",
	backstory="""You are a senior Python developer with extensive experience in software and its best practices.
            	You have expertise in writing clean, efficient, and scalable code. """,
	llm='gpt-4o',
	human_input=True,
)
coding_task = Task(
	description="""Write code to answer the given problem
                	assign the code output to the 'result' variable
                    	Problem: {problem},
                    	""",
	expected_output="code to get the result for the problem. output of the code should be assigned to the 'result' variable",
	agent=coding_agent
)
3. To execute the code, we will use PythonREPL(). Define it as a crewai tool.
@tool("repl")
def repl(code: str) -> str:
	"""Useful for executing Python code"""
	return PythonREPL().run(command=code)
4. Define executing agent and tasks with access to repl and FileReadTool()
executing_agent = Agent(
	role="Python Executor",
	goal="Run the received code to answer the given problem",
	backstory="""You are a Python developer with extensive experience in software and its best practices.
            	"You can execute code, debug, and optimize Python solutions effectively.""",
	llm='gpt-4o-mini',
	human_input=True,
	tools=[repl, FileReadTool()]
)
executing_task = Task(
	description="""Execute the code to answer the given problem
                	assign the code output to the 'result' variable
                    	Problem: {problem},
                    	""",
	expected_output='the result for the problem',
	agent=executing_agent
)
5. Build the crew with both agents and corresponding tasks.
analysis_crew = Crew(
	agents=[coding_agent, executing_agent],
	tasks=[coding_task, executing_task],
	verbose=True
)
6. Run the crew with the following inputs.
inputs = {'problem': """read this file and return the column names and find mean age
   "/home/santhosh/Projects/Code/LangGraph/gym_members_exercise_tracking.csv""",}

result = analysis_crew.kickoff(inputs=inputs)

print(result.raw)
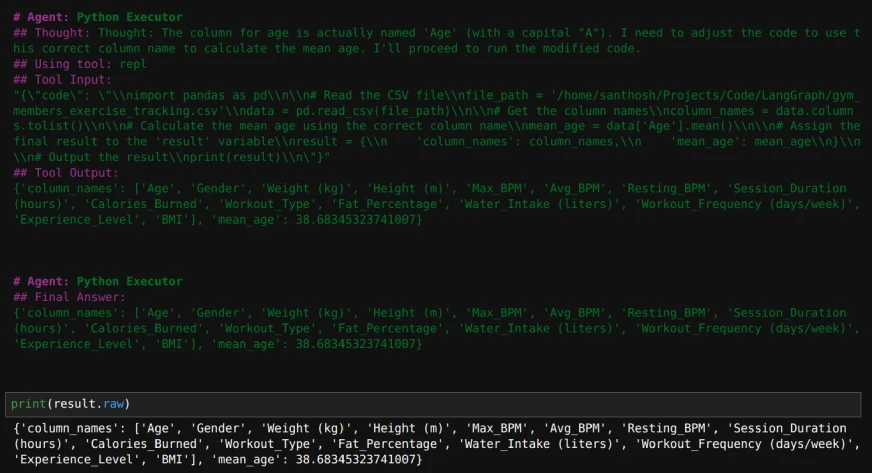
Here’s how the output will look like:

Also Read: Build LLM Agents on the Fly Without Code With CrewAI
Building a Data Analysis Agent with AutoGen
1. Import the necessary libraries.
from autogen import ConversableAgent
from autogen.coding import LocalCommandLineCodeExecutor, DockerCommandLineCodeExecutor
2. Define the code executor and an agent to use the code executor.
executor = LocalCommandLineCodeExecutor(
	timeout=10,  # Timeout for each code execution in seconds.
	work_dir='./Data',  # Use the directory to store the code files.
)
code_executor_agent = ConversableAgent(
	"code_executor_agent",
	llm_config=False,
	code_execution_config={"executor": executor},
	human_input_mode="ALWAYS",
)
3. Define an agent to write the code with a custom system message.
Take the code_writer system message from https://microsoft.github.io/autogen/0.2/docs/tutorial/code-executors/
code_writer_agent = ConversableAgent(
    "code_writer_agent",
    system_message=code_writer_system_message,
    llm_config={"config_list": [{"model": "gpt-4o-mini"}]},
    code_execution_config=False,
)
4. Define the problem to solve and initiate the chat.
problem = """Read the file at the path '/home/santhosh/Projects/Code/LangGraph/gym_members_exercise_tracking.csv'
        	and print mean age of the people."""

chat_result = code_executor_agent.initiate_chat(
	code_writer_agent,
	message=problem,
)
Once the chat starts, we can also ask any subsequent questions on the dataset mentioned above. If the code encounters any error, we can ask to modify the code. If the code is fine, we can just press ‘enter’ to continue executing the code.
5. We can also print the questions asked by us and their answers, if required, using this code.
for message in chat_result.chat_history:
    if message['role'] == 'assistant':
        if 'exitcode' not in message['content']:
            print(message['content'])
            print('\n')

    else:
        if 'TERMINATE' in message['content']:
            print(message['content'])
            print("----------------------------------------")
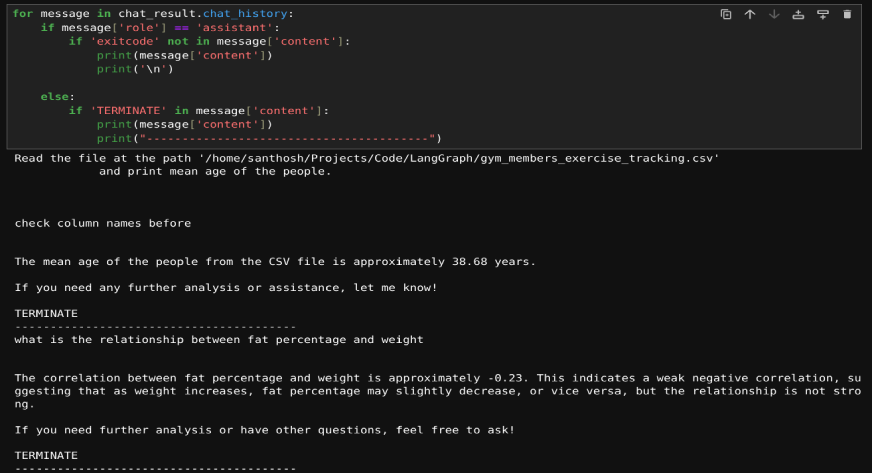
Here’s the result:

Also Read: Hands-on Guide to Building Multi-Agent Chatbots with AutoGen
LangGraph vs CrewAI vs AutoGen
Now that you’ve learned to build a data analysis agent with all the 3 frameworks, let’s explore the differences between them, when it comes to code execution:
| Framework | Key Features | Strengths | Best Suited For |
|---|---|---|---|
| LangGraph | – Graph-based structure (nodes represent agents/tools, edges define interactions) – Seamless integration with PythonREPL |
– Highly flexible for creating structured, multi-step workflows – Safe and efficient code execution with memory preservation across tasks |
Complex, process-driven analytical tasks that demand clear, customizable workflows |
| CrewAI | – Collaboration-focused – Multiple agents working in parallel with predefined roles – Integrates with LangChain tools |
– Task-oriented design – Excellent for teamwork and role specialization – Supports safe and reliable code execution with PythonREPL |
Collaborative data analysis, code review setups, task decomposition, and role-based execution |
| AutoGen | – Dynamic and iterative code execution – Conversable agents for interactive execution and debugging – Built-in chat feature |
– Adaptive and conversational workflows – Focus on dynamic interaction and debugging – Ideal for rapid prototyping and troubleshooting |
Rapid prototyping, troubleshooting, and environments where tasks and requirements evolve frequently |
Conclusion
In this article, we demonstrated how to build data analysis agents using LangGraph, CrewAI, and AutoGen. These frameworks enable agents to generate, execute, and analyze code to address data queries efficiently. By automating repetitive tasks, these tools make data analysis faster and more scalable. The modular design allows customization for specific needs, making them valuable for data professionals. These agents showcase the potential of AI to simplify workflows and extract insights from data with ease.
To know more about AI Agents, checkout our exclusive Agentic AI Pioneer Program!
Frequently Asked Questions
A. These frameworks automate code generation and execution, enabling faster data processing and insights. They streamline workflows, reduce manual effort, and enhance productivity for data-driven tasks.
A. Yes, the agents can be customized to handle diverse datasets and complex analytical queries by integrating appropriate tools and adjusting their workflows.
A. LLM-generated code may include errors or unsafe operations. Always validate the code in a controlled environment to ensure accuracy and security before execution.
A. Memory integration allows agents to retain the context of past interactions, enabling adaptive responses and continuity in complex or multi-step queries.
A. These agents can automate tasks such as reading files, performing data cleaning, generating summaries, executing statistical analyses, and answering user queries about the data.


