Imagine a software engineer creating marketing strategies or a program manager designing tech apps—sounds unconventional, right? This is the new reality of the modern workspace, where multitasking is revolutionized with AI agents! Powered by advanced large language models (LLMs), AI agents are evolving from simple assistants to autonomous contributors. They are managing projects, making decisions, and enhancing productivity. Now, with the rise of no-code agent development platforms, these agents are accessible to everyone—content creators, marketers, developers, data scientists or students – irrespective of their technical knowledge. These platforms enable everyone to build and deploy agents through simple prompts. In this blog, we’ll show you how to build a Daily Email Newsletter Agent to automate your daily dose of news using Relevance.ai. Let’s dive in!
Table of contents
Getting Started with Relevance.ai
As per Relevance.ai, agents are AI team members that can work alone, or as part of a team of other agents and real people. They have defined roles and responsibilities and can choose how best to get their work done. These agents work based on the domain-specific knowledge provided, using the prompts and tools you equip them with.

Here are some of the features that make building agents with Relevance.ai super easy:
- Pre-built Templates: These templates are already built by real-world domain experts. Anyone can customize the settings and behaviors of these pre-built agents to meet their specific operating procedures.
- Tools: To add efficiency to the agents, Relevance.ai offers pre-built tools like Google Search, Web Scrape, analyze CSV, and more. It also allows you to build your own tools by combining a few logical steps.
- Multiagents: A single agent can often be insufficient especially when building solutions for complex tasks. Relevance.ai makes it simple to create multiagent systems by allowing us to create and add sub-agents within our agentic system.
Along with these, each registered user gets 100 credits every day to build, iterate, and use AI Agents on the Relevance.ai platform.
Let’s get started with the Relevance.ai platform:
- Go to: https://relevanceai.com/.
- Sign Up to create your Profile.
- While filling the details, at the bottom right corner, select the relevant data center based on your location. (if you are India, select “ Australia (East)). Selecting a suitable data center allows your agent to work faster.
Once done, you will reach the homepage of Relevance.ai.
Building an AI Agent on Relevance.ai Using Pre-built Templates
Now let’s try building an agent! On the homepage of Relevance.ai, you will find many pre-built agent templates that we can clone or used directly.
If you scroll down further, you will find many pre-existing tools that can be used directly by our agents, as well.
Lets try using a pre existing agent template – City Event Guide.
- Click on it and Clone it into your Project.
- You will enter the homepage of your agent.
- In the middle of the screen, at the bottom, type any city name and press “Ctrl+Enter”.

You will get a detailed list of events happening in that city. - If you wish to customize this agent and tweak it as per your needs, click on the configure agent button at the top right side corner of your screen.
- To modify the tasks that your agents can perform, you change its prompt and to do that you make changes within its Core instructions. You can find the Core instructions section on the left side panel.

- To check or change the LLM that this agent is using, in the left side panel, head to Advanced Settings.

- Here you can select any other LLMs from a list of other GPT and Claude models. You can also change the creativity of the LLMs by changing the Temperature.
- When you are done with making the changes, click on Save Changes at the bottom left side corner of the screen. Similarly you can modify any pre-existing tools with Relevance.ai too!
Navigating the Features of Relevance.ai
Here’s the layout of the Relevance.ai homepage.

In the left side panel, under the Workforce section:
- You can click on Agents to build your custom agent.
- You can click on Tools to build the custom tools that you need within your agent.
- You can click on Knowledge to add data sources like PDFs, CSV files, audio, and more that you may require within your agent.
Then you have the Monitor section. Here you have the Activity Center and Analytics that provide you with the details on the performance of your agent. Both these features are available only with the Business plan.
After this, under the Account section, you have various integrations where you can connect various accounts like Gmail, LinkedIn, Hubspot, etc. to use within your agent. In fact you will need to use one such integration for the Daily Newsletter Agent that we are going to build in this blog.
Building a Daily Newsletter Agent Using Relevance.ai
Problem Statement:
- All of us get several daily or weekly newsletters based on our interests in our inboxes. But it can be pretty time consuming to go through each one of them to find the information that is the most relevant for you.
For example, I love to read about latest happenings in the field of Generative AI and about all the latest developments from Analytics Vidhya’s blogs.
It would be great if I could get a daily update on the latest blogs published by Analytics Vidhya and a rundown of latest happenings in the field of Generative AI right within by mail box everyday.
Solution:
An agent which sends a daily email newsletter summarizing the latest Blogs from AV’s website and GenAI news from the web.
Implementation:
You need three things to build this newsletter
- Access to an email account from where the agent can send the mail.
- A tool that can:
- Get the information of the 5 latest blogs on Analytics Vidhya.
- Get the latest news in the field of Generative AI.
- Get the email IDs of the person(s) that you wish to share this information.
- An LLM to create an email consisting of a summary of the above information that can be sent as a newsletter.
- An Agent that can trigger this tool whenever required.
Let’s start with the first one: Integrating Email!
Step 1: Integrating Email
- Click on Integrations. Under Connect your integrations, click on Google.

- Then click on +Integration.
- Now, choose the account that you can connect to and allow all the permissions.

Your Gmail account is now integrated into your Relevance.ai account!
Now let’s head to the second task: Creating the Tool.
Step 2: Creating the Tool
- To start building a tool on Relevance.ai, from the left side panel, click on Tools.
- Then, at the top right corner of your screen, click on +New.
- In the middle of the screen, click on +Create Tool.
- At the top, change the name of the tool to Newsletter Tool.
Once this much is set, you can create this tool in another 4 steps. First of all you need to add inputs, which are like variables. Then you will add the pre-built tools that will work with those variables. After this, you will add an LLM to work with the output generated from those tools. Finally, you will need to set up an email chain using which you can share the newsletter.
Let’s continue building out Newsletter Agent.
5. Adding Inputs
Under the Inputs section, you will create the three inputs that our agent would need, which are:
- Link to AV’s blog site
- Google query to search for the latest Generative AI news
- Email address of the person that you wish to share the newsletter with.

To add the first input:
- Select the type of input to be “Text Input“.
- Add Title: AV’s blog website.
- Add description (optional): In the box below it, paste the link to the website: https://www.analyticsvidhya.com/blog/.
- At the bottom right corner, click on “set value as default“. This ensures that you won’t have to provide this input again.
- Rename the small green box at the bottom of this section, which represents the output of this section, from “text” to “blog_website” – to make it easier to recall this input when required later.

To add the second input:
- Select the type of input to be “Text Input.”
- Add Title: “Gen AI News.”
- In the box below it, type: “Latest news on Generative AI.”
- Rename the small green box at the bottom of this section from “text” to “Gen_AI.”
- At the bottom right corner, click on “set value as default.”
And to add the last input:
- Select the type of input to be “Text Input.”
- Add Title: “Email ID.”
- In the box below it, type the email ID that you wish to send this newsletter to (you can use your own email ID too!).
- Rename the small green box at the bottom of this section from “text” to “email_id.”
Now, head to the Steps section. This is where you define the logic of our tools by chaining together LLMs, APIs, or other tools that you may need.
6. Adding the Pre-built Tools
- Click on +Add Step.
- From the list of tools, click on Extract Website Content.
- Click on the box below Website URL and from the list of inputs, click on blog_website.
- Click on +Add Step.
- From the list of tools, click on Google Search.
- Click on the box below Search Query and from the list of inputs, click on Gen_AI.

7. Adding the LLM
- Click on LLM.
- Under the prompt section, write the following prompt:
You are AV’s daily newsletter provider. In the newsletter, you include a summary of 5 latest blogs along with their links from AV’s blogs using {{scrape.output.page}} and then you summarise 3 top news with their links from {{google.organic}}
The content within the curly brackets is the output from the tools you used above i.e. Extract content from the web and Google search. - Click next to the curly brackets and select the relevant output to establish the two results as an input for your LLM. Once done, the two inputs will be highlighted in green colour.
- Below this, you can select the LLM model that you wish to work with. By default, it’s set to GPT 4o(mini).

Now let’s set up the email chain.
8. Setting Up the Email Chain
- Click on +Add Step.
- Within the list, scroll down to Communication and collaboration. Click on it.
- Scroll down and click on Send Email.
- Under, Email Account, select the email account associated with your Relevance.ai account.
- Below Email Provider, click on Gmail.
- Skip the next two optional fields. Under the To email field, click on +New item.
- In the box that comes below, click on email_id.
- Skip the optional fields.
- In the Email Subject space, type: AV’s Daily Newsletter.
- In the box below Email Body, type {{ and from the list of inputs click llm.answer.
This is to call the output generated by the LLM in your email body.
- Click on the Save icon at the top right corner of the screen.

Congratulations, you have done most of the heavy lifting. Hit on Run tool and within a few minutes you will receive an email in your inbox.
While the task we wanted to achieve has been completed. We can add other functionalities like scheduling and chatting with this tool. Lets do that in the final step!
Step 3: Building the Agent
- First, head back to the homepage.
- From the left side panel, click on Agents.
- From the top right corner, click on +NewAgent.
Now, follow these steps to build this agent:
Step 3.1: Build the Agent’s Profile
This is where you add details like the agent’s name and description. It’s for your reference and would not go to the agent’s design.
For the Newsletter Agent
- Add Agent name: AV’s Daily Newsletter
- Add Agent Description: This agent sends summaries of AV’s latest blogs and some of the trending Gen AI news in the form of a daily newsletter.

Step 3.2: Connect Resources
In the left side panel, you will find the Connected Resources section. Under this, you have 3 options: abilities, tools, and sub-agents.
- Abilities allow you to schedule the tasks or allow your agent to escalate to humans. The scheduling feature is available only in the paid version.
- Tools allow you to add tools within your agent.
- Subagents let you add other pre-existing agents from your Relevance.ai account, into your existing project.
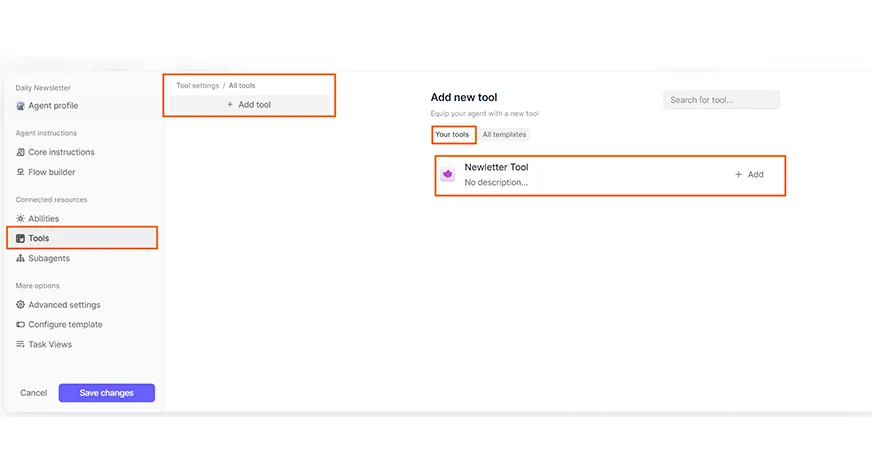
Adding Tools for the Newsletter Agent:
- Click on Tools section in the left side panel.
- At the right side of the screen, below the Add new tool section, you will find the Your tools section. Under this, you will find Newsletter Tool. Click on +Add.
- Once you have added this, in the middle of the screen, under the Tool settings/All Tools list, click on the Newsletter Tool.
- On the right-hand side of the screen, you will find certain control features for your tool.
For this tool:
- Set the Approval Mode to Auto Run. This is to ensure that the agent doesn’t need human approval every time it extracts the content from the website.
- Let the Max auto runs before approval is asked for be at No limits. This ensures that it can run an infinite number of times on its own without asking for approval.
- Under Prompt for how to use this tool, you can let it remain vacant.

Depending upon the use of the agent you are designing, you can modify these settings.
Step 3.3: Add Agent Instructions
In the left side panel, you will find the Agent instructions section. Under this section, you have two options: Core Instructions and Flow Builder.
- Using Core Instructions you write the detailed task for the agent.
- With Flow Builder, you can create a flow diagram of the agent’s tasks.
While the flow builder isn’t required, it can help your agent assign priorities more efficiently in case it’s performing a complex task involving multiple steps.
For the Newsletter Agent, under Core Instructions, you will add a detail outlining the introduction and the tasks for the agent. Type the following prompt in the box:
”You are an AV’s Daily Newsletter agent. Use Newsletter Tool** to create it.
Then type forward slash (/) and in the pop-up that appears, click on Newsletter Tool.

Once done, at the bottom left side corner, click on confirm and continue.
Your agent is now ready!
Step 3.4: Run the Newsletter Agent
Once your agent is created, you will be directed to the agent’s home page.
In the center, at the bottom of the screen, add the task for the agent. Let’s add, Send a newsletter to <<add an email address to which you wish to send the newsletter>>, then click on the button at the corner of this box.
Now, wait for a couple of seconds! Your agent is working and soon you will receive your daily newsletter in the mentioned email address.

Now that your task is done, you can chat further with the agent to get customised information. Feel free to type prompts like “Give 500 word summary of the first blog” or “Give names of 10 latest blogs”.
Here is a quick review of what you did. you created a tool to help us extract content from the website, get the latest news from Google, used LLM to create an email, and then set up a tool to send that email. Finally, you designed an agent to provide an infrastructure where you can truly interact with the tools and links that you are using.
Click on the Share button at the top right corner of your screen to get the shareable link, embedding the link for your agent. Use it and share it with your colleagues.
You can try the agent we built: here
Conclusion
Relevance.ai provides a powerful, no-code platform for building AI agents, making it accessible to anyone without technical expertise. The platform’s intuitive interface comes with features like pre-built templates, and multi-agent support, and facilitates easy integration of external tools. This enables fast prototyping, and scalability, ensuring that users can quickly build, iterate, and deploy agents.
You can learn all about AI agents and how to build them in our Agentic AI Pioneer Program that is tailored for learners of all levels, irrespective of their technical or or coding knowledge.
Frequently Asked Questions
Q1. What is Relevance.ai?
A. Relevance.ai is a no code based ai agent development platform. It provides several pre built tools, templates that allow individuals and businesses to design complex AI agents for their use.
Q2. What is no code AI agent development?
A. No Code AI agent development is a process involving no coding-based tools and platforms for designing and developing AI Agents for individual and business use.
Q3. Why do we need no code AI agent development platforms?
A. The no-code AI agent development platforms are easy and intuitive platforms for designing AI agents. They allow us to make complex agents using simple prompts, pre-built tools, and templates.
Q4. What are some popular no-code agent development platforms?
A. Some of the popular no-code agent development platforms are Wordware, CrewAI Studio, Vertex AI Studio, etc.
Q5. What are AI agents?
A. An AI agent is an artificial intelligence system that utilizes a large language model (LLM) as its core computational engine to exhibit capabilities beyond text generation, including conducting conversations, completing tasks, reasoning, and demonstrating some degree of autonomous behavior.
Q6. Can we integrate WhatsApp into our agents using Relevance.ai?
A. Yes, we can integrate WhatsApp into our agents and use it to trigger our agents using Relevance.ai. Besides this Relevance.ai also provides integrations like Gmail, Outlook, HubSpot, etc – helping users to build agents for actual use cases.
Q7. Can we monitor the performance of our agents using Relevance.ai?
A. Yes, we can monitor our agents using Relevance.ai. From the home page, we can head to the “Analytics” and “Activity Center” to check more details regarding our agent’s use. Although these are paid features and hence can’t be accessed in the free version.
Anu Madan has 5+ years of experience in content creation and management. Having worked as a content creator, reviewer, and manager, she has created several courses and blogs. Currently, she working on creating and strategizing the content curation and design around Generative AI and other upcoming technology.