How can you ensure your machine learning models get the high-quality data they need to thrive? In today’s machine learning landscape, handling data well is as important as building strong models. Feeding high-quality, well-structured data into your models can significantly impact performance and training speed. The TensorFlow Dataset API simplifies this process by offering set of tools to build, manage, and optimize data pipelines. In this guide, we’ll go step by step from configuring your development environment using Vertex AI Workbench to loading data from various sources and incorporating these pipelines into your model training process.
Learning Objectives
- Build datasets from in-memory arrays as well as external data sources such as CSV and TFRecord files.
- Utilize operations such as mapping, shuffling, batching, caching, and prefetching to streamline data processing.
- Seamlessly incorporate your datasets into TensorFlow’s model training routines for efficient model development.
- Learn to launch a Vertex AI Workbench instance, set up a Jupyter Notebook, and start working.
- Enhance your machine learning models by applying data augmentation techniques directly in your data pipelines.
This article was published as a part of the Data Science Blogathon.
Table of contents
- What is TensorFlow?
- What is Vertex AI Workbench?
- Understanding the TensorFlow Dataset API
- Setting Up Your Environment with Vertex AI Workbench
- Loss Function and Gradient Computation
- Loading Data from Disk
- Transforming Datasets: Mapping, Batching, and Shuffling
- Data Augmentation and Advanced Techniques
- Best Practices for Production Pipelines
- Conclusion
- Frequently Asked Questions
What is TensorFlow?
TensorFlow is an open-source platform developed by Google for machine learning and deep learning research. It provides an extensive ecosystem of tools and libraries, allowing researchers to push the boundaries of what’s possible in machine learning and enabling developers to build and deploy intelligent applications with ease. TensorFlow supports both high-level APIs (like Keras) and low-level operations, making it accessible for beginners while remaining powerful for advanced users.
What is Vertex AI Workbench?
Vertex AI Workbench is a managed development environment in Google Cloud that is designed to help you build and train machine learning models. It provides a fully managed Jupyter Notebook experience along with preinstalled machine learning libraries, including TensorFlow and PyTorch. With Vertex AI Workbench, you can seamlessly integrate your local development with cloud computing resources, making it easier to work on large-scale projects without worrying about infrastructure setup.
In this guide, not only will you learn how to work with TensorFlow’s Dataset API, but you will also see how to set up your environment using Vertex AI Workbench. We will cover everything from launching a new instance, creating a Jupyter Notebook, and loading the datasets.
Understanding the TensorFlow Dataset API
The TensorFlow Dataset API is a set of tools designed to simplify the process of building data input pipelines. In any machine learning task, your model’s performance depends not just on the algorithm itself but also on the quality and flow of the data being fed into it. The Dataset API allows you to perform tasks like loading data, preprocessing it, and transforming it on the go.
What makes this API so powerful is its ability to chain multiple operations in a single, easy-to-understand sequence. You can load data from various sources, apply necessary transformations (such as scaling or normalization), and even shuffle the data to prevent the model from overfitting. This approach not only makes your code cleaner and easier to maintain, but it also optimizes performance by leveraging techniques like caching and prefetching.
Setting Up Your Environment with Vertex AI Workbench
Before you start working with the TensorFlow Dataset API, you need a robust environment. Vertex AI Workbench is an excellent choice for this purpose because it offers a fully managed, cloud-based development environment that comes with all the tools you need pre-installed.
Launch Vertex AI Workbench Instance
- Start by logging into your Google Cloud account. From the Navigation menu, search and select Vertex AI.

- Click on the “Enable All Recommended APIs” button. This ensures that your project has access to all the necessary API services.
- In the navigation menu, click on Workbench. Make sure you are in the Instances view.
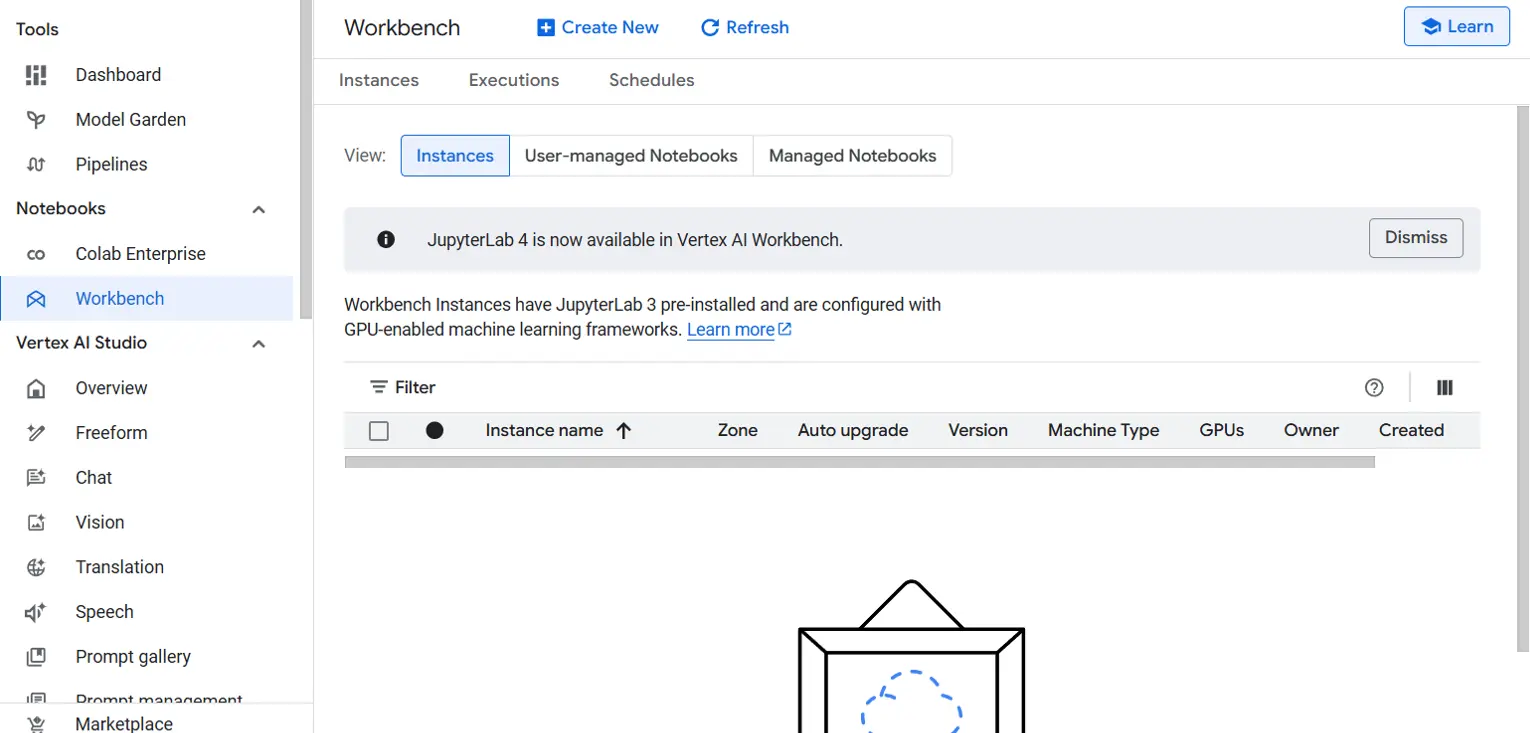
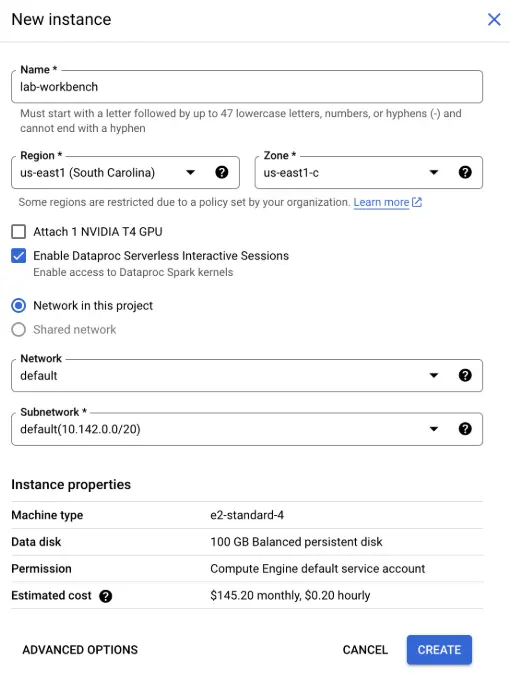
- Click on Create New to launch a new Workbench instance. You will be prompted to configure the instance:
- Name: Give your instance a meaningful name, such as lab-workbench.
- Region and Zone: Select the appropriate region and zone where you want your instance to be located.
- Advanced Options: If needed, customize the instance settings by selecting options like machine type or disk size.
- After configuration, click Create. It might take a few minutes for your instance to be set up. Once it is ready, you will see a green checkmark next to its name.
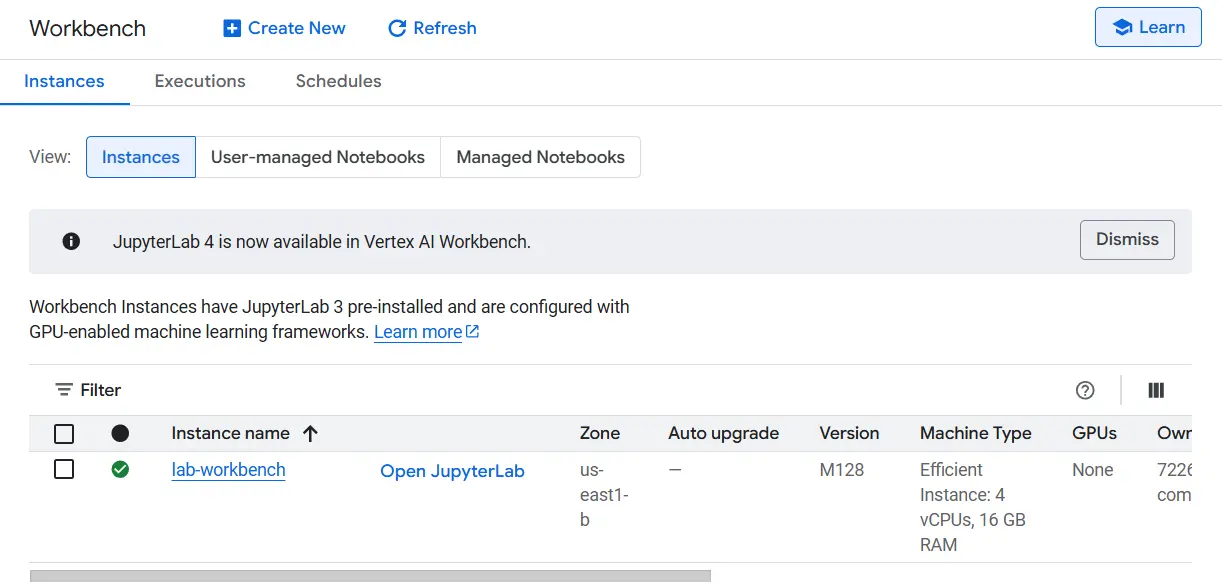
- Click Open JupyterLab next to your instance’s name. This will open the Jupyter Lab interface in a new tab in your browser.
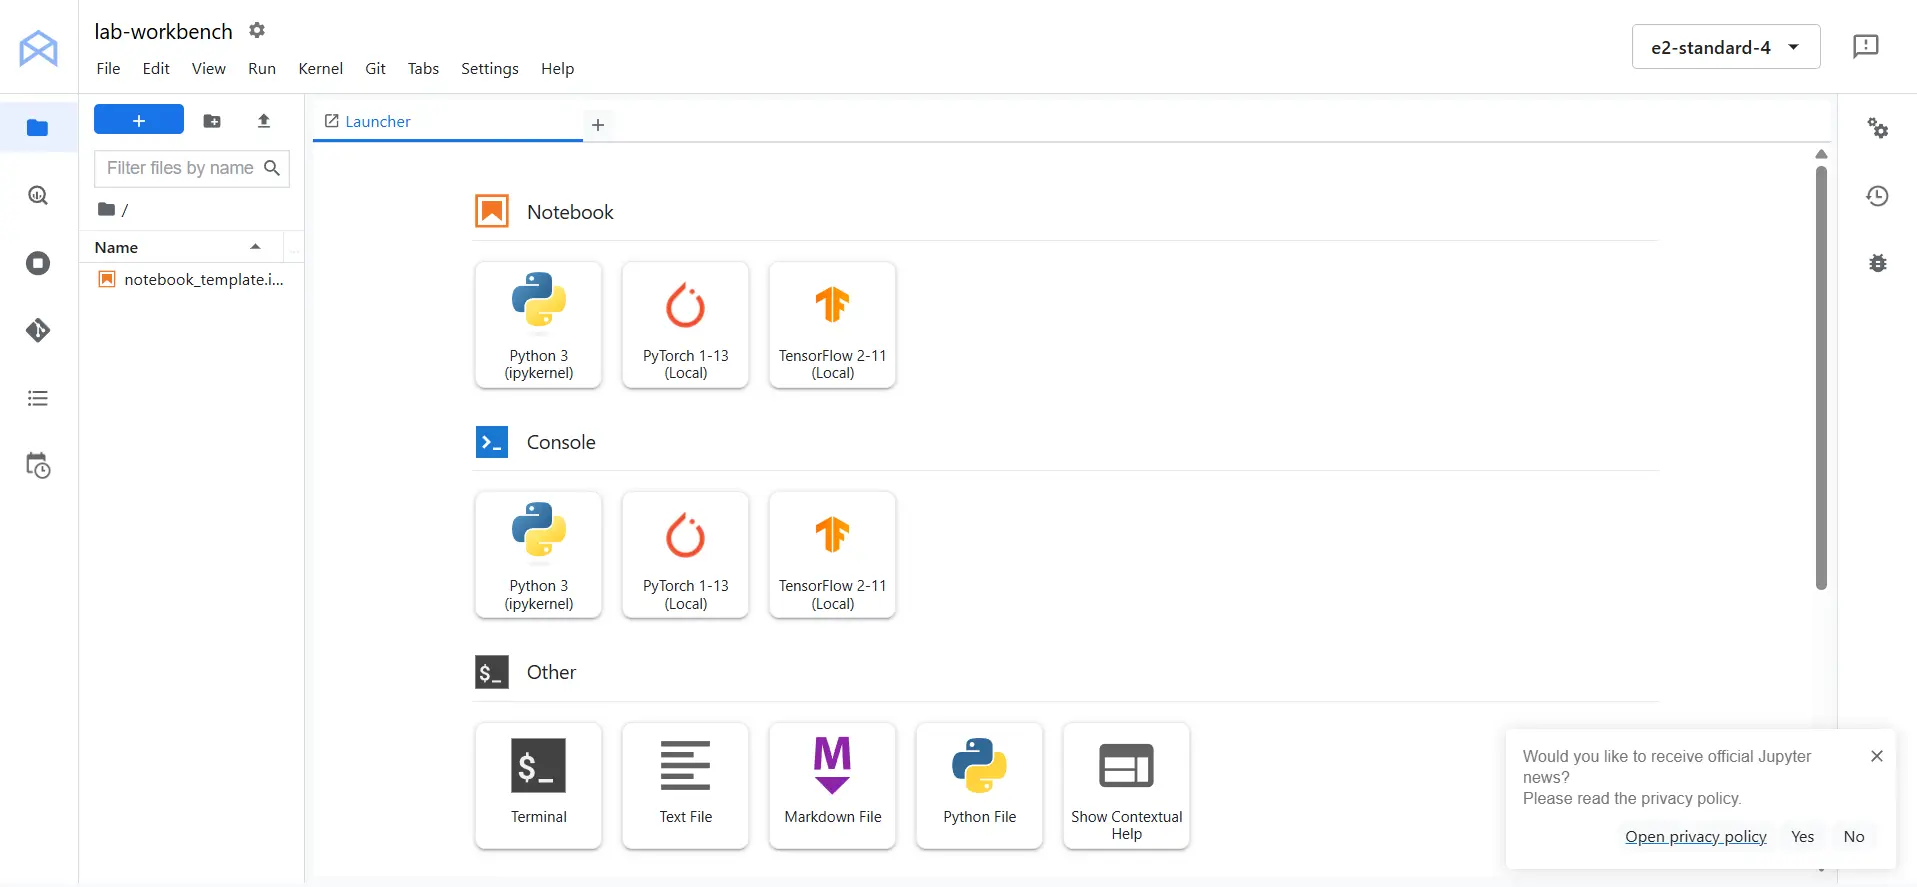
Creating a Jupyter Notebook
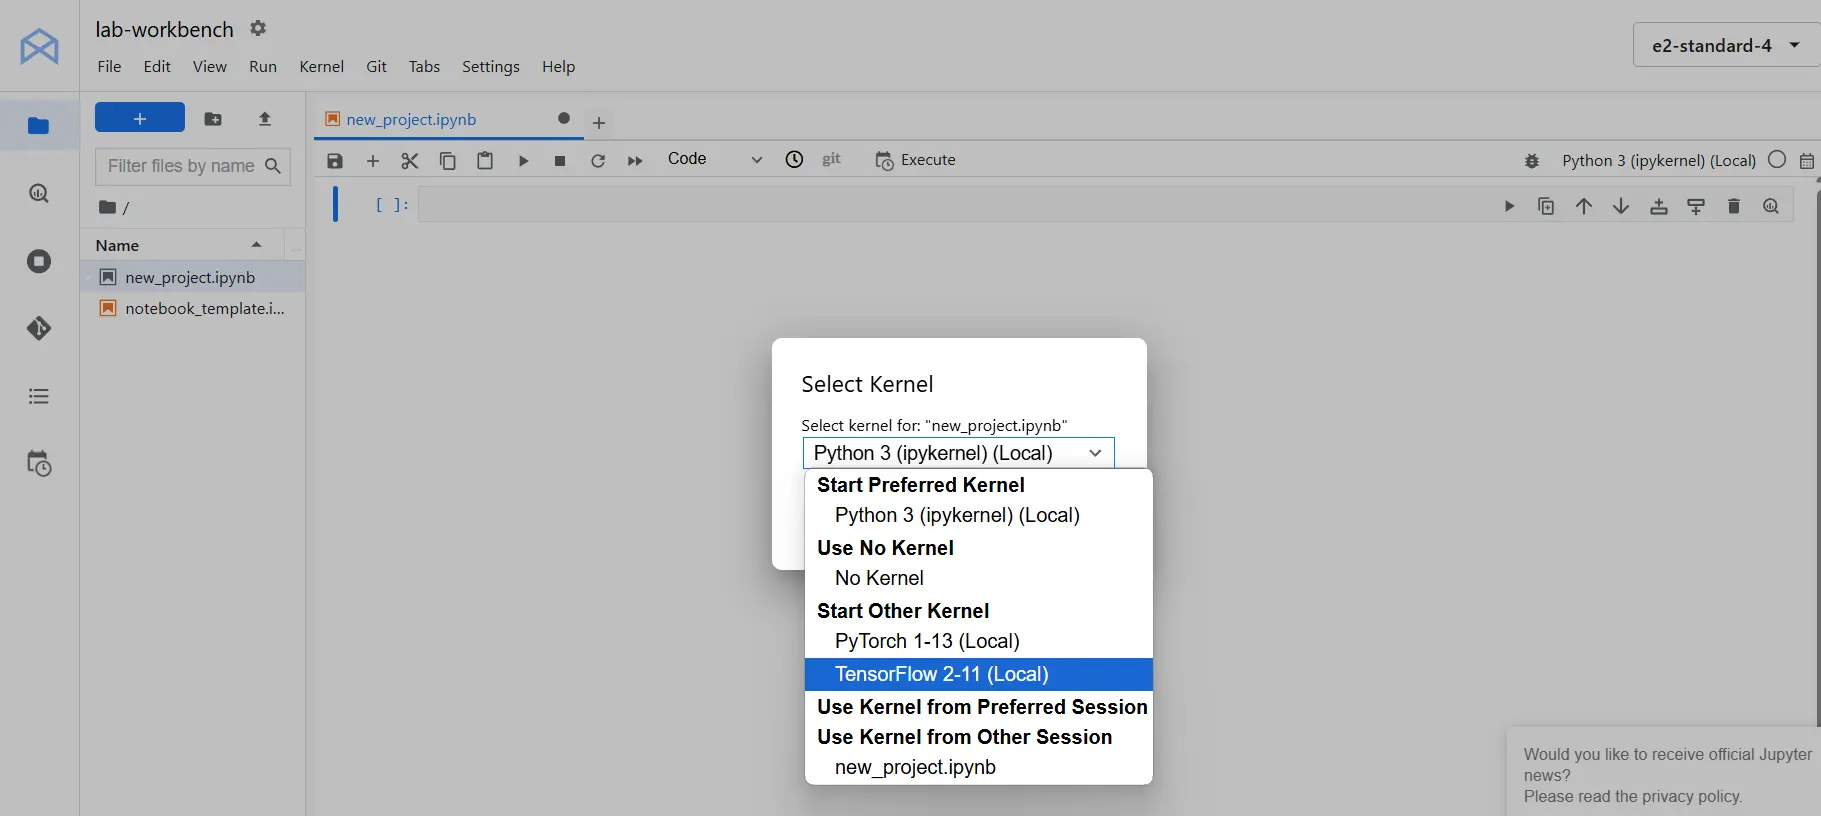
Once you have your JupyterLab interface open, you can start a new Python Notebook by clicking on the Python 3 icon. It’s a good idea to rename the notebook to something descriptive. To do this, right-click on the file name (which might initially be Untitled.ipynb) and select Rename Notebook. Choose a name that reflects the project, such as “new_project”. Also change the kernel from python 3 to TensorFlow 2-11 (Local).
Manipulate data with tf.data
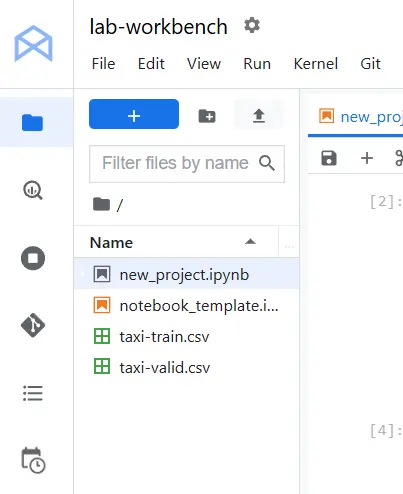
First upload the taxi-train.csv and taxi-valid.csv dataset into the notebook.
Importing the Required Libraries
First, we need to import TensorFlow and NumPy, and then set the TensorFlow logging level to a minimal setting. This reduces log verbosity during execution.
import tensorflow as tf
import numpy as np

print("TensorFlow version:", tf.version.VERSION)

# Set minimal TF logging level.
import os
os.environ['TF_CPP_MIN_LOG_LEVEL'] = '3'
Creating a Dataset from Memory
Once your environment is set up, you can start working with data. The simplest way to begin is by creating a dataset from memory. This means converting data stored in your computer’s memory (like lists or NumPy arrays) into a format that TensorFlow can process.
Imagine you have a small set of numbers that you want to use for a basic experiment. The TensorFlow Dataset API allows you to quickly convert these numbers into a dataset that can be manipulated further. This process is straightforward and can be extended to more complex data structures.
For example, you might start with a simple NumPy array that contains several numbers. Using the Dataset API, you can create a dataset from this array. The dataset can then be iterated over, and you can apply various transformations such as mapping a function to each element.
Creating the Synthetic Dataset
We first create a synthetic dataset. In this example, we generate our feature vector X and a corresponding label vector Y using the linear equation y=2x+10.
N_POINTS = 10
X = tf.constant(range(N_POINTS), dtype=tf.float32)
Y = 2 * X + 10
Next, we define a function that accepts our feature and label arrays, along with the number of training passes (epochs) and the desired batch size. This function constructs a TensorFlow Dataset by slicing the tensors, repeating them for the specified number of epochs, and batching them (dropping any remaining examples to keep batch sizes consistent).
def make_synthetic_dataset(X, Y, epochs, batch_size):
    # Create the dataset from tensor slices
    ds = tf.data.Dataset.from_tensor_slices((X, Y))
    # Repeat the dataset and batch it (drop the remainder for consistency)
    ds = ds.repeat(epochs).batch(batch_size, drop_remainder=True)
    return ds
Let’s test our function by iterating twice over our dataset in batches of 3 datapoints:
BATCH_SIZE = 3
EPOCHS = 2

dataset = make_synthetic_dataset(X, Y, epochs=EPOCHS, batch_size=BATCH_SIZE)

print("Synthetic dataset batches:")
for i, (x_batch, y_batch) in enumerate(dataset):
    print(f"Batch {i}: x: {x_batch.numpy()}  y: {y_batch.numpy()}")
    assert len(x_batch) == BATCH_SIZE
    assert len(y_batch) == BATCH_SIZE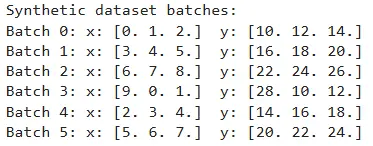
Loss Function and Gradient Computation
Next, we define the mean squared error (MSE) loss function and a helper function to compute gradients. These functions remain similar to our previous implementation.
def loss_mse(X, Y, w0, w1):
    Y_pred = w0 * X + w1
    error = (Y_pred - Y) ** 2
    return tf.reduce_mean(error)

def compute_gradients(X, Y, w0, w1):
    with tf.GradientTape() as tape:
        current_loss = loss_mse(X, Y, w0, w1)
    return tape.gradient(current_loss, [w0, w1]), current_loss
Training loop
Now, we update our training loop so that it iterates over the tf.data.Dataset created by our function. In this example, we train the model over 250 epochs using a batch size of 2.
First, initialize the model parameters as TensorFlow variables:
# Initialize model parameters
w0 = tf.Variable(0.0)
w1 = tf.Variable(0.0)

EPOCHS_TRAIN = 250
BATCH_SIZE_TRAIN = 2
LEARNING_RATE = 0.02

# Create the training dataset (synthetic)
train_dataset = make_synthetic_dataset(X, Y, epochs=EPOCHS_TRAIN, batch_size=BATCH_SIZE_TRAIN)
Then, we run the training loop using stochastic gradient descent. The loop updates the model parameters with each batch, and we print the training status every 100 steps.
# Training loop
print("\nStarting training loop for synthetic linear regression:")
MSG = "Step {step} - loss: {loss:.6f}, w0: {w0:.6f}, w1: {w1:.6f}"
for step, (X_batch, Y_batch) in enumerate(train_dataset):
    grads, loss_val = compute_gradients(X_batch, Y_batch, w0, w1)
    # Update the parameters using gradient descent
    w0.assign_sub(LEARNING_RATE * grads[0])
    w1.assign_sub(LEARNING_RATE * grads[1])

    if step % 100 == 0:
        print(MSG.format(step=step, loss=loss_val.numpy(), w0=w0.numpy(), w1=w1.numpy()))

# Final assertions (tolerance based)
assert loss_val < 1e-6
assert abs(w0.numpy() - 2) < 1e-3
assert abs(w1.numpy() - 10) < 1e-3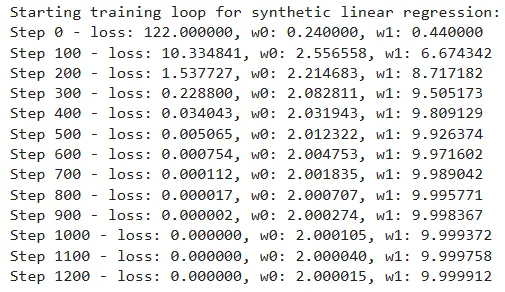
Loading Data from Disk
In practical applications, data is often stored on disk rather than in memory. Loading data from disk with these methods ensures that you can handle large datasets efficiently and prepare them for model training. Two common formats for storing data are CSV and TFRecord.
Loading a CSV File
CSV (Comma-Separated Values) files are widely used for storing tabular data. The TensorFlow Dataset API offers a convenient way to read CSV files. The process involves parsing each line of the file to convert text into numeric data, batching the results, and applying any additional transformations.
Below, we define the column names and default values for our CSV file:
CSV_COLUMNS = [
    'fare_amount',
    'pickup_datetime',
    'pickup_longitude',
    'pickup_latitude',
    'dropoff_longitude',
    'dropoff_latitude',
    'passenger_count',
    'key'
]
LABEL_COLUMN = 'fare_amount'
DEFAULTS = [[0.0], ['na'], [0.0], [0.0], [0.0], [0.0], [0.0], ['na']]
Next, we wrap the CSV dataset creation into a function that reads the files based on a file pattern and a specified batch size:
def make_csv_dataset(pattern, batch_size):
    # Create dataset from CSV files with specified column names and defaults.
    ds = tf.data.experimental.make_csv_dataset(
        file_pattern=pattern,
        batch_size=batch_size,
        column_names=CSV_COLUMNS,
        column_defaults=DEFAULTS,
        header=True
    )
    return ds
# For demonstration, assume the CSV files are located in '../toy_data/'.
temp_ds = make_csv_dataset('taxi-train.csv', batch_size=2)
print("\nSample CSV dataset (prefetched):")
print(temp_ds)
To improve readability, let’s iterate over the first two elements of this dataset and convert them into standard Python dictionaries:
for data in temp_ds.take(2):
    print({k: v.numpy() for k, v in data.items()})
    print("\n")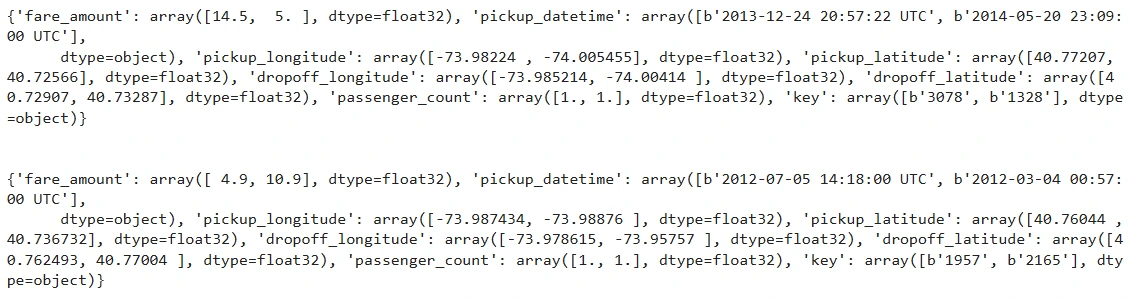
Loading a TFRecord File
TFRecord is a binary format optimized for TensorFlow. It allows faster reading speeds compared to CSV files and is highly efficient for large datasets. While the code provided here focuses on CSV, similar techniques can be applied when working with TFRecord files.
For example:
def parse_tfrecord(example_proto):
    # Define the features expected in the TFRecord
    feature_description = {
        'feature1': tf.io.FixedLenFeature([], tf.float32),
        'feature2': tf.io.FixedLenFeature([], tf.float32)
    }
    return tf.io.parse_single_example(example_proto, feature_description)

# Create a dataset from a TFRecord file
tfrecord_dataset = tf.data.TFRecordDataset("data/sample_data.tfrecord")
tfrecord_dataset = tfrecord_dataset.map(parse_tfrecord)
tfrecord_dataset = tfrecord_dataset.batch(4)

# Iterate through the TFRecord dataset
for batch in tfrecord_dataset:
    print(batch)
Transforming Datasets: Mapping, Batching, and Shuffling
Once you have created your dataset, the next step is to transform it. Transformation is a broad term that covers several operations:
- Mapping: This operation applies a specific function to every element in the dataset. For example, you could multiply every number by two or perform more complex mathematical operations.
- Shuffling: Shuffling the dataset is crucial because it randomizes the order of the data. Randomization helps prevent your model from learning any biases related to the order of the data, which can improve the generalization of your model.
- Batching: Batching involves grouping your data into smaller chunks. Instead of feeding individual data points to your model, batching allows you to process multiple data points at once, which can lead to more efficient training.
For our taxi dataset, we want to separate the features from the label (fare_amount). We also want to remove unwanted columns like pickup_datetime and key.
# Specify columns that we do not want in our feature dictionary.
UNWANTED_COLS = ['pickup_datetime', 'key']

def extract_features_and_label(row):
    # Extract the label (fare_amount)
    label = row[LABEL_COLUMN]
    # Create a features dictionary by copying the row and removing unwanted columns and the label
    features = row.copy()
    features.pop(LABEL_COLUMN)
    for col in UNWANTED_COLS:
        features.pop(col, None)
    return features, label
We can test our function by iterating over a few examples from our CSV dataset:
for row in temp_ds.take(2):
    features, label = extract_features_and_label(row)
    print(features)
    print(label, "\n")
    assert UNWANTED_COLS[0] not in features.keys()
assert UNWANTED_COLS[1] not in features.keys() 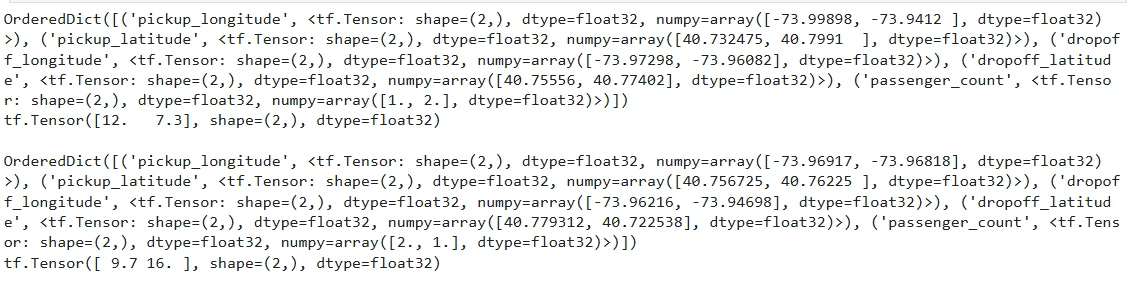
Batching the Data
We can refine our dataset creation process by incorporating batching and applying our feature-label extraction function. This helps in forming data batches that are directly consumable by the training loop.
def create_dataset(pattern, batch_size):
# The tf.data.experimental.make_csv_dataset() method reads CSV files into a dataset
    dataset = tf.data.experimental.make_csv_dataset(
        pattern, batch_size, CSV_COLUMNS, DEFAULTS)
    return dataset.map(extract_features_and_label)

BATCH_SIZE = 2

temp_ds = create_dataset('taxi-train.csv', batch_size=2)

for X_batch, Y_batch in temp_ds.take(2):
    print({k: v.numpy() for k, v in X_batch.items()})
    print(Y_batch.numpy(), "\n")
    assert len(Y_batch) == BATCH_SIZE
Shuffling and Prefetching for Efficient Training
When training a deep learning model, it is crucial to shuffle your data so that different workers process various parts of the dataset simultaneously. Additionally, prefetching data helps overlap the data loading process with model training, improving overall efficiency.
We can extend our dataset creation function to include shuffling, caching, and prefetching. We introduce a mode parameter to differentiate between training (which requires shuffling and repeating) and evaluation (which does not).
def build_csv_pipeline(pattern, batch_size=1, mode='eval'):
    ds = tf.data.experimental.make_csv_dataset(
        file_pattern=pattern,
        batch_size=batch_size,
        column_names=CSV_COLUMNS,
        column_defaults=DEFAULTS,
        header=True
    )
    # Map each row to (features, label)
    ds = ds.map(extract_features_and_label)
    # Cache the dataset to improve speed if reading from disk repeatedly.
    ds = ds.cache()

    if mode == 'train':
        # Shuffle with a buffer size (here, arbitrarily using 1000) and repeat indefinitely.
        ds = ds.shuffle(buffer_size=1000).repeat()

    # Prefetch the next batch (AUTOTUNE uses optimal settings)
    ds = ds.prefetch(tf.data.AUTOTUNE)
    return ds

# Testing the pipeline in training mode
print("\nSample batch from training pipeline:")
train_ds = build_csv_pipeline('taxi-train.csv', batch_size=2, mode='train')
for features, label in train_ds.take(1):
    print({k: v.numpy() for k, v in features.items()})
    print("Label:", label.numpy())

# Testing the pipeline in evaluation mode
print("\nSample batch from evaluation pipeline:")
eval_ds = build_csv_pipeline('taxi-valid.csv', batch_size=2, mode='eval')
for features, label in eval_ds.take(1):
    print({k: v.numpy() for k, v in features.items()})
    print("Label:", label.numpy())
Data Augmentation and Advanced Techniques
Data augmentation is an essential technique in deep learning, particularly in domains like image processing. The Dataset API allows you to integrate augmentation directly into your pipeline. For example, if you wish to add random noise to your dataset:
def augment_data(x):
    return x + tf.random.uniform([], -0.5, 0.5)

# Apply data augmentation
augmented_dataset = dataset.map(augment_data)
This step increases the diversity of your data, helping your model generalize better during training.
Optimizing Your Data Pipeline
To further enhance performance, consider using caching and prefetching techniques. Caching saves the state of your processed dataset in memory or on disk, while prefetching overlaps data preparation with model execution:
optimized_dataset = dataset.cache().shuffle(100).batch(32).prefetch(tf.data.AUTOTUNE)
Best Practices for Production Pipelines
When moving from experimentation to production, consider the following best practices:
- Modular Pipeline Design: Break down your pipeline into small, reusable functions.
- Robust Error Handling: Implement mechanisms to gracefully handle corrupt or missing data.
- Scalability Testing: Validate your pipeline with small subsets of data before scaling to larger datasets.
- Performance Monitoring: Continuously track your pipeline’s performance to identify and address potential bottlenecks.
By following these guidelines, you can ensure that your data pipelines remain efficient and reliable, even under heavy production loads.
You can find the notebook and the outputs in the link – here.
References: Google Cloud Platform’s repository
Conclusion
The TensorFlow Dataset API is a fundamental component in creating efficient and scalable machine learning pipelines. In this guide, we started by updating our linear regression example to use a TensorFlow Dataset created in memory. We then demonstrated how to load data from disk, particularly CSV files, and explained how to transform, batch, and shuffle data for both training and evaluation.
In this guide, we explored how to build and optimize data pipelines using the TensorFlow Dataset API. Starting with synthetic data generated in memory, we walked through creating datasets, applying transformations, and integrating these pipelines into training loops. We also covered practical techniques for loading data from disk, particularly CSV files, and demonstrated how to incorporate shuffling, caching, and prefetching to boost performance.
By using functions to extract features and labels, batch data, and build robust pipelines with shuffling, caching, and prefetching, you can streamline the data ingestion process for your machine learning models. These techniques not only simplify your code but also enhance model performance by ensuring that the data is fed efficiently into the training loop.
Key Takeaways
- Efficient data handling is key: TensorFlow Dataset API streamlines data pipelines for better model performance.
- Vertex AI Workbench simplifies ML development: A managed Jupyter Notebook environment with preinstalled ML libraries.
- Optimize data loading: Use operations like batching, caching, and prefetching to enhance training efficiency.
- Seamless model integration: Easily incorporate datasets into TensorFlow training routines.
- Data augmentation boosts ML models: Enhance training datasets with transformation techniques for improved accuracy.
Frequently Asked Questions
Q1. What is the TensorFlow Dataset API?
A. The TensorFlow Dataset API is a set of tools that help efficiently build, manage, and optimize data pipelines for machine learning models.
Q2. Why is data handling important in machine learning?
A. Well-structured and high-quality data improves model accuracy, training speed, and overall performance.
Q3. What is Vertex AI Workbench?
A. Vertex AI Workbench is a managed Jupyter Notebook environment on Google Cloud for developing and training ML models.
Q4. How does the TensorFlow Dataset API improve data processing?
A. It enables operations like mapping, shuffling, batching, caching, and prefetching to streamline data flow.
Q5. What are the benefits of using Vertex AI Workbench for TensorFlow?
A. It provides a fully managed, cloud-based development environment with preinstalled ML libraries and seamless cloud integration.
Q6. How can I create a TensorFlow dataset from memory?
A. Use tf.data.Dataset.from_tensor_slices() to convert NumPy arrays or lists into a TensorFlow dataset.
The media shown in this article is not owned by Analytics Vidhya and is used at the Author’s discretion.
Hello! I'm a passionate AI and Machine Learning enthusiast currently exploring the exciting realms of Deep Learning, MLOps, and Generative AI. I enjoy diving into new projects and uncovering innovative techniques that push the boundaries of technology. I'll be sharing guides, tutorials, and project insights based on my own experiences, so we can learn and grow together. Join me on this journey as we explore, experiment, and build amazing solutions in the world of AI and beyond!


