If you’ve built apps with LLMs or worked with agents, you’ve probably tried tools like LangChain, AutoGen, or OpenAI’s Assistants API. These models are pretty good at reasoning and generating things, but the trouble starts when your agent needs to pull in real-world data, like checking a database or reading a CRM. That’s where Model Context Protocol (MCP) comes in. It’s not a whole new framework, just an open standard that helps AI assistants connect to data and tools more easily. MCP solves issues like writing custom API wrappers and managing token limits, making things run a lot smoother.In this articlw you will get to know about the how to use mcp , working and advantages of MCP.
Table of contents
What is MCP?
Model Context Protocol (MCP) is a powerful open standard that was launched by Claude’s parent company, Anthropic, in November 2024. It allows Large Language Models (LLMs) like Claude or GPT to seamlessly access external content such as documents, databases, tools, local files or APIs, in a structured, secure, and scalable way.

MCP at its core consists of three main components:
- Model: It refers to the LLM (like Claude or GPT-4) that’s responding to your inputs.
- Context: It is the additional information the model needs to respond meaningfully. The source of this information can be documents, PDFs, prompts, or database entries.
- Protocol: It represents a set of rules that lets the model access and use that context from structured sources.
Thus, with MCP, the client (LLM interface) can automatically discover available servers (data sources), and request specific information based on your query.
How to Use MCP?
In this tutorial, we will use MCP to connect the Claude desktop app (client) to our local files and data using Python. We’ll then use the external data as context to perform these 4 tasks:
- Create a custom greeting tool
- Count the number of files on our desktop
- Save a chat with Claude to our local system
- Ask Claude questions using a local PDF document
Requirements
To perform all these 4 tasks, make sure that you have:
- A system with Python 3.11+ installed
- Claude desktop app (free or pro version)
- Basic familiarity with Python
- VS Code or any IDE
- A few local documents (e.g. a PDF like a leave policy)
One-time Set Up
Before we start with performing the tasks, here are a few one time tasks that you need to perform to ensure all your 4 tasks are performed smoothly.
Create a Python Environment
It is highly recommended to create a separate python environment to perform these tasks. If you are using a conda environment, you can do that by executing the following command:
conda create ~n mcp python==3.11
Install the MCP Library
Since we are working with Python, it’s important to incorporate Python code files. To do this, write and execute the command:
pip install mcp
The code file, besides Python can also be in Typescript, Java or Kotlin. You can read more about these in MCP Documentation.
Download Claude’s Desktop App
To download the app, head to https://claude.ai/download and download the app for your respective system. Once installed, it may take a few seconds to launch. It’s completely normal. Although, yoy can build with Claude MCP using Claude’s free plan but the plan its usage limits while experimenting and is often inconvenient to work with. Hence its preferred to work with a paid subscription.
Set-up the Configuration File
The configuration file is unique for each client. Since we are using Claude’s desktop app, we will need to download Claude’s configuration file. To do this:
- Go to Claude Settings.
- Then go to the Developer Section.
- Click on “Edit Configuration”.

- Look for “claude_desktop_config.json”. If the file isn’t already there, please create it with the same name.

This file maps your tools (Python scripts) to Claude and you’ll update this file after each task. Now that we are done with all our installations and downloads, let’s start with our tasks.
Task 1: Create a Custom Greeting Tool
In this task, we’ll build a tool that will create a personalised greeting for you whenever prompted with a “Hi” or “Hello”.
Step 1: Create a New Python File
Here, I have created a new file named “greeter.py”.
from mcp.server.fastmcp import FastMCP// FAST MCP is just an easier way to build a server

# Create an MCP server named "Greeter"

mcp = FastMCP("Greeter")

@mcp.tool()

def greet() -> str:

    """Return this welcome message, when greeted with "Hi", "Hey" or "Hello"."""

    return "Hey <add your own name>, Welcome to the world of MCPs!"

if __name__ == "__main__":

    mcp.run()
Code Explanation:
The code creates an MCP server that reads for a greeting request and responds with a personalized message.
- The function uses a decorator to tell the server how to respond when prompted with “Hi“, “Hey“, or “Hello“.
- The command we give to the MCP server gets shared with the LLM, which in turn might generate the same response we fed to the server or a version similar to it.
- You may get a completely different response than what you expect; this is because the final output is generated by an LLM.
Step 2: Update the Config File
Make sure there are absolutely no syntax errors in your configuration file. In a configuration file we need three things:
- Name of our server
- Location of the Python program
- Location of the Python file that has to be executed

Step 3: Restart Your Claude Desktop App
Restarting the app is essential because,
- It tells you about any errors in your code. The error gets highlighted and you can go to the “Logs” section to get insights on how those errors can be corrected.
- When no errors are detected, the tool gets registered to the Claude desktop app and you will be able to access it from within the app.
- Restarting the app gives it access to the most recent integrations. So you need to do it every time you update or change your code.
Step 4: Say “Hi” to Claude in the App
Just prompt a “Hi” to Claude via the app and it will greet you back using your tool!
Once you say “hey” to the Claude desktop app, you will get a pop-up asking you to allow the app to use the tool that you have just created. Click on “Allow tool for this chat”. Currently you have to allow a tool to work in a chat every time you call that tool in a given chat.

Once permission is given, you get the response from the desktop app.

Task 2: Count Files on Your Desktop
This tool will count the number of files present on your desktop and return the total when you ask Claude.
Step 1: Create a New Python File
Here, I am creating a file named file_counter.py
from mcp.server.fastmcp import FastMCP

import os

# Create an MCP server named "FileCounter"

mcp = FastMCP("FileCounter")

@mcp.tool()

def count_desktop_files() -> str:

    """Count the number of files on the desktop"""

    desktop_path = os.path.expanduser("~/Desktop")  # Gets desktop path (e.g., /Users/apoorv/Desktop)

    try:

        # List all items in desktop directory, filter to files only

        files = [f for f in os.listdir(desktop_path) if os.path.isfile(os.path.join(desktop_path, f))]

        file_count = len(files)

        return f"There are {file_count} files on your desktop."

    except Exception as e:

        return f"Error counting files: {str(e)}"

if __name__ == "__main__":

    mcp.run()
Code Explanation:
This code sets up an MCP server to scan the desktop directory, count the number of files, and return the count. The function filters through the directory using Python’s os library to count only the files (not folders).
Step 2: Update the Config File
Follow the steps as above and make sure there aren’t any extra files.
Step 3: Restart Your Claude Desktop App
Follow the steps as above.
Step 4: Ask Claude
Give the following prompt to the Claude Desktop app: “How many files are there on my desktop?”
Then you will get the pop up to allow the tool for this chat. Once approved you will get the output based on the number of files on your system.

Task 3: Save Conversations as Text Files
This tool allows Claude to save your ongoing conversation into a .txt file on your desktop.
Step 1: Create a New Python File
For this, I’m going to create a new file named conversation_saver.py.
from mcp.server.fastmcp import FastMCP

import os

from datetime import datetime

mcp = FastMCP("ConversationSaver")

@mcp.tool()

def save_conversation(conversation: str) -> str:

    """Save the current conversation to a text file on the desktop"""

    desktop_path = os.path.expanduser("~/Desktop")

    timestamp = datetime.now().strftime("%Y%m%d_%H%M%S")

    file_path = os.path.join(desktop_path, f"claude_chat_{timestamp}.txt")

    try:

        with open(file_path, "w") as f:

            f.write(conversation)

        return f"Conversation saved at: {file_path}"

    except Exception as e:

        return f"Error saving conversation: {str(e)}"

if __name__ == "__main__":

    mcp.run()
Code Explanation:
The code creates an MCP server that saves the ongoing conversation to a text file on your desktop, naming it with a timestamp. It uses Python’s datetime to generate unique file names and the os library to save the content in a text file.
Step 2: Update the Config File
Make sure there are absolutely no syntax errors in your configuration file and there aren’t any extra files in the list.
Step 3: Restart Your Claude Desktop App
To check for any errors in your code, restart the app after writing the code. Any errors get highlighted after this step and you can correct them. If there are no errors, your tool gets registered to the Claude app, after which you can access it directly from there.
Step 4: Save the Chat
I’ve gave a prompt to the Claude App: “What is a RAG system”
This time, it is NOT going to access any tools; since we haven’t so far created any tool for this type of query. So the app won’t ask you for any permissions and would continue like AI chatbots usually do. It will generate an output based on its training information.
Now I give the app, a second prompt: “Save this chat”
Claude will prompt you to allow the tool and then save the full conversation to your desktop, timestamped.

You can open the .txt file on your desktop to view the entire exchange.
Check the output I received here.
Task 4: Ask Questions About a Local PDF
This tool lets Claude access a document (which can be word doc, pdf or ppt) available on your local system, and answer questions from it; without you having to upload it manually. For this task, I’ll be prompting some questions regarding my company’s leave policy; the pdf for which is present at my desktop.
Step 1: Create a New Python File
For this task, I’m going to create a new file named leave_policy_reader.py.
from mcp.server.fastmcp import FastMCP

import os

import PyPDF2  # For PDF text extraction

mcp = FastMCP("SmartContext")

# Hardcoded path to your leave policy PDF (edit this to your file’s location)

LEAVE_POLICY_PDF = "/Users/apoorv/Desktop/AV/Code/MCP/leave_policy.pdf"

@mcp.tool()

def fetch_context(query: str) -> str:

    """Fetch content from a leave policy PDF for leave-related queries"""

    query_lower = query.lower()

    # Only process if "leave" is in the query

    if "leave" not in query_lower:

        return "This tool only answers leave-related questions. Ask about leaves!"

    if not os.path.exists(LEAVE_POLICY_PDF):

        return f"Error: Leave policy PDF not found at {LEAVE_POLICY_PDF}!"

    try:

        # Read the PDF

        with open(LEAVE_POLICY_PDF, "rb") as f:

            pdf_reader = PyPDF2.PdfReader(f)

            content = ""

            for page in pdf_reader.pages:

                extracted_text = page.extract_text()

                if extracted_text:

                    content += extracted_text + "\n"

            if not content:

                return "Error: No text could be extracted from the leave policy PDF!"

        # Return the content with the query for Claude

        return (f"Using context from {LEAVE_POLICY_PDF}:\n\n"

                f"Content:\n{content}\n\n"

                f"Query: {query}\n\n"

                f"Please answer based on the content above.")

    except Exception as e:

        return f"Error reading leave policy PDF: {str(e)}"

if __name__ == "__main__":

    mcp.run()
Code Explanation:
This code builds an MCP server that reads a PDF document (leave policy) and answers leave-related queries. It uses PyPDF2 to extract text from the PDF and responds based on the document’s content. It only gets activated if the query is about “leave”.
Step 2: Update the Config File
As has been done in the previous task.
Step 3: Restart Your Claude Desktop App
As has been done in the previous task.

Step 4: Ask Claude
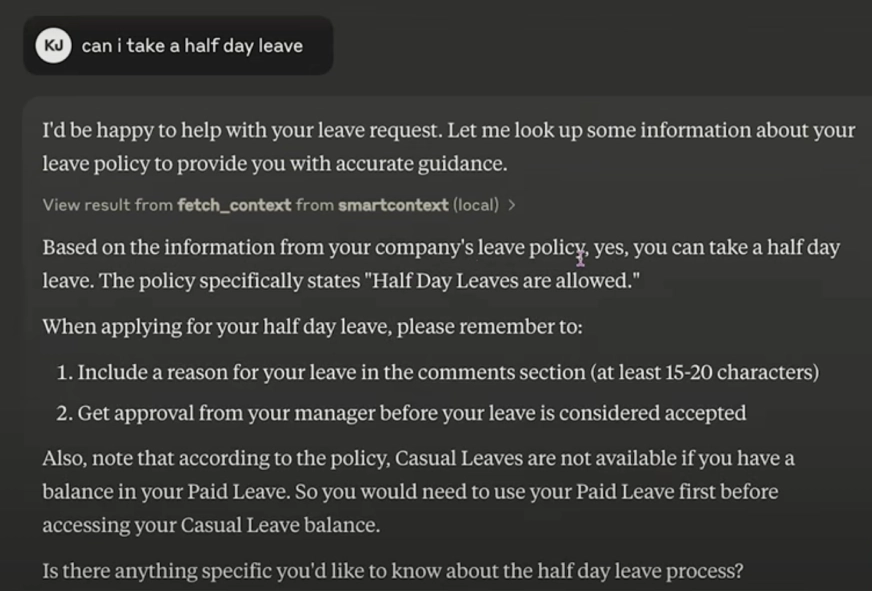
To test this tool, I added the following prompt to my Claude app: “Can I take half day leave?”
Claude processes the prompt, realises it needs the access to the tool we had created and prompts us to grant it access to the tool.
Once the tool is called, it is going to compile the information from the leave policy document and the original query. It would then feed it to the claude LLM and ask it to answer based on it. To do this, the tool will read your PDF in real time and share the information to the LLM.
Finally you get the response based on the leave policy.
This way you can build customised tools to access different files on your system without having to upload the files again and again!
You can find the entire code and further details of how to enhance your Claude Desktop with the MCP framework, here.
How Does MCP Work?
In its true essence, MCP standardizes the communication between the clients and servers, without needing custom code or manual data uploads. Clients and Servers can mean different things for different technologies, but for MCP, these are:.
- Client: This is the interface where the LLMs respond to you. This could be Claude’s desktop app, your IDE, or a chatbot.
- Server: This is the system or data source (local or remote) that holds the context, for e.g. Google Drive, GitHub, Gmail, your local files, PDFs, etc.
When you ask a question or give a command, the client sends a request to the server for the relevant information. The server then provides the necessary context (e.g., a file, email, or database), which the client uses to give you a response or complete a task. This process allows AI to efficiently work with real-time, dynamic data.

Here you can check the video about the MCP to clear more undestanding :
Advantages of Using MCP
After the above hands-on, it’s easier to answer this question. Using model context protocol:
- Eliminates manual data uploads or custom integrations.
- Allows LLMs to work with both local and cloud-based systems.
- Standardises the way any client works with a server as long as they are using the same protocol.
- Supports SDKs in Python, TypeScript, Kotlin, and Java.
Why are we Suddenly Talking About MCP?
So far, we have covered everything about MCP – from what it is to how to use it, why to use it, and its applications. But there is still one question that needs to be answered: Why are we and the whole world talking about it now – almost 5 months after it was launched?
Well, there are 3 main reasons for this:
- Need for AI Agents: Since last year, there has been a wave of AI agents in the market. Although these agents have become much smarter, they still struggle to work well with real-world data and tools (like calendars, emails, or databases). MCP fixes this by standardizing how AI connects to these tools, making it easier for them to work together.
- Community Momentum: Popular companies like Cursor, Continue, Source Graph, and more are MCP clients, while companies like Github, One Drive, Google Drive, etc. are in the list of its servers. Both these lists are growing day by day, as more and more companies join the MCP world.
- Model-Agnostic & Open Source: MCP is open-source and works with any AI model. Whether you’re using Claude, GPT-4, or any other AI system, MCP connects them to real-world data and tools. Unlike closed systems, you aren’t locked into one particular model or service.
These are a few of many reasons on why the world is talking about MCP and why it is going to make waves in the coming few months.
Conclusion
Model Context Protocol (MCP) is revolutionizing how AI systems interact with the real world by providing seamless integration with tools, databases, and local files. With MCP, AI agents can now effortlessly access relevant data and perform complex tasks without needing custom code or manual integrations. Whether it’s improving customer service, automating workflows, or enhancing personal AI assistants, MCP unlocks powerful new possibilities for AI models, making them more efficient, intuitive, and adaptable. As businesses and developers continue to adopt MCP, its potential to enhance AI-driven systems will only grow, opening up new opportunities across industries.
Frequently Asked Questions
Q1. What is Model Context Protocol (MCP)?
A. MCP is an open standard that enables AI models to access real-world data, such as local files, documents, and databases, seamlessly and efficiently.
Q2. How does MCP work?
A. MCP connects an AI client (like Claude or an IDE) with a server (local or remote data source), allowing the AI to request and use context without manual input or custom coding.
Q3. Do I need a paid subscription for Claude to use MCP?
A. While the free version of Claude works, it often hits rate limits, making it less convenient. A paid version removes these restrictions.
Q4. What are the basic requirements to use MCP?
A. You’ll need Python 3.11+, Claude Desktop App, an IDE like VS Code, and some local documents for the tasks.
Q5. Can MCP work with any AI model?
A. Yes, MCP is model-agnostic and can be used with any AI model, including Claude, GPT-4, and open-source LLMs.
Q6. What tools can be connected using MCP?
A. MCP allows AI to access a variety of tools such as Google Drive, GitHub, Notion, emails, and local files.
Q7. How do I set up the configuration file for Claude?
A. You need to go to Claude’s settings under the developer section and create a claude_desktop_config.json file that maps your tools to Claude’s interface.
Anu Madan has 5+ years of experience in content creation and management. Having worked as a content creator, reviewer, and manager, she has created several courses and blogs. Currently, she working on creating and strategizing the content curation and design around Generative AI and other upcoming technology.


